What Is The Exposure Triangle?
Before we jump in, it’s important to know what exposure is. Exposure refers to how much light reaches your camera’s sensor or film through the lens. It dictates how light or dark a photo is.
The more light you let in, the higher the exposure. If a photo is “overexposed” it’s too light. Alternatively, the less light you let in, the lower the exposure. If a photo is “underexposed” it’s too dark. The goal is to find a balance between those two extremes.
Your exposure is dictated by three different elements: aperture, ISO, and shutter speed. It’s often difficult for new photographers to get the brightness they want when only considering one of these elements at a time. Yes, you can use auto mode, aperture, or shutter priority but that doesn’t teach you how to master your camera.
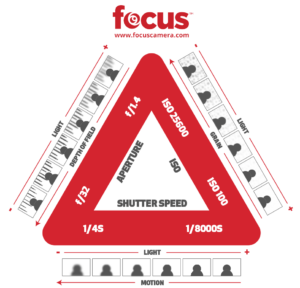
The good news is, this isn’t rocket science. The key is understanding that aperture, ISO, and shutter speed work together to adjust exposure; together they make up the “Exposure Triangle.” All three control the flow of light entering your camera.
The core idea behind the exposure triangle is this: if you raise or lower one of the elements, you must adjust at least one of the others; if you don’t make up the difference of how much light is or is not entering into your camera, your image may be over or underexposed.
For example, if you lower your ISO (which makes an image darker) you must then elongate your shutter speed to let in more light. This is one of a few possibilities all of which make more sense when you know what aperture, ISO, and shutter speed are. So, let’s talk about it.
Aperture
When you hear someone refer to an “aperture” they’re talking about the physical hole in your lens that controls how much light enters your camera when you take a photo. This is the setting to adjust if you want to take portraits with a blurred background or bokah-centric photos—it controls your depth of field (more on that in a second).
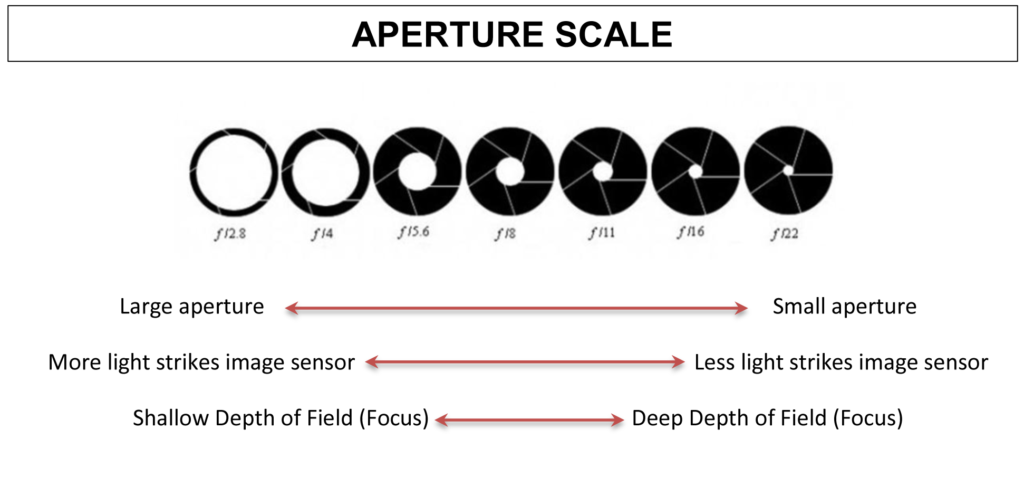
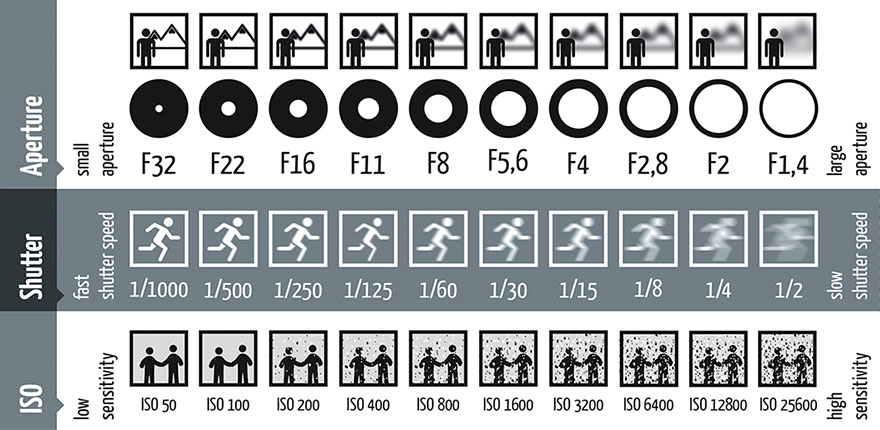
The amount of light that your aperture lets in is measured in “f-stops.” If you’re searching for this setting on your camera, it will look like one of these: f/1.4, f/2, f/5.6, f/11, f/16, f/22, etc. The wider the aperture (low f-stop number), the more light gets into the lens. However, a smaller aperture (high f-stop number) lets in less light.
Depth of Field
The amount of light your aperture lets in changes your depth of field; depth of field is the distance that your camera is able to focus. This is not necessarily intuitive so be patient with yourself here:
- Shallow depth of field: the larger the hole in the aperture, the smaller your depth of field. In other words, the more light you let into your camera, the less it can focus on. This is commonly used in portrait photography to focus on one subject and blur out everything else around them. To achieve that effect, set your f-stop to f/2.8 and lower (like f/2, f/1.8 or f/1.4). Here are a few options.
- Deep depth of field: the smaller the hole in the aperture, the larger your depth of field. In other words, the less light you let into your camera, the further it can focus. Let’s say you’re trying to photograph a majestic mountain range. But every time you try to take a picture of the mountains, only the trees right in front of you are in focus. If you are this confused nature-goer, your depth of field is too short; you must elongate your depth of field. In that situation, make your f-stop number as large as possible. Set it to a high number like f/16 or f/22. The higher the number, the larger the range.
Choosing A Lens
This is an important moment to mention that the range of your f-stop is limited by your lens. It’s hard in this day and age to stumble upon a “bad” lens, but you should know what type of photography you want to use your equipment for before you invest. If you want to shoot portraits or close-up nature photography look for a lens with a very low aperture capability like f/1.4. If you want to include every single detail in the background of your pictures, focus on the other end of the spectrum; make sure you get a lens with a very high f-stop range of f/16 or f/22.
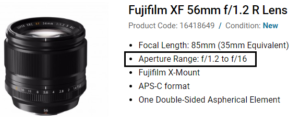
Again, there is no right or wrong here. It all depends on what you’re using your lens to capture. In fact, the next time you’re at a wedding take note of the photographer—we’re willing to bet they have two cameras on them at all times so they don’t have to switch lenses: one camera/lens for precious portrait moments (f/2.8) and another to take pictures of everyone on the dance floor (f/16).
ISO
The second side of the exposure triangle is ISO. ISO* (pronounced eye-sew) stands for International Standards Organization or International Organization of Standardization (different names, same company). This independent organization creates standards for various consumer goods around the world. All of this to say: the ISO acronym doesn’t stand for anything important or hold any secret photography knowledge. Instead, it is the name of a company. Now, let’s talk functionality.
When you click a shutter button to take a photo, the aperture opens and light enters your camera; the ISO setting determines how sensitive your camera’s image sensor is to that light.
ISO & Image Sensors
But why is that important? What’s an image sensor? For digital photography neophytes, a camera’s image sensor is the hardware at the back of your camera body that converts the image you see in your viewfinder to a digital file. Without an image sensor, there would be no way to record images onto your memory card.
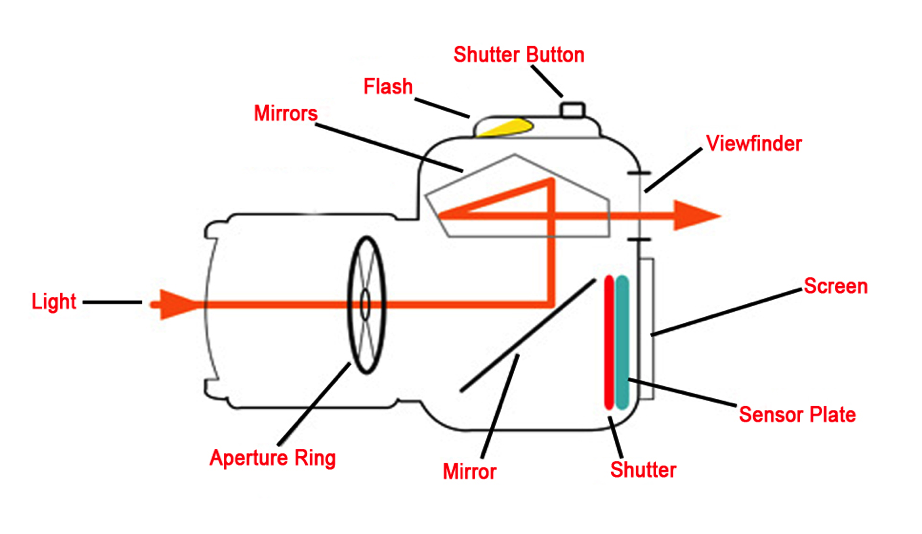
So, with that in mind, the ISO setting measures how much light the image sensor receives.
On average, an ISO display will show a range of numbers from about 100 to 1600. However, it can go as low as 50 and as high as 51200. If your ISO is set low to 100, your sensor is less sensitive to light and your images will be darker. Alternatively, If your ISO is set high to 1600, the more sensitive it is to light making your images lighter. If you want a good place to start, the “normal” setting is ISO 100.
In short: low ISO number = darker image / high ISO number = brighter image.
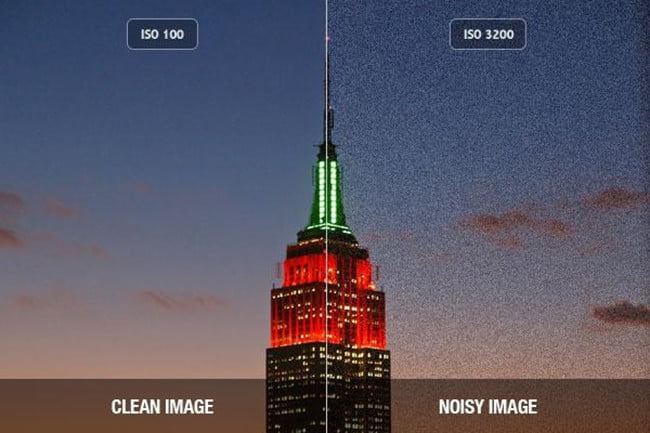
A word of caution: do not raise your ISO levels too high. When you raise your ISO levels too much you can see an increase in “noise” which adds an unpleasant grainy effect to an otherwise nice photo. However, high ISO is still useful when your aperture cannot physically open any wider to accommodate more light, or when your shutter cannot stay open any longer without sacrificing sharpness. Which brings us to…
Shutter Speed
The third and final line of the exposure triangle is shutter speed. Shutter speed is measured in seconds and fractions of a second. For example (from fastest to slowest): 1/1000, 1/30, 1, 4, etc.. This unit of measurement refers to how long a lens shutter stays open, and therefore how long the sensor is exposed to light. There are two extremes, fast and slow shutter speeds.
The easiest way to remember it is:
- To freeze a moment, choose a faster shutter speed.
- To blur a moment chose a slower shutter speed.
Fast Shutter Speeds
The faster the shutter, the less time the sensor has to collect light. As a result, quick shutter speeds create sharp images that are less likely to blur. In terms of functionality, fast shutter speeds work best in well-lit areas and are great for portraits, sports photography, and any other action shot scenario. It’s also more conducive to hand-held photography.
A few examples of quick shutter settings are 1/2000, 1/1000, 1/500 and 1/250.
Slow Shutter Speeds
As we know, the longer an image sensor is exposed to light, the brighter the resulting image will be. However, slow shutter speeds aren’t only useful for low-light shooting. They’re also great for creating more artistic shots; if you’ve ever seen a photo of rushing water that looks like fog over glass or moving cars that look like beams of light, it was done with an extended shutter speed. That said, you need a tripod to capture any shot slower than 1/60—if you try to take them by hand, it will result in blurry photos and frustration.
A few examples of quick shutter settings are 1/15, 1/8, 1/4, 1/2, 1, 4, 8.
Adjustments
There’s a lot of math behind balancing the three sides of the exposure triangle. We will not be doing that math here today—we’ve found it often does more to confuse exposure triangle newbies than help them. Suffice to say, if you change one side of the exposure triangle, then you need to adjust the others. Opening the aperture without lowering ISO or shortening exposure time will create an overexposed image. Similarly, raising your ISO without closing the aperture or shortening exposure produces similar ill effects.
Our recommendation? Practice.
Mastering the exposure triangle takes time, but keep at it. If one combination isn’t producing desired results, play around. When constraints rise up with one-third of the triangle, you still have two more sides to work with.
*Back in ye olde days of exclusively film cameras, ISO wasn’t adaptive. You chose your ISO sensitivity per roll of film. With digital, however, it’s a lot more flexible.


Your internet site has outstanding content. I bookmarked the website