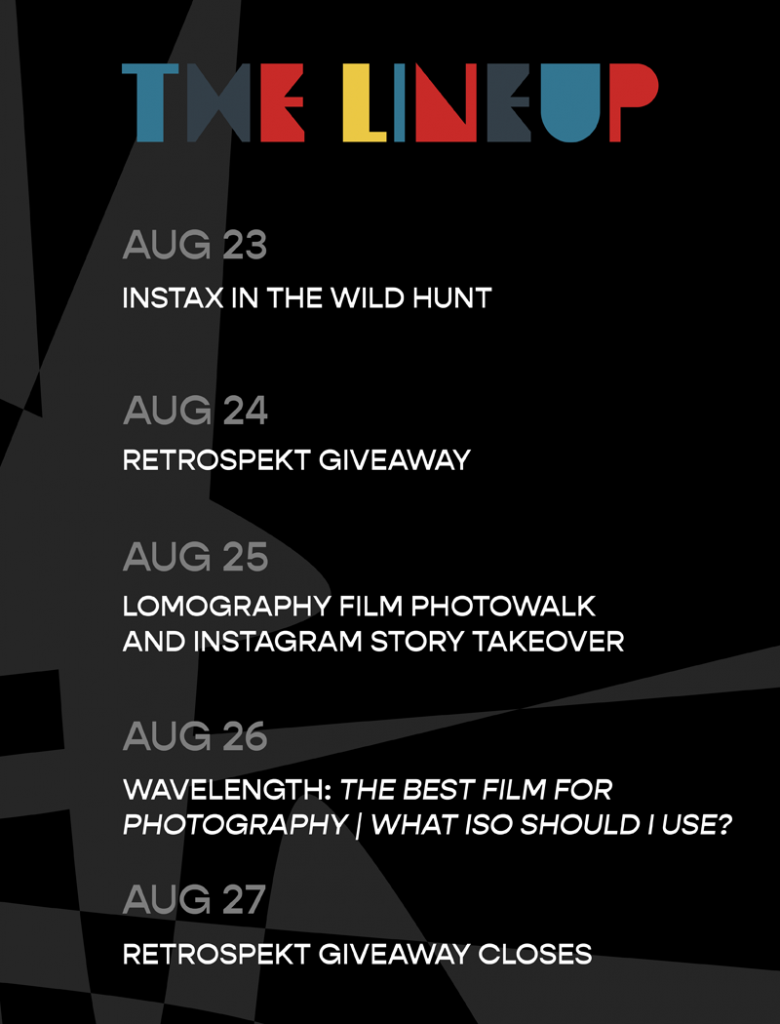
Focus is excited to announce Film Week 2021 – a week-long celebration of film photography. Over the next four days we are running multiple events and promotions related to your favorite film photography gear and brands, including Ilford, Fujifilm, Polaroid, Lomography and more. Check out a breakdown of the events below.
Find a hidden Instax in the Wild print. Hint: they are hidden in iconic Brooklyn locations.
Share a photo of the print on Instagram in a post or story and tag @focuscamera
Terms & Conditions
No purchase necessary, some restrictions apply. Entrants may claim one print each, and each print is valid for one prize pack only. Five prints will be available to claim per day from Monday August 23rd through Thursday August 26th, 2021. Limited to New York City residents only. This giveaway is not endorsed by or associated with Facebook or Instagram. Focus Camera reserves the right to terminate this promotion at any time.
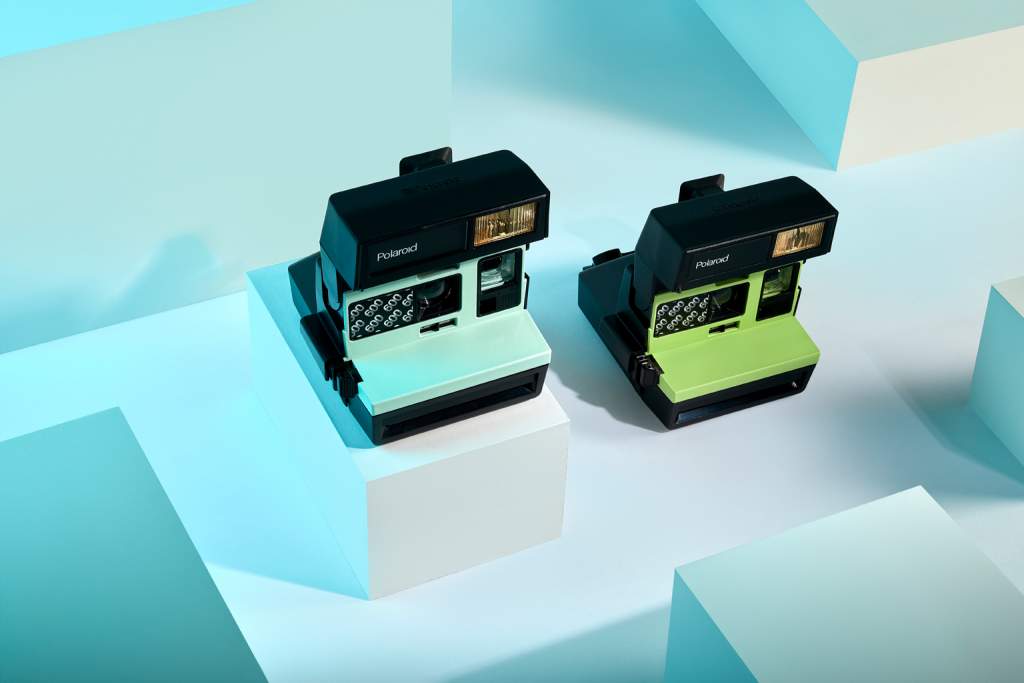
Aug 24, 2021 – Retrospekt Giveaway
Follow @focuscamera and @retrospekt_ on Instagram for your chance to win a refurbished Polaroid 600 Instant Camera
In partnership with our friends at Retrospekt, whose mission is to revive retro technology for a new generation, we’re giving away a refurbished Polaroid 600 Instant Film Camera + a pack of film.
To enter the giveaway, simply follow @focuscamera and @retrospekt_ on Instagram, and look out for our post on Tuesday August 24, 2021. Post a comment on the post and tag one of your friends to enter. Tag one friend per comment, and comment as many times as you like; the more friends you tag, the more entries you receive.
Terms & Conditions
No purchase necessary, some restrictions apply. Limited to US residents only. This giveaway is not endorsed by or associated with Facebook or Instagram. The entry period runs from August 24, 2021 until 11:59PM on August 27, 2021. The winner will be notified on August 30, 2021. Focus Camera reserves the right to terminate this promotion at any time.
Aug 25, 2021 – Lomography Film Photography Photowalk
Focus Camera & Lomography are hosting a film photography photowalk through Bushwick on Aug 25, 2021 | Photo by James Allan
The art, the people, and the unique and unusual happenings that define New York’s streets make it the perfect place to shoot street film photography. After all, quite like the city itself, film photography is spontaneous, surprising, a little risky, and lots of fun.
Please join Focus Camera and Lomography on the evening of Wednesday, August 25th, for a film photography photowalk through Bushwick, one of the city’s most colorful and lively neighborhoods.
Attendees will be provided with a roll of 35mm color film to use for the event. At the end of the photowalk, the film be will be collected and developed. Scans will be sent to each attendee via email the following week.
Attendees are encouraged to bring their own cameras, though Lomography will also be providing some cameras for use during the photowalk, including a mix of Sprocket Rocket, Fisheye, LaSardina, and Actionsampler cameras. Please arrive early, and bring your credit card and photo ID, if you are interested in loaning a camera for the event.
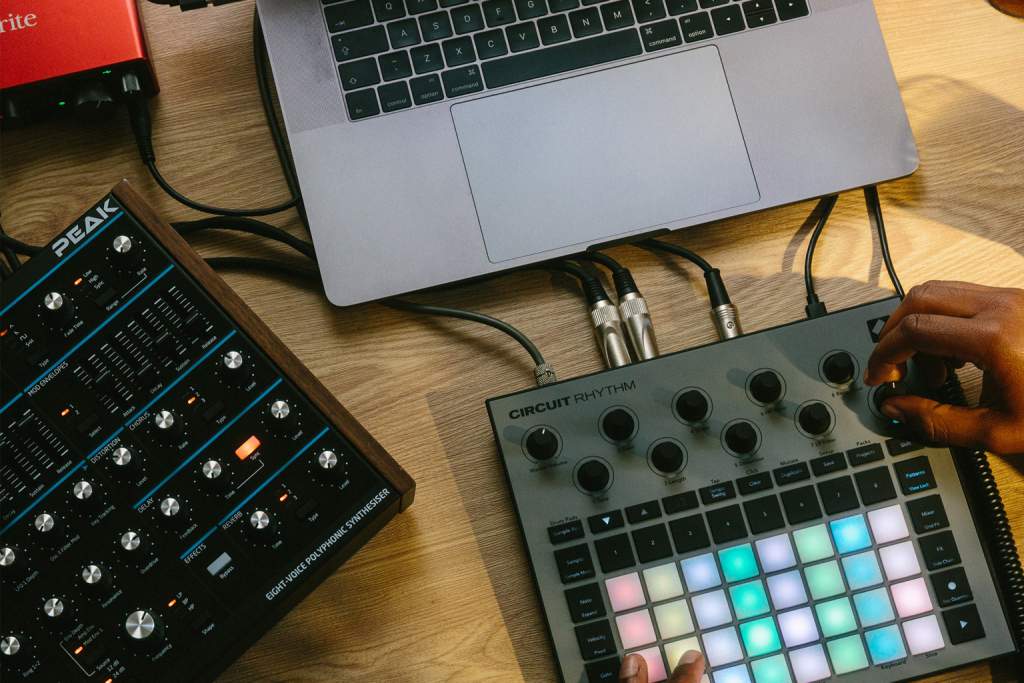
Novation's Circuit Rhythm Sampler | Courtesy of Novation
When Novation launched the Circuit Tracks at the start of this year, they also announced another new product in the Circuit line. Marketed as a versatile and intuitive sampler, the Circuit Rhythm quickly became one of the most hyped releases of 2021. With both products now shipping to customers, we compared the Circuit Rhythm vs Circuit Tracks to see how they fit into the popular product line.
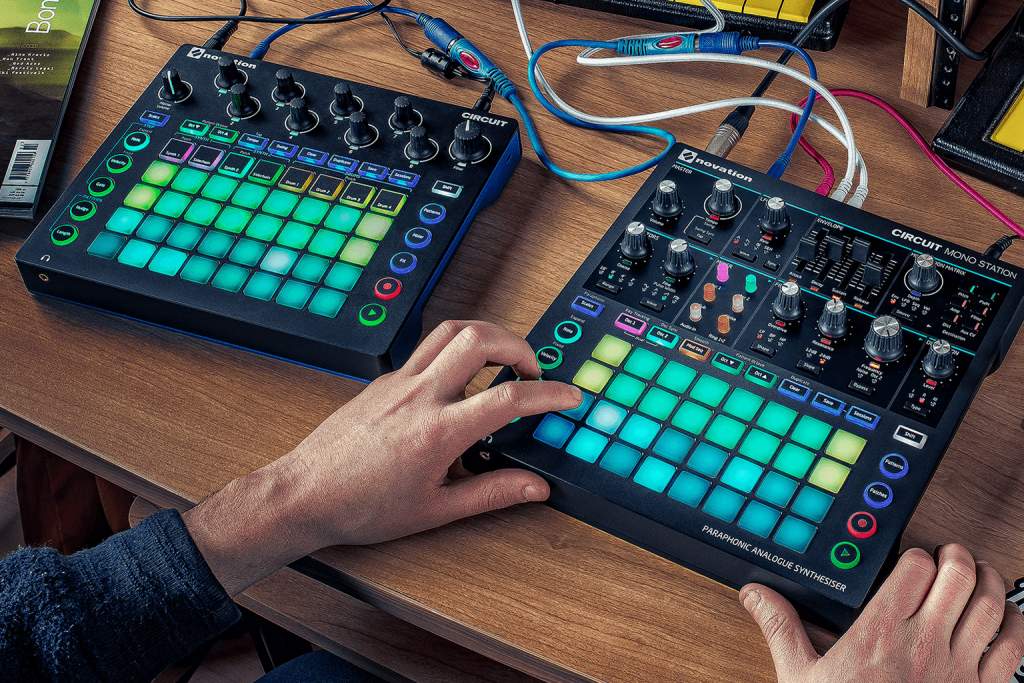
Novation’s original Circuit and Circuit Mono Station grooveboxes | Courtesy of Novation
The original Circuit groovebox was released in 2015. Featuring a sequencer, synthesizer, and drum machine all-in-one, the Circuit allowed users to quickly and easily construct their own pattern-based musical sequences. Featuring two synth tracks, four drum tracks, a 4×8 sequencing grid, and a simple yet intuitive interface, the compact and affordably priced Circuit was immediately popular with producers, DJs, and musicians of all skill levels.
In 2017, Novation released another groovebox, the Circuit Mono Station. Instead of the polyphonic digital synths found in the Circuit, the Mono Station was equipped with a paraphonic analogue synthesizer. The groovebox also featured some new controls and features for creating monophonic and paraphonic tones. While less popular than the Circuit, the Mono Station was generally well-received, although it has since been discontinued.
More recently, in February 2021, Novation announced the Circuit Tracks and Circuit Rhythm. While the Circuit Tracks was announced as a direct update of the original Circuit, Novation describes the Circuit Rhythm as a “versatile sampler for making and performing beats.” We’ve taken a closer look at both models below to see how they compare.
Circuit Tracks
When comparing the Circuit Tracks to the original Circuit, we called it a “fantastic groovebox.” Maintaining the affordability and usability of its predecessor while offering more advanced capabilities, the Circuit Tracks is a shining example of a perfect upgrade.
Featuring the same synth and drum tracks as the original Circuit, the Tracks also offers two MIDI tracks (with full-size ports). This allows you to sequence and mix external instruments via the groovebox, in addition to the built-in synth and drum tracks. Two mono audio inputs also allow you to feed external signals into the Tracks for mixing or applying sound effects to.
These features make the Tracks the perfect centerpiece of your setup. The groovebox allows you to create 32-step patterns, which can be chained to build sequences with up to 256 steps per track. Multiple patterns and pattern chains can be assigned to a single drum pad, called a scene. Scenes can also then be chained together, ultimately allowing you to create more complex musical arrangements.
Meanwhile, expandable storage enables you to save and access up to 31 packs via MicroSD, in addition to the 1-pack internal memory. Each pack can hold 128 patches and up to 64 projects.
Despite its new features, the Circuit Tracks maintains the intuitive workflow and usability of its predecessor that make it great for live performances. The battery-powered groovebox is also very lightweight and portable, making it easy to take with you wherever you go. Topped off with an affordable $399.99 price tag, it’s easy to see why the Circuit Tracks holds such appeal to beginner, intermediate, and experienced producers.
Circuit Rhythm
The Circuit Rhythm is a sampler, not a groovebox. It’s designed to complement an existing setup, rather than serve as the base like the Circuit Tracks. The most critical distinction between the two models is that the Rhythm allows users to record samples directly into the hardware, before transforming them into their own unique beats. While you can load samples into the Tracks, you cannot record them directly to the unit, and have less effects and tools to experiment with.
The Rhythm features eight sample tracks with 32-step patterns each, chainable for up to 256-steps per track. While sample duration is limited to 3 minutes and 40 seconds, you can record up to 128 samples per pack. For comparison, the Circuit Tracks offers 64 sample slots per pack. Like the Tracks, the Rhythm also offers expandable storage via MicroSD.
The Rhythm features full-size MIDI in, out, and thru ports, as well as analogue sync out, so it can easily connect with an existing setup. The sampler also has a stereo input; however, samples are summed to mono as they’re recorded. While being limited to monophonic tones may be a dealbreaker for some, the Rhythm ultimately offers a remarkable level of control over your samples.
The Circuit Rhythm | Courtesy of Novation
Once recorded, you can use the Rhythm to slice, resample, or play the samples chromatically. You also have a variety of playback modes (One-Shot, Gated, Loop, Reverse, Choke) and Grid FX (Beat Repeat, Vinyl Simulation, Reverse, Gator, Phaser) to help you transform your samples into a groove. There’s also unquantized recording functionality, and a more comprehensive side chain feature than the one found on the Tracks.
If you already own a Circuit Tracks, you’ll take to using the Rhythm very easily. Like the groovebox, the Rhythm has a sleek, screenless interface, with a 4×8 grid of velocity sensitive pads. The workflow is also very similar: intuitive, and geared towards live performance. The small, lightweight, and battery-powered sampler is also just as portable as the Tracks.
The Circuit Rhythm costs $399.99. While it’s not without limitations, there is simply not another sampler at this price point with the Rhythm’s capabilities.
Circuit Rhythm vs Circuit Tracks Spec Comparison
The side-by-side spec comparison below highlights the biggest differences between the Circuit Rhythm vs Circuit Tracks.
Vinyl Simulation, Beat Repeat, Phaser, Gater, Reverse, Auto-Filter, and Digitiser
Scale Mode
Yes
No
Note Repeat
No
Yes
Projects (per pack)
64
64
Sample time per pack (seconds)
196.6
220
Samples per pack
64
128
Synth Presets (per pack)
128
N/A
Expandable storage
microSD
microSD
Pattern length
up to 32 steps (256 when chained)
up to 32 steps (256 when chained)
Pattern settings
Sync rate and Pattern Direction
Sync rate and Pattern Direction
Step Probability
Yes
Yes
Pattern Mutate
Yes
Yes
Scenes
16 per project
16 per project
View Lock
Yes
Yes
MIDI I/O & Sync
Full Size MIDI In, Out and Thru Sync Out
Full Size MIDI In, Out and Thru Sync Out
Battery
Built-in rechargeable Lithium-ion battery
Built-in rechargeable Lithium-ion battery
USB
USB-C
USB-C
Dimensions (width x depth x height)
240mm x 210mm x 30mm (40mm height including knob caps)
240mm x 210mm x 30mm (40mm height including knob caps)
Weight
1.72 lbs (780g)
1.72 lbs (780g)
The Verdict
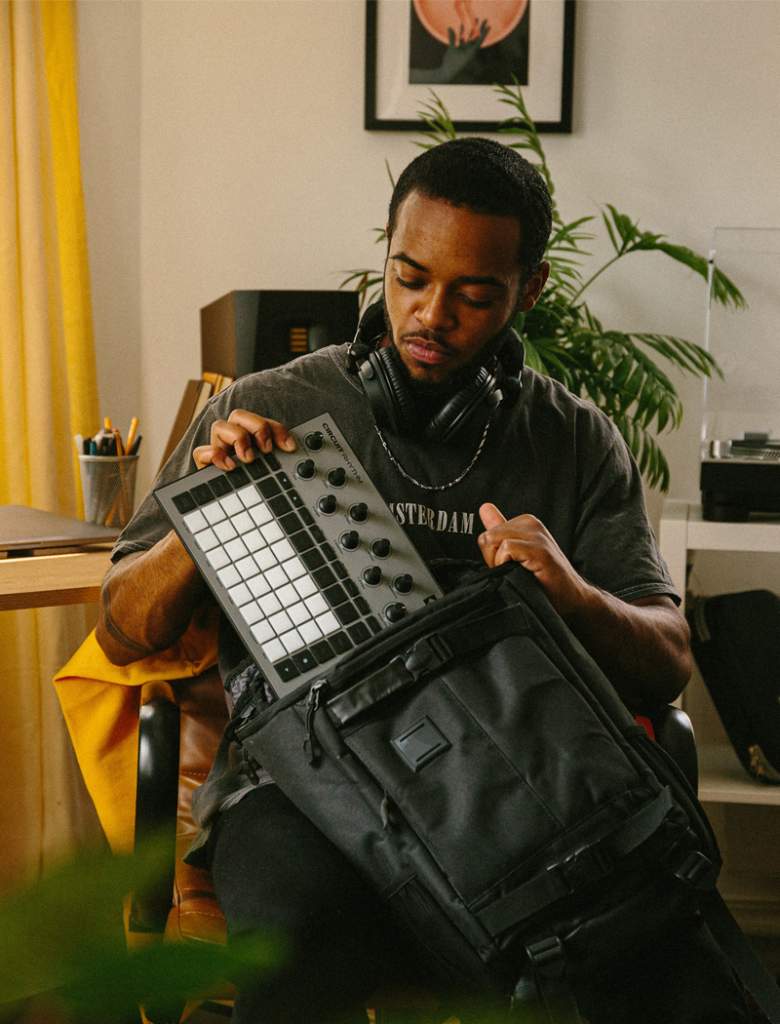
You can fit the Circuit Rhythm and Circuit Tracks in the same backpack | Courtesy of Novation
Ultimately, the Circuit Rhythm and the Circuit Tracks serve different yet complementary purposes. The Circuit Tracks is designed to be the brain of your setup, with external signals flowing in and out of the groovebox as you mix, sequence, and create your music.
Conversely, the Circuit Rhythm allows you to record, slice, and sculpt samples into your own mix, which you can then feed into the Tracks to include in larger, more complex arrangements.
Both units are also highly portable – you can carry them in the same backpack – not to mention remarkably affordable, given their capabilities. All the while offering a similarly versatile and easy-to-use workflow.
Whether you invest in the Tracks, Rhythm, or both, depends on the current state of your setup, and the type of music you’d like to create. Whichever route you choose, you’re unlikely to be disappointed.
Frame within a frame photography is a popular composition technique that can help add depth and symmetry to your photos. Simply put, it involves photographing artificial or natural elements that form a frame inside the larger frame of your image.
Typically, the frame within the frame is used to emphasize the subject or focal point of your image. For example, photographing a person standing in a doorway, or capturing a scenic landscape through the frame of a window.
While simple in concept, frame within a frame photography can be used in various ways, ranging from subtle to pronounced. We’ve listed some ideas and tips below for utilizing this technique to enhance the composition of your photos.
Most photographers position the frame in the foreground or background of their image. Placing the frame in the foreground invites the viewer into the world of the photograph, and can be used to great effect in landscape photography. The effect is enhanced when combined with leading lines, another composition technique that adds depth and draws the viewer in.
It can be difficult to perfect your exposure settings when shooting foreground frame within a frame photography. For example, imagine you are photographing an outdoor landscape through the frame of a window on a bright day. If you let in too much light, the outdoor landscape will be overexposed, and look washed out. Conversely, too little light and the window frame (and anything else inside in the foreground) will be too dark and shadowy.
To avoid this issue, try shooting at a less bright time of day. During the golden hour – the hour after sunrise or before sunset – the light outside will be less intense. Therefore, there will be less disparity between the ideal exposure settings for shooting inside and outside. Plus, the soft, reddish light should make for more colorful and visually interesting photos.
If shooting in the middle of the day is your only option, using a neutral density (ND) filter or graduated ND filter can help cut the intensity of the light outside, allowing you to correctly expose everything in shot.
BackgroundFraming
Photo by Els Fattah
Placing the frame in the background establishes a hierarchal composition that emphasizes the subject of your photo. It’s more subtle than placing the frame in the foreground, and works well in portrait photography; especially when combined with a shallow depth of field that helps to isolate the subject from the background.
To achieve a shallow depth of field, you’ll need to shoot with a wide aperture. A wide aperture allows more light to enter your lens, so it’s best to avoid shooting in a bright setting. If you’re shooting outdoors, try to shoot in the shade or during the golden hour when the sunlight is less harsh.
MultipleFrames
Multiple Frames Within a Frame Photography
1 of 3
Photo by Martino Pietropoli
Photo by Serhat Beyazkaya
Photo by Bart Pal
While it’s not exactly clear why humans love symmetry, there’s no denying that we do. Frames are symmetrical by definition, and immediately make a photo more visually appealing, whether the viewer is conscious of it or not. Similarly, a frame also adds depth to your photos, drawing the viewer into the image.
Using multiple frames within the frame of your photo compounds these effects. When executed correctly, you can create truly mesmeric and visually arresting imagery.
___
The frame within a frame photography examples above showcase how this simple technique can help improve the composition of your photos. Try to incorporate a frame within a frame on your next shoot to measure the impact for yourself.
The new Sigma 150-600mm F5-6.3 DG DN OS | Sports lens is based on their popular 2014 lens for full-frame DSLRs. Featuring an updated optical design and a new, compact build, the new model is Sigma’s first ultra-telephoto zoom lens designed specifically for full-frame, mirrorless cameras. Courtesy of Sigma, we received early access to a pre-production sample of the lens. Pairing it with a Sony a7 III, we took the lens to the sports fields of Brooklyn Bridge Park to see what it could do. Here’s our Sigma 150-600mm F5-6.3 DG DN OS Sports lens review.
The new 150-600mm F5-6.3 lens follows the April release of Sigma’s 35mm F1.4 DG DN | Art lens, itself an updated version of a previous model. As we found in our review of that lens, the housing of Sigma’s new lens is remarkably light and compact compared to the original, despite other optical and technical improvements.
The L-mount version of the new DG DN lens measures 4.3 x 10.4’’ (109.4mm x 263.6mm) and weighs 4.6 lbs. (2.1kg). This makes it 1.7 lbs. (0.76kg) lighter and about one inch shorter than the original model. That’s a crucial difference, especially considering the size of the latest mirrorless camera models. The Alpha 1, Sony’s flagship mirrorless camera, measures 5.1 x 3.8 x 3.2’’ (128.9 x 96.9 x 80.8mm) and weighs just 1.62 lbs. (0.737 kg).
The lens is dust and splash-proof, with a water and oil repellant coating on the front element. Meanwhile the barrel is constructed of durable aluminum and TSC (Thermally Stable Composite) components. Additionally, the lens features an updated optical construction, including 4 FLD elements and 2 ELD elements, and an enhanced autofocus system driven by a stepping motor and high-precision magnetic sensor.
The new lens also offers up to four stops of optical image stabilization (OS) compensation, with two modes for panning or handheld shooting. New on-lens controls include an OS Mode switch, Custom switch (for custom OS settings), Focus Limiter switch, three customizable AFL buttons, and a Zoom Torque switch. The Zoom Torque switch allows you to toggle the zoom ring’s level of resistance between three settings: Smooth, Tight, and Lock.
The lens is available in Sony E-mount and L-mount and has a 95mm filter thread size. A bag, lockable hood, and tripod socket (with a removable foot) are included with the lens.
Performance
Sigma 150-600mm F5-6.3 DG DN OS Sports Lens Gallery
1 of 5
Photo by Jonny Carrillo
Photo by Jonny Carrillo
Photo by Jonny Carrillo
Photo by Jonny Carrillo
Photo by Jonny Carrillo
Like the original model, the lens’ long focal length (and wide focal range) makes it well-suited for capturing faraway subjects. Combined with its reliable optical image stabilization modes for panning and handheld shooting, you can also use the lens effectively to capture moving subjects. It’s a great option for landscape, wildlife, and sports photographers.
The updated optical construction of the new lens helps it stand out from its predecessor. The original model suffered for having such a large focal range, particularly when shooting at its widest length. This isn’t an issue with the new model. We found the lens capable of delivering crisp, clear visuals throughout its the focal range. Additionally, even when shooting into the sun, we had almost no issues with chromatic aberrations, courtesy of the lens’ new ultra-low dispersion glass.
We also really appreciated the on-lens controls, particularly the Zoom Torque switch. The Lock and Tight settings prevented zoom creep, a common complaint with the original model. Meanwhile, the Smooth setting allowed us to easily cycle through the entire 150-600mm focal range in a single motion.
While the lens is smaller and lighter than the original model, it’s still quite big. If this is your first large telephoto lens, it may take some getting used to. Your tripod may not even support the front-heavy weight of the lens. When shooting handheld, we recommend using the lens’ tripod socket to attach it to a monopod for added stability.
Price
The new lens is available for pre-order now in Sony E-mount or L-mount for $1,499. Considering the previous model has a price tag of $1,849, that’s a great deal. The new lens is also more affordable than the nearest Sony competitor. The Sony FE 200-600mm F5.6-6.3 G OSS lens currently has a $1,998 price tag.
The Verdict
Offering a more portable build and improved image quality, autofocus, and image stabilization, the new Sigma 150-600mm F5-6.3 DG DN OS | Sports is a fantastic update to a classic lens. Offering professional-grade features and image quality at an affordable price, it’s a worthwhile investment for all sports, wildlife, and landscape photographers.
The Sony Alpha ZV-E10 interchangeable lens digital camera | Courtesy of Sony
Last week Sony announced the Alpha ZV-E10, their latest APS-C interchangeable lens camera. Like the Sony ZV-1, the new model is designed for vloggers and content creators seeking a powerful yet easy-to-use video camera. Available for pre-order now, we compared the Sony ZV-E10 vs ZV-1 to see what differs the two vlog cameras.
At first glance, the Sony ZV-E10 offers two key advantages over the ZV-1. Firstly, the new model is equipped with a 24.2MP APS-C Exmor CMOS sensor; the same sensor as the Sony a6100. In fact, technically speaking, the ZV-E10 resembles the a6100 more than the ZV-1, and should offer a comparable performance. The ZV-1 uses a smaller, 20.1MP 1’’ sensor.
Secondly, the ZV-E10 is an interchangeable lens camera, compatible with Sony E-mount lenses. Combined with its larger sensor, this greatly enhances the versatility and performance capabilities of the camera in comparison to the fixed lens ZV-1.
For example, with a wide aperture lens like the Sony 35mm f1.4 GM (equivalent to 52.5mm on an APS-C camera) on the ZV-E10, you’ll generate a far shallower depth of field than possible with the ZV-1. Plus, in addition to nicely complementing the ZV-E10, full-frame E-mount lenses will continue to serve you if you later upgrade to an even more advanced video camera, such as the Sony a7R IV or Alpha 1.
The ZV-1 has a fixed ZEISS Vario-Sonnar T* 24-70mm f/1.8-2.8 lens. It’s a great quality lens, and even has a built-in neutral density filter for when you’re shooting in bright conditions. However, it simply cannot compare with the wide range of E-mount lenses available, albeit except in price. While you may be limited to a single lens with the ZV-1, at least that means you’ll never have to spend hundreds or thousands of dollars on another lens.
Stills & Video
Sony ZV-E10 Sample Gallery
1 of 7
Shot with the Sony FE 90mm f/2.8 G OSS Lens | Courtesy of Sony
Shot with the Sony FE 50mm f/1.8 Lens | Courtesy of Sony
Shot with the Sony FE 135mm f/1.8 GM Lens | Courtesy of Sony
Shot with the Sony FE 35mm f/1.4 GM Lens | Courtesy of Sony
Shot with the Sony FE 35mm f/1.4 GM Lens | Courtesy of Sony
Shot with the Sony 16-50mm f/3.5-5.6 OSS Lens | Courtesy of Sony
Shot with the Sony E 10-18mm f/4 OSS Lens | Courtesy of Sony
The ZV-E10 has a maximum continuous shooting speed of 11fps. That’s less than the ZV-1’s 24fps, but not surprising given its larger sensor. Besides, neither camera is really intended for still photography. If you’re interested in both vlogging and still photography, we recommend the Sony a6100. It has similar specs to the ZV-E10 plus a built-in electronic viewfinder, a feature not available on both vlog cameras.
In terms of video, both the ZV-E10 and ZV-1 offer unlimited 4K recording with full pixel readout. However, thanks to its larger sensor, the ZV-E10 records significantly more data (and therefore, detail) while recording. Additionally, the larger sensor enables the ZV-E10 to record more effectively in low-light. The ISO has also been improved. The ZV-E10 has an ISO range of 100 to 32000, which can be expanded for stills to 50 to 51200. The ZV-1 has an ISO range of 100 to 12800 for stills and video.
While the a6100 offers these specs as well, it doesn’t offer the same cinematic color profiles as the ZV-E10 and ZV-1. Both cameras support HLG (Hybrid Log Gamma) and S-log 3/2, an important feature for vloggers that grade their work.
Similarly, both the ZV-1 and ZV-E10 feature a red recording lamp on the front of the unit. However, the latter also displays a red frame around the LCD screen to indicate when the camera is recording. It’s a small but welcome added touch.
Focus & Image Stabilization
The Sony ZV-E10 | Courtesy of Sony
The ZV-E10 utilizes the same strong, hybrid autofocus system as the ZV-1, supporting Sony’s fast and reliable Eye AF functionality. However, the new camera also offers additional focus points on the sensor; 425 points to the ZV-1’s 315.
Both cameras offer the helpful Product Showcase feature. This allows the camera to automatically pull focus between your subject and a product when the product is held up in front of the camera. Though this feature is slightly more impressive on the ZV-E10, thanks to its larger sensor and shallower depth of field.
When it comes to image stabilization, the ZV-1 has the edge. The camera uses both optical and electronic image stabilization, whereas the ZV-E10 only offers electronic image stabilization. However, we don’t anticipate that this will have a huge impact. Like the ZV-1, the new model’s autofocus should still work well with Sony’s wireless grip for stable recording while walking and talking into the camera.
Battery Life
One of the biggest flaws of the Sony ZV-1 is its battery life. The camera uses NP-BX1 batteries, which offer a life of 260 shots when using the LCD screen, or just 45 minutes of video recording (up to 75 minutes if recording continuously).
Conversely, the ZV-E10 uses an NP-FW50 battery. This affords the camera a life up to 440 shots when using the LCD, or 80 minutes of video recording (125 minutes if continuously recording).
Sound Recording
The Sony ZV-E10 and ZV-1 cameras share the same, built-in 3-Capsule Directional Microphone | Courtesy of Sony
The ZV-E10 is equipped with the same built-in 3-capsule directional microphone as the ZV-1. Surprisingly reliable for a built-in microphone, it’s optimized to record voices directly in front of the camera, while blocking out ambient sounds. In other words, it’s ideal for vlogging. Like the ZV-1, a wind screen is included with the new camera.
Both the ZV-E10 and the ZV-1 also have a Multi Interface hot shoe, enabling them to support a Digital Audio Interface. This means they can record audio digitally via a compatible microphone, instead of using a conventional analog microphone.
Audio transmitted via analog technology faces a greater risk of noise and signal interference. This is not an issue when recording via digital audio on the ZV-1 or ZV-E10. Compatible devices include Sony’s wireless microphone for vloggers, the ECM-W2BT.
Price
The Alpha ZV-E10 (body only) is available for pre-order now for $698 in both black and white, or $798 with a 16-50mm f/3.5-5.6 kit lens. The ZV-1 is currently priced $749.99, and also available in black and white.
Given the new camera’s capabilities, that’s a great value price. However, keep in mind that you’ll also need to purchase one or more E-mount lenses to take full advantage of the camera’s capabilities.
Other Features
The features listed above represent the biggest differences between the Sony ZV-E10 vs ZV-1. However, the new camera also offers several other advantages.
These include the addition of a headphone jack, a higher maximum shutter speed, additional exposure compensation stops, additional transition speed and shift sensitivity settings, and a new USB-C (USB 3.1 Gen 1) port. That’s in addition to the Micro USB port also found on the ZV-1.
Check out our side-by-side spec comparison below to more closely compare the differences between the Sony EV-10 vs ZV-1.
4K video recording (oversampled from 6K) with full pixel readout, no pixel binning
4K video recording with full pixel readout, no pixel binning
Color Profiles
Yes (Off / PP1-PP10) Parameters: Black level, Gamma (Movie, Still, Cine1-4, ITU709, ITU709 [800%], S-Log2, S-Log3, HLG, HLG1-3), Black Gamma, Knee, Color Mode, Saturation, Color Phase, Color Depth, Detail, Copy, Reset
Yes (Off / PP1-PP10) Parameters: Black level, Gamma (Movie, Still, Cine1-4, ITU709, ITU709 [800%], S-Log2, S-Log3, HLG, HLG1-3), Black Gamma, Knee, Color Mode, Saturation, Color Phase, Color Depth, Detail, Copy, Reset
Image Stabilization
Electronic
Optical and Electronic
ISO Range
Still images ISO 100-32000 (ISO numbers up from ISO 50 to ISO 51200 can be set as expanded ISO range.), AUTO (ISO 100-6400, selectable lower limit and upper limit)
Movies ISO 100-32000 equivalent, AUTO (ISO 100-6400, selectable lower limit and upper limit)
Still images Auto (ISO100–12800, selectable with upper/lower limit), 100/125/160/200/250/320/400/500/640/800/1000/1250/1600/2000/2500/3200/4000/5000/6400/8000/10000/12800 (Extendable to ISO64/80), Multi-Frame NR: Auto (ISO100–12800), 100/200/400/800/1600/3200/6400/12800
Movies Auto (ISO125 Level–ISO12800 Level, selectable with upper/lower limit), 125/160/200/250/320/400/500/640/800/
Fast Hybrid AF (phase-detection AF / contrast-detection AF)
XAVC S (100 Mbps)] SDXC/SDHC Memory Card (UHS-I U3 or higher); [XAVC S (60 Mbps/50 Mbps)] SDXC/SDHC Memory Card (Class 10 or higher); [AVCHD/Still image] Memory Stick Duo, Memory Stick PRO Duo, Memory Stick PRO-HG Duo, Memory Stick Micro, Memory Stick Micro (Mark2), SDXC/SDHC/SD Memory Card (Class 4 or higher), micro SDXC/SDHC/SD Memory Card (Class 4 or higher)
Memory Card Slot
1 Multi slot for Memory Stick Duo / SD memory card
1 Multi slot for Memory Stick Duo / SD memory card
Microphone Jack
Yes
Yes
Headphone Jack
Yes
No
USB Ports
SuperSpeed USB Type-C™ (USB 3.1 Gen 1 compatible) and Micro USB
Micro USB (USB 2.0)
USB Charging
Yes
Yes
Multi Interface Shoe
Yes
Yes
Battery & Battery Life
NP-FW50 Still Images: Monitor: approx. 260/approx. 130 min., Monitor (when Auto Monitor off is set to 2 s): approx. 410/approx. 205 min.(CIPA standard) Movies Actual Recording: Approx. 80 min (LCD monitor) (CIPA standard) Continuous Recording: Approx. 125 min (LCD monitor) (CIPA standard)
NP-BX1 Still Images: Approx. 440 shots (LCD monitor) (CIPA standard) Movies Actual Recording:
Approx. 45 min (LCD monitor) (CIPA standard) Continuous Recording:
Approx. 75 min (LCD monitor) (CIPA standard)
Dimensions (W x H x D)
Approx. 4.55 x 2.53 x 1.76'' (115.2 x 64.2 x 44.8 mm) (from grip to monitor)
Approx. 4.15 x 2.36 x 1.71'' (105.5 x 60.0 x 43.5mm)
Weight (with battery & memory card)
12.1 oz (343g)
10.4 oz (294g)
The Verdict
The Sony Alpha ZV-E10 | Courtesy of Sony
Offering a larger sensor, the versatility of interchangeable lenses, and several other advantages, the Alpha ZV-E10 is definitively the stronger camera. For established vloggers looking to enhance the quality of their content through advanced technical capabilities, it’s well worth the upgrade.
The camera is compact, easy to use, and affordably priced, so it’s a great option for new vloggers too. However, if you’re trying to stick to a tight budget, the ZV-1 may be the better choice. With a fixed lens, you won’t have to spend much more than the initial $748 price tag in the long-term. Although we do recommend investing in a few extra batteries.
That concludes our comparison of the Sony ZV-E10 vs ZV-1. The new vlog camera is available for pre-order now, and is due to start shipping to customers in late August.
It’s never been more important to have a decent home office setup. Working from home has become increasingly common in recent years, especially since the start of the COVID-19 pandemic. Remote work aside, a comfortable workspace is also critical for anyone that regularly uses a computer. That is, gamers, content creators, or anyone that regularly uses the internet. If you’re reading this, you probably fall into at least one of those categories.
Offices have changed significantly over the past fifty years. Just about the only thing that hasn’t changed is using a desk; today, some people don’t even use a chair. If your workspace needs an upgrade and you’re not sure where to start, fear not. We’ve put together a list of gear that every home office setup should include.
The days of clunky, immobile personal computers are coming to an end. With the exclusion of some occupations, most people simply don’t require a large desktop computer. The latest laptops and tablets are remarkably small, capable, and affordable.
For example, a 14-inch touchscreen HP Chromebook with a Dual Core A4 chip and 4GB memory costs just $279.99. Alternatively, an 8th generation 10.2-inch Apple iPad with an A12 bionic chip and 128GB memory costs $499. With a high-speed Internet connection, there’s little you can’t do with either of these devices.
The latest tablets and laptops also tend to be lightweight and portable, allowing you to set up your workspace wherever you like. While it’s healthier to use a desk and chair when working for longer periods of time, the ability to do so from your couch, bed, or favorite coffee shop is incredibly liberating. Portability is also important if you plan to alternate between working from home and an office, or if your workplace has a hot desk policy.
If you find it difficult to use a small screen, we recommend investing in an external display monitor rather than a larger computer. That way, you can use the large display while working from home, but still have the option of working in other locations from your laptop or tablet if the need arises. An external monitor also typically offers a better quality image display than a built-in computer monitor.
Ergonomic Mouse & Keyboard
The Logitech MX Keys keyboard and MX Master 3 mouse can be purchased as a bundle with a comfortable memory foam palm rest | Courtesy of Logitech
One of the downsides of using a smaller laptop or tablet is that it can be difficult to use the built-in keyboard or mousepad for long stretches of time. For your home office setup, we recommend investing in a more comfortable external mouse and keyboard.
Logitech’s MX Master 3 wireless mouse has an ergonomic build that more comfortably fits in the palm of your hand than a standard computer mouse. Additionally, it offers multiple, intuitively placed buttons and scroll wheels, and has a 4000 dots-per-inch (DPI) sensor resolution. The high DPI resolution means the mouse is more sensitive to movement. That makes it ideal for gamers, or anyone that require a highly responsive mouse. Logitech’s Darkfield Laser Tracking technology means you can also use the MX Master 3 on most surfaces, including glass.
The MX Keys wireless keyboard is similarly well-designed. Featuring responsive, spherically dished keys that match the shape of your fingertips, the board is optimized for fluid, silent keystrokes. The board also uses proximity sensors to detect your hands and illuminate the keys as you prepare to type.
The MX Master 3 and MX Keys are priced at $99 each, or can be purchased together in a bundle with a comfortable non-slip palm rest for $229.99.
Webcam & Microphone
The Logitech C920S Pro HD Webcam would make a great addition to your home office setup
Video calls have become a new standard means of communicating with faraway coworkers, clients, family, and friends. As a result, having the ability to record sound and video is critical for your home office setup.
While most laptops and tablets have a built-in camera and microphone, they are not designed for high-quality recording. Therefore, we strongly advise investing in an external camera and microphone.
The Logitech C920S is a great value webcam. Priced at $79.99, the camera easily connects to your computer via USB, and records Full HD video (1080p at 30fps). The webcam has automatic light correction, a high quality five-element glass lens, and a lens cover that also helps to protect your privacy. Additionally, the webcam has dual microphones that likely surpass the capabilities of your computer’s onboard microphone. However, we still recommend using an external microphone for optimal sound recording.
We discussed the benefits of using an external microphone in a previous post. At the time, we recommended Blue’s Yeti and Yeti X USB microphones. Capable of studio-grade recording via four different sound pattern modes (cardioid, stereo, omnidirectional, and bidirectional), both microphones remain excellent choices. They are priced at $149 and $189.99 respectively. However, the original Yeti is currently available in a bundle with the C920S webcam and a 4-port USB hub for $219.99.
Poor quality sound and video can have a severe impact on your online calls. For the sake of your coworkers, clients, friends or family, invest in external recording devices that will make your video calls crisp and clear. They will thank you for it.
Headset
The Logitech H390 USB Headset features a noise-canceling microphone that’s perfect for voice calls
Like an external microphone, a headset allows you to record and listen to audio at a higher quality than your computer’s microphone and speakers can provide.
The Logitech H390 USB headset is a great option. Featuring a noise-cancelling microphone, in-line controls, and comfortably padded headbands and earcups, it’s ideal for anyone that takes voice calls frequently. The H390 headset is currently priced at $39.99, but is also available in a bundle with the C920S webcam and USB hub for $119.99.
Alternatively, if you’re into gaming, the Logitech G Pro X gaming headset features high-quality Blue VO!CE microphone technology, memory foam padding, 7.1 channel surround sound with enhanced bass rendering, and a sleek yet sturdy aluminum and steel frame.
___
Investing in the electronics and accessories listed above will help update your home office setup. Additionally, their highly portable nature means you’ll have the freedom to setup your workspace wherever you feel is best. Let us know in the comments below what else you think belongs in a modern home office setup.
As they say, necessity is the mother of invention. Over the past year, you may have noticed a boom in content creators producing product videos in the comfort of their homes. These can be found all over TikTok, Instagram, and YouTube. It isn’t hard to understand why more and more videographers are looking to make high quality product videos in their living rooms and kitchens. With modern cameras, from the wide selection of mirrorless, to smartphones like the Sony Xperia 1 III, the Samsung Galaxy S21 Ultra, and the iPhone 12 Pro, learning how to create a product video from home is a valuable and fun exercise worth experimenting with.
If you’re looking to get started with product videos, or for a few extra pointers, we have listed five tips below for shooting an engaging product video at home.
There’s a reason I’m mentioning set design first. It’s going to be one of the more valuable aspects of your product video, and where you can really let your creativity shine. Hammering down on the specific look of your product video is going to impact every decision you make to follow.
Where do you even start?
First, get to know everything there is about your product, including what content has been made in the past. Knowing your product’s story is going to help you tell yours.
Shooting for a well-known brand? How can you incorporate their brand identity into the product video aside from featuring the product itself? Choosing specific color palettes, props, and other elements will go a long way to making a legitimate looking product ad.
Let’s use an example: you’re shooting a spec-ad for Coca-Cola, so you’ll likely want a red or black backdrop. This will keep your product ad consistent with what the brand has done in the past. If shooting for a lesser-known brand, do your best to research their website and social accounts to see what makes them and their product unique.
What you’ll want to do next is really think about how you want your set to look.
Using an infinite white or black backdrop is always a good place to start. If you want a different look, consider putting your product on plexiglass or something with a reflective surface. This can add a lot of visual flare and dimension to your product video. Just keep in mind, surfaces like plexiglass scratch easily and are a magnet for dust and other particles. This can become very noticeable on camera. In addition to shooting at home, you’ll also have to consider limited space and budget. Fortunately, background paper is relatively affordable, especially in smaller sizes. No matter the set design you decide on, the main goal is to be intentional about your choices.
Tip 2: Lighting
Once you have your set ready, it’s time to light it. I recommend a classic three point set up for your product video. Three lights may sound pricey, but decent lighting kits aren’t as hard to find these days. Having three lights ensures you’ll have your key, fill, and back light, the go-to set-up for many productions.
If you do decide to go with three lights for your product video, here is a brief description of the standard set-up.
Key Light – The key light is going to be your main source of light for the subject. You’ll want to use your strongest light for this.
Fill – Less intense, this light can be used to reduce any harsh shadows caused by your key.
Back Light – The back light is going to help separate your subject from the background. This light adds depth to the image.
If you can’t afford three lights, you can usually get away with a one light setup, especially for smaller products. With a one light set up, I recommend placing it directly overhead and as close as possible to your subject. This will help get the most bang out of your light’s buck. Just make sure you have some kind of diffusion on the light to avoid harsh shadows. For this you can use a softbox or go DIY with a shower curtain, t-shirt, or thin white towel.
As your budget increases, incorporating gels, tube lights, and mini LEDs can be a lot of fun and help you get eye-catching effects on your product.
Tip 3: Planning Your Shots
Of course, starting a shoot without a plan is rarely a good idea, although I know many filmmakers who do it anyway (you know who you are). Some may assume that because a product video usually only runs for 15-30 seconds, they can shoot whatever they want and make it look stunning in post. This is hardly ever true. In fact, it’s closer to the opposite. Because you only have 15-30 seconds, you likely only have 5-10 shots that are going to make the cut. This means every shot needs to be just as impactful as the one before.
Going into your shoot with a fully formed shot list and storyboard is going to save you time and help produce the best possible content. It’s key to know what details on the product you will need close ups of and what kind of transitions you’re going to shoot in camera. Trying to chop together a product’s story in post isn’t easy. More often than not you’ll find key components missing, causing a big headache. Do yourself a favor and go in with a plan.
Tip 4: Operating Your Camera
No matter what camera you have on hand, getting smooth footage is going to be imperative to creating a quality product video. Tools like sliders, tripods, and gimbals are all valuable assets to creating smooth looking footage. If these aren’t in the budget don’t worry, shooting handheld is possible, too.
There’s a lot that can be said for having a lightweight, mirrorless camera with a prime lens to shoot with. These cameras are often less bulky and less heavy than their DSLR counterparts, making smoother shots easier to capture. Smartphones are also an amazing tool for product videos because they are lightweight and small in size. They enable you to move the camera in ways that you simply can’t with other gear.
I recommend trying to shoot in either 60fps or 120fps. Make sure to double your shutter speed if shooting at these frame rates for natural looking motion blur. This will allow you to slow your footage down in post, helping with any shakiness. You can also create speed ramps in post, a great way to hide any moments that got a bit too bumpy or if you missed focus.
A lot of people want to use the best gear possible, often meaning a hefty price tag. But you don’t need a cinema camera to shoot an impactful product video. With mirrorless cameras becoming more affordable and more technically impressive, they’ve become great options for beginners and even advance shooters. Cameras in Sony’s Alpha line and in Fujifilm’s GFX-series are amazing options with their ability to shoot in 4K, lowlight, and at 120fps in 1080p. Even smartphones have a lot of upside, including the ability to shoot in slow motion.
At the end of the day, the camera will be a compliment to your own creativity.
Tip 5: Investing in a Macro Lens
If you’re going to make any significant investments here, I’d highly recommend a solid macro lens for product video ads. That is to say, your 24mm, 35mm, and 50mm are going to help you get a lot of the shots you need, but there’s nothing as impactful as getting close-up details of your product.
Most products–if you take a hard enough look–have so many intricate details that are worth pointing out. A bottle of whiskey, for example, could have an interesting cap, engravings in the glass, or mention of a unique ingredient on the bottle. These are all small details you’re going to want to capture with a macro lens.
Aside from capturing important details on your product, there’s nothing quite like extreme close ups of a product to make it pop. The water drops on a cold beer bottle, the glass shine of a glossy watch, the texture of a tasty cheeseburger–a macro lens is going to help these qualities appear larger than life.
Check out one of our earlier posts about macro lenses if you’re interesting!
____
If you take these five tips with you, you’ll be in a good position to shoot your first product video!
Fashion photographer Dani Diamond hit the streets with Sony’s new flagship mirrorless camera, the a1, for a hands-on test in Downtown Brooklyn. In the video above, Diamond uses the remarkably powerful, 50MP camera to capture stunningly high resolution portraits.
You may also be interested in watching our Sony a1 unboxing video, featuring Dani Diamond’s initial reaction to the Sony a1.
Petra Leary is an award-winning aerial photographer based in Auckland, New Zealand. Her drone photography skills have seen her work with clients including Ford, Toyota, and T-Mobile, and publications such as The Guardian, Conde Nast Traveler China, and New Zealand Geographic. Leary is also an ambassador for the brands DJI and Peak Design.
We spoke with Leary last week about she got started with drone photography, her career so far, and what tips she has for aspiring aerial photographers.
Six years ago, Leary was fresh out of college and had just started working as a junior graphic designer. A photography enthusiast, she loved shooting urban skylines in her spare time, often climbing to the tops of buildings to get the perfect shot. One day, a friend who owned a camera drone asked Leary if she’d like to try using it.
“I was instantly hooked,” Leary says, explaining that she purchased her own drone the very same day. “I never really had the same interest in normal photography after that. I just wanted to shoot photos with the drone.”
A drone or UAV (unmanned aerial vehicle) is any aircraft without a pilot or passengers on-board. They are generally operated via remote control. In photography, a drone refers to a UAV with a camera built-in or attached to the aircraft. Drone photographers like Leary operate and pilot the drone while simultaneously photographing or shooting video.
“The functionality of it I love, because it reminds me of playing video games,” Leary says, admitting she’s an avid gamer. “It’s almost a combination between playing a game and having a camera.”
However, requiring dual skill sets, drone photography is not an easy style to master. Leary says it can be “nerve-wracking” when you first start flying, and many photographers struggle to get used to “controlling a drone and being able to photograph at the same time.”
Finding Work
Landscape Aerial Photography by Petra Leary
1 of 4
Photo by Petra Leary
Photo by Petra Leary
Photo by Petra Leary
Photo by Petra Leary
While drone photography has become increasingly popular in recent years, at the time, Leary says it was somewhat rare. Once she started sharing her photos on Instagram, they quickly drew attention. Friends working in advertising and publishing started reaching out with professional opportunities.
One friend hired Leary to shoot aerial footage of Rotorua, a city in New Zealand known for its geothermal activity. The photos Leary captured were used in the branding of a local restaurant, Terrace Kitchen. Framed photos of her work still hang on the restaurant’s walls.
Another friend asked Leary to submit her photo of a swimming pool to a local magazine. Leary’s image was used on the front cover. Word continued to spread, and requests for work kept coming.
Within two years of first using a drone, Leary was working as a drone photographer full-time. Her work has since garnered numerous awards, including the 2019 Webstar Magazine Media Best Photographer award, and an honorable mention in the 2019 International Photography Awards. We also recently named Leary one of the top ten women photographers on Instagram you should be following.
Today, new clients find Leary through her Instagram profile, website, and word of mouth referrals. She appreciates the creative freedom that comes with professional aerial photography work.
“Sometimes [the client] will have specific locations in mind, but it’s usually pretty open to this is the sort of area that we want to photograph,” Leary says. “So it’s your job to go out and find things that look interesting.”
Leary adds that she also enjoys working with clients that “already have an idea” of what they want “because you end up doing things that you probably wouldn’t do otherwise.”
Rules and Regulations
Photo by Petra Leary
One of the biggest hurdles when it comes to drone photography can be the laws and restrictions regarding flying UAVs. In the US, the regulations can vary drastically depending on the county and state you’re in.
However, Leary doesn’t feel held back by the rules. In New Zealand, she benefits from a regulation known as shielded flight, which allows her to fly her drone, even at night and in a controlled airspace, provided it stays within 100 meters (328ft) of, and below, the top of a man-made or natural object. The logic being that other aircraft are unlikely to be flying at the same height as these structures.
Of course, other restrictions can apply, especially for commercial work. Leary says the time she spends on applications and permits can vary from job to job. Especially if she’s shooting in a new location and needs to research the local regulations. It’s clear Leary respects the administrative side of her work as a dull yet necessary part of the job.
“There’s not that much time that goes into it, compared to the actual work, the actual photography side of it,” Leary says. “Once you’ve done it a few times, it’s pretty simple. It just becomes pretty normal to do.”
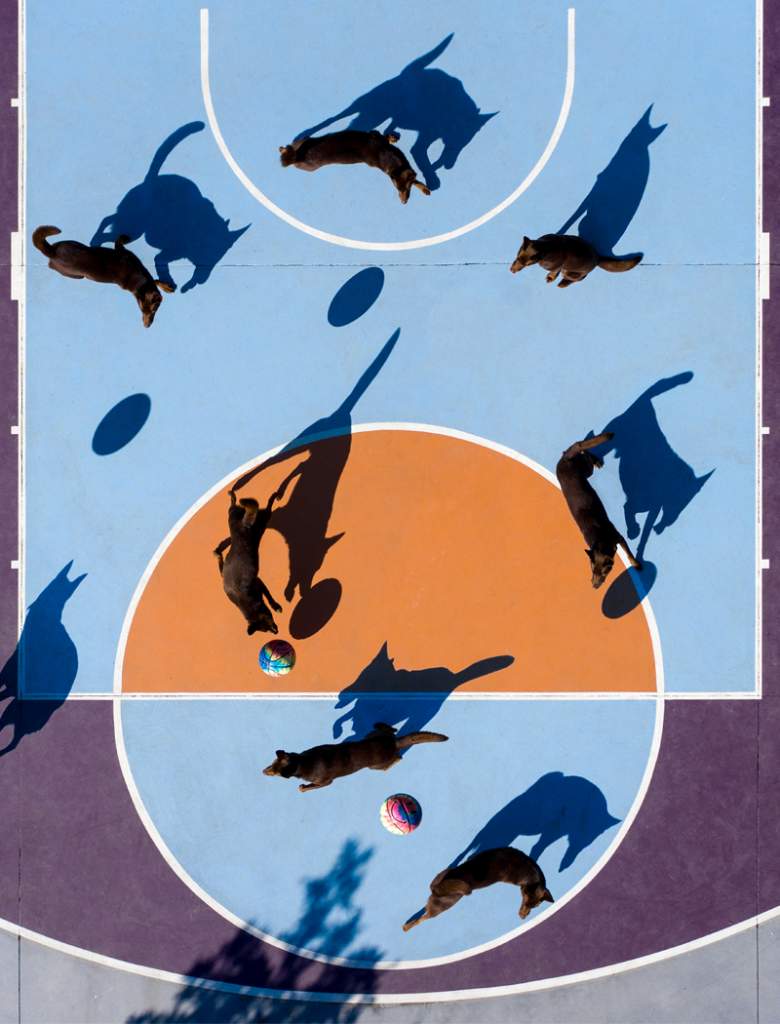
Developing a Style
Sports Courts by Petra Leary
1 of 5
Photo by Petra Leary
Photo by Petra Leary
Photo by Petra Leary
Photo by Petra Leary
Photo by Petra Leary
Leary’s biggest tip for aspiring aerial photographers is “find your own style.”
“Drones are so popular now that every person has one, and you see so many photos that look exactly the same,” Leary explains. She recommends trying to do something that is uniquely yours, and doesn’t just replicate what others are doing.
Leary’s own style is clearly informed by her background in graphic design. She’s particularly well known for photographing sports courts from a birds-eye view, emphasizing the symmetry and geometric shapes in their design.
“It’s funny, because a lot of people ask me whether I play basketball and stuff, and I’ve never, ever played in a team,” Leary says with a laugh. “It’s really just the graphic element of what you see.”
“I like how they all kind of follow a format, but they have variation as well. It’s the same layout for everything, but they all look different; different surfaces or different surroundings, things like that.”
Location Scouting & Shooting Conditions
Photo by Petra Leary
When it comes to location scouting, Leary says Google Maps is an invaluable tool. She regularly explores New Zealand via the satellite view, looking for new locations to shoot. However, it’s not a perfect system.
“A lot of the time you tend to find something, and then when you get there, it’s really different, because the satellite images are from four years ago.”
Leary says she also researches online when new sports courts are being built, and even knows a construction company that specializes in basketball courts that will let her know once they’ve built a new court.
Ideal shooting conditions can vary, Leary says, depending on the subject. When shooting landscapes or natural scenery, she tries shoot in softer light, such as early morning or late afternoon. However, harsh light can also be beneficial when shooting a “concrete or urban environment.”
“The really hard shadows can actually make it look amazing, because it gives you a more realistic shadow-to-person or object ratio.”
When it comes to the weather, Leary recommends shooting on a “really still day” to avoid unwanted drone movement. “Flying in the wind is a completely different thing to flying on a nice day.”
Camera Gear & Accessories
Photo by Petra Leary
Leary primarily uses a DJI Mavic Pro 2 drone with a DJI smart controller. The drone’s powerful Hasselblad camera has a 20MP 1-inch CMOS sensor, fixed lens (equivalent to 28mm), and supports an advanced 10-bit DLog-M color profile.
Leary also uses a DJI Inspire 2 drone with a Zenmuse X5S gimbal for more demanding commercial shoots. Leary uses the interchangeable lens camera with the Panasonic LUMIX 15mm F1.7 and Olympus M.Zuiko 45mm F1.8 lenses. The camera has a Micro Four Thirds sensor, so the focal length equivalents are 30mm and 90mm respectively.
Leary brings both drones to every shoot so she always has a back-up option, as well as a car charger in case she runs out of battery. Low charge can be a big issue in drone photography, which Leary says she learned the hard way.
“One thing I learnt a few years ago was that if your drone gets to a certain battery level, it will just go to land, no matter where you are,” Leary says. Her Mavic Pro 2 started running low on battery while she was shooting on a remote peninsula, and ended up landing “in the middle of nowhere.”
Retrospectively, Leary wishes she’d engaged Sports Mode in the final minutes before the drone descended. This feature enables the Mavic Pro 2 to travel up to 45mph (72kph). Other features Leary likes to use on the Mavic Pro 2 include Tripod Mode and Burst Mode.
Tripod Mode stabilizes the drone, and makes it less “sensitive to your movements” explains Leary. “If you’re trying to align perfectly above something, it just makes it way easier.” Meanwhile, Burst Mode allows Leary to capture five to nine shots in rapid succession. It’s a feature Leary finds helpful when shooting sports, or any fast-moving subject.
Post-Production
Photo by Petra Leary
Leary says the duration of her shoots can vary from a few minutes to multiple hours long. Her post-production workflow, however, is generally more straightforward.
“Basically, from start to finish I use Lightroom to catalog everything,” Leary explains. She then generally selects her favorite images and color-grades them directly in Lightroom. However, Leary also uses Photoshop to layer multiple frames together to create more complex compositions, which she then returns to Lightroom for a final grade.
Such compositions, including the image above, are a staple of Leary’s work. While every one of the images Leary shares on her website and Instagram profile are compelling, it is her most visually arresting compositions that have helped her establish a highly-respected, international profile. Further evidence that “finding your own style” is paramount to an aerial photographer, or indeed, any photographer’s success.
____
We hope you enjoyed our interview with acclaimed aerial photographer, Petra Leary. Check out her website, petraleary.com, or follow her on Instagram at @petraleary to see more of her work.
We recently invited New York City fashion photographer Dani Diamond to join us for an unboxing of the Sony a1.
The a1 is Sony’s new flagship, full-frame, mirrorless camera. Equipped with a high resolution 50MP sensor, and capable of shooting stills at 30fps and recording 8K 30p 10-bit 4:2:0 video internally, the a1 is a highly anticipated release. The a1 will also be Diamond’s first foray into mirrorless cameras. He currently shoots on a full-frame DSLR, the Nikon D850.
Check out out the video above to see Diamond’s first impressions of the Sony a1, and everything that’s included in the box. Dani Diamond also recently put the a1 to the test in a street photography shoot in Downtown Brooklyn.
On June 29, 2021, Sony announced a new firmware update for the a1. The 1.10 update will improve the camera’s autofocus performance, including its eye detection ability in harsh light. The overall stability of the camera has also been improved, along with compatibility with the Remote Camera Tool app. To download the firmware update for your Sony a1, click here.