Home Blog Page 12

The 5 Best Sony E-Mount Portrait Lenses

The 5 Best Sony E-mount Portrait Lenses

The style of photography you prefer to shoot should influence which lenses you buy. For example, portrait photographers tend to use telephoto prime lenses with a focal length over 50mm. However, there are some exceptions, evident in our list below of the 5 best Sony E-mount portrait lenses. 

Sony E-mount shooters have a wide variety of lenses to choose from. Sony currently has over sixty E-mount lenses available, not to mention the third-party alternatives or other-mount lenses that can be used with an adapter. For the purposes of this post, we specifically focused on finding the best portrait lenses within the Sony range of E-mount lenses.  

Additionally, the models we’ve selected are full-frame (FE), G Master (GM) lenses. Our reasoning being that full-frame lenses can be paired with both full-frame and cropped sensor cameras, while the reverse is not true. Meanwhile, the G Master line is Sony’s premium line of lenses, offering the highest quality build and performance capabilities.  All five models are also part of the select few lenses fast enough to keep up with the Sony a1 while shooting continuously at 30fps.  

While price was not a criterion in our search for the best Sony E-mount portrait lenses, we have also included some honorable, affordable mentions at the tail-end of our post for photographers on a budget. 

Sony FE 35mm f/1.4 GM 

It’s unwise to go too wide when snapping portraits. In addition to the risk of distortion, the broad field of view can make your subject also appear… well, wider. 35mm is an appropriate cut-off, which is why the Sony FE 35mm F1.4 GM is our widest portrait lens recommendation. The lens, which was released earlier this year, offers a natural, distortion-free field of view similar to the human eye.  

The 35mm F1.4 lens is particularly great for street portraits. The extra width gives you plenty of space to capture your subject and their vibrant, urban surroundings. Additionally, the 11-blade circular aperture reaching F1.4 allows the lens to perform well in low-light, not to mention generating pleasing bokeh. An Extra-low Dispersion (ED) glass element and Nano AR Coating II also help the lens suppress aberrations, flare, and ghosting for a great optical performance. 

The 35mm F1.4 is also a great option for photographers with a cropped sensor camera like the Sony a6600 or 6400. On APS-C cameras like these, the lens has a field of view equivalent to a 52.2mm lens, which is still ideal for street portraiture.  

In addition to strong performance capabilities, the lens offers a sophisticated, lightweight build. Weighing 1.16 lb. (524g), the lens is lighter than both the Sigma 35mm F1.2 and 35mm F1.4 DG DN Art lenses, as well as the Sony Distagon T* FE 35mm F1.4 ZA. The lens body also offers premium features such as an aperture ring and a customizable focus hold button, and dust and moisture resistant weather sealing.   

The Sony 35mm F1.4 costs $1,398, which is more affordable than the Sigma 35mm F1.2 and Sony Distagon T* FE 35mm F1.4 ZA. Overall, a great value lens that’s perfect for street portraiture. 

Sony FE 50mm f/1.2 GM 

Like the 35mm lens above, the Sony FE 50mm F1.2 GM is one of Sony’s newest lenses. Featuring a state-of-the-art optical construction housed within a compact, light build, Sony’s 60th E-mount lens has been in high demand since it was announced in March this year

Weighing 1.72 lb. (778g) and measuring 3.43’’ by 4.25’’ (87 x 108mm), the lens has a similar build to the Sony Planar T* 50mm F1.4 ZA.  The compact size means it’s a great option for small full-frame and APS-C bodies, with a cropped sensor field of view equivalent to a 75mm lens. In addition to a small stature, the body offers an aperture ring, aperture click switch, and two customizable focus hold buttons, and is weather sealed against dust and moisture.   

With a maximum aperture of F1.2, the 50mm GM is Sony’s fastest E-mount prime lens currently available. This helps the lens deliver smooth, luscious bokeh and a fantastic low-light performance. The lens optics include three Extreme Aspheric (XA) elements that help it achieve high, edge-to-edge resolution, and a small minimum focusing distance of 1.32ft (40cm). 

Another great feature of the lens is its focus mechanism. With four Extreme Dynamic (XD) linear motors, the state-of-the-art system enables the lens to autofocus with incredible speed and accuracy. In a portrait shoot where you or your subject are moving around frequently, this feature is sure to come in handy. Additionally, the linear response manual focus ensures precision and complete control when adjusting the focus ring yourself.  

The Sony FE 50mm F1.2 GM is well worth its $1,998 price tag. Offering a compact build and truly stunning visual performance, you’ll be amazed at the things you can do with this lens.  

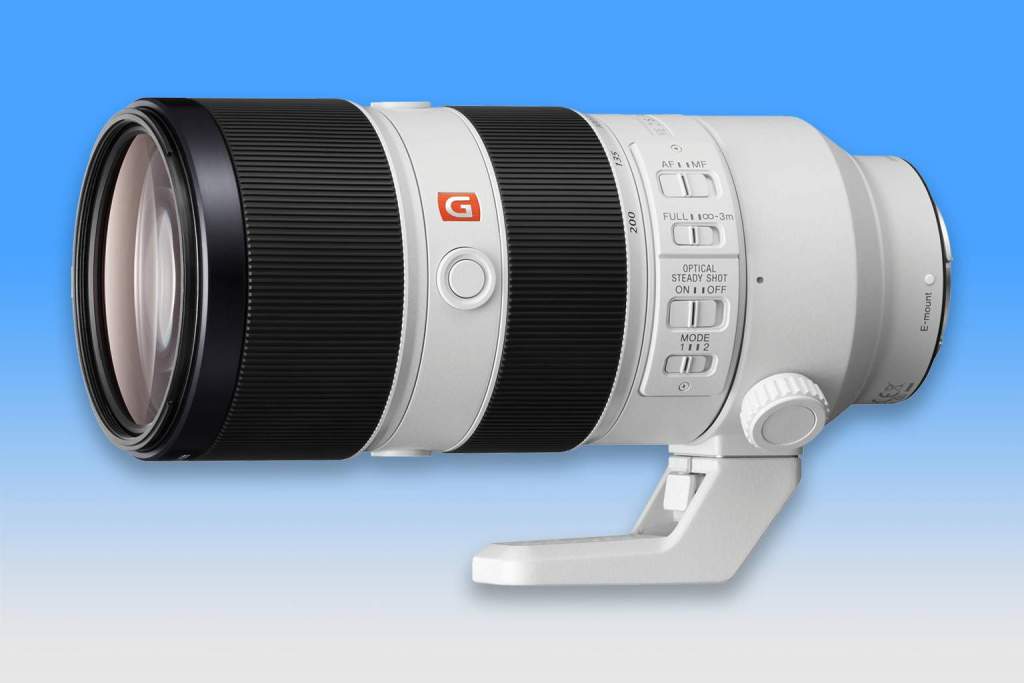
Sony FE 70-200mm f/2.8 GM 

Sony FE 70-200mm F2.8 GM Lens

While four out of the five best Sony E-mount portrait lenses we’ve selected are primes, most photographers typically have at least one or two zoom lenses in their bag. The Sony 70-200mm F2.8 GM is a fantastic choice, offering an outstanding optical performance throughout its focal range that rivals premium prime lenses. We also included it in our list of the 5 best lenses for the Sony a7 III

With a complex optical construction including four ED elements, two Super ED elements, two XA elements, and Nano AR Coating, the Sony 70-200mm F2.8 generates gorgeous, high resolution visuals with excellent clarity and contrast. With so much glass, the lens uses two separate motors (an RDSSM & double linear motor) and multiple position sensors to power its fast, reliable autofocus.  

The 70-200mm F2.8 has built-in Optical Steadyshot image stabilization, which becomes 5-axis image stabilization when paired with select Sony Alpha cameras, including the a7R IV, a7S III, a7 III, and the a6600. The lens also supports Sony’s Mode 2 stabilization functionality, enabling smoother, steadier imagery when panning.  

Weighing 3.26 lb. (1.48kg) and measuring 3.46’’ x 7.87’’ (88 x 200mm), the 70-200mm F2.4 is the largest lens in our list. It may feel a little uncomfortable on smaller E-mount cameras, though the build quality is impeccable. The lens has durable, weather-sealed housing, plus a removable, rotating tripod mount, smooth-turning focus and zoom rings, three customizable focus hold buttons, and switches for the focus, focus limiter, image stabilization, and lens modes.  

The Sony 70-200mm F2.8 GM is a true powerhouse. Offering a sophisticated optical performance and professional-grade build, the versatile, telephoto zoom lens costs $2,598, yet offers plenty of bang for your buck.

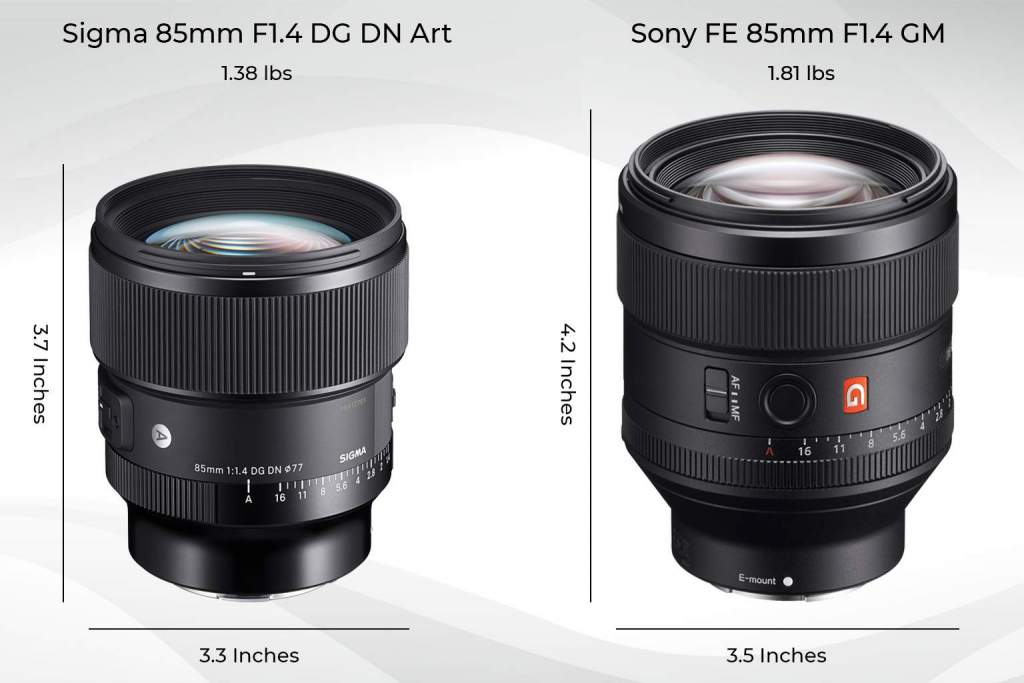
Sony FE 85mm f/1.4 GM 

The Sony 85mm F1.4 GM has been one of Sony’s most popular lenses since its release in 2016. Remarkably well built, the lens is still a strong competitor to more recently released third party lenses like the Sigma 85mm F1.4 DG DN Art. We compared the two lenses recently and found they both offered superb performance capabilities.  

Telephoto lenses with a focal length of 85mm or higher are ideal for portraiture as they make it easier to isolate your subject from the background. A wide aperture like F1.4 helps as well, shortening the depth of field and blurring the background into visually pleasing bokeh. Additionally, just as a smaller focal length can make your subject look wider, a longer focal length can have a slimming effect. On an APS-C camera, the Sony 85mm F1.4 lens’ field of view is even narrower, equivalent to a 127.5mm lens.  

At 1.81 lb. (820g), it’s slightly heavier than the two previous lenses, but still a comfortable pairing with any Sony E-mount camera. The lens comes fitted with an aperture ring, aperture click switch, customizable focus hold button, hood luck mechanism, and is reliably weather sealed against dust and moisture.  

Nano AR Coating and three ED elements in the optical construction of the lens help it deliver crisp, high quality visuals free of aberrations, flare, and ghosting. The overall image quality output is fantastic. Meanwhile, the dual sensor RDSSM autofocus motor can be a little noisy, though it’s very fast and accurate. It has no trouble keeping up with the advanced Eye AF capabilities of Sony’s Alpha cameras.   

The Sony 85mm F1.4 GM costs $1,798, and is easily one of the all-time great Sony G Master lenses. W 

Sony FE 135mm F1.8 GM 

The fifth and final Sony E-mount portrait lens we recommend is the Sony FE 135mm F1.8 GM. In a previous post, we compared it to the Sony 85mm F1.8 GM (also above) and found both models to be fantastic options for portrait photographers.  

One disadvantage of longer lenses is that they tend to have a higher minimum focusing distance. That isn’t the case with the 135mm F1.8. Thanks to its floating focus mechanism, the lens has a minimum focusing distance of just 2.3ft (70cm). It’s a great option for close-up portraits. In fact, you could also use this lens quite effectively for macro photography.  

Another nice feature is the focus range limiter switch on the side of the lens. Allowing you to restrict the autofocus to a narrower focus range, it helps the lens avoid accidentally focusing on other objects in frame. The lens also has an aperture ring, aperture click switch, AF/MF switch, and two customizable focus hold buttons (for horizontal and vertical shooting). At 2.1 lb. (950g) and measuring 3.52’’ x 5’’ (89.5 x 127mm), it has some size to it, but it’s well worth it given the lens’ visual output. 

Optically, the lens performs excellently. XA, ED, and Super ED elements reduce aberrations for edge to edge resolution, while Nano AR Coating suppresses flare and ghosting. Additionally, the 11-blade circular aperture helps the lens deliver luscious, bokeh-filled backgrounds, isolated from your tack-sharp subject, for breathtaking portraits.  

The Sony 135mm F1.8 GM costs $2,098 and will make any portrait photographer – and their subjects – very happy.  

Honorable, Affordable Mentions 

The 5 best Sony E-mount portrait lenses we identified above are premium-grade lenses, ideal for intermediate and professional photographers. However, if you find yourself a little restrained by budget, there are some more affordable alternatives.  

We’re particularly fond of the three, full-frame prime lenses Sony added to their G line earlier this year. Priced at just $598 each, the 24mm F2.8, 40mm F2.5, and the 50mm F2.5 are all incredibly light and compact, and capable of delivering fantastic image quality. The latter two lenses are particularly well-suited to portrait photography. Check out our review of these lenses to learn more. 

The Sony Sonnar T* FE 35mm F2.8 ZA is another great option. The remarkably compact lens costs just $598 and uses high-quality ZEISS glass to deliver a strong optical performance.  There’s also Sony’s nifty-fifty lens, the $248 50mm F1.8. 

___ 

As we mentioned, there are a wide variety of lenses available to Sony E-mount shooters. If you’re interested in portrait photography, we hope our list of the 5 best Sony E-mount portrait lenses helps you determine which lens or lenses you should invest in next. 

Panasonic LUMIX GH5 II | Worth The Upgrade?

Panasonic LUMIX GH5 II - Worth the Upgrade?
The LUMIX GH5 II | Courtesy of Panasonic

The Panasonic LUMIX GH5 II (or GH5M2) was announced last month, the second iteration of the popular LUMIX GH5. Available for pre-order now, it’s due to start shipping in the coming weeks. We’ve compiled everything we know so far below, including a side-by-side comparison of the LUMIX GH5 vs GH5 II. 

Panasonic also announced the development of another new camera last month. While not much is known about the LUMIX GH6, Panasonic did reveal it would replace the original GH5 as the flagship camera of the LUMIX G Series. It’s due to be released by the end of 2021.  

With a powerful predecessor to compare to, and a new flagship model expected by the end of the year, you might be wondering whether it’s worth upgrading to the GH5 II. However, before we dive in and find out, let’s review a little GH5 family history.  

Family History  

The original LUMIX GH5 was first announced in early 2017, itself succeeding the LUMIX GH4, the world’s first mirrorless, interchangeable lens camera capable of recording 4K video. As the next model up, the GH5 was the world’s first mirrorless camera to record 4K 30p 10-bit 4:2:2 video internally.  

Despite its impressive video specs, the GH5 is mostly known as a photography camera.  The 20.3MP Micro Four Thirds camera is capable of burst shooting stills with a whopping 6K resolution at 30fps, and a 4K resolution at up to 60fps.  

Panasonic promptly followed it up with the LUMIX GH5S in early 2018, which we called one of the four best cameras for videographers.  Equipped with a 10MP sensor, the lower resolution enables the GH5S to deliver a better video and low-light performance. Read our full review of the GH5S here.  

Following the GH5 and GH5S, the GH5 II has big shoes to fill. That’s especially true given that the next model up, the GH6, has already been announced. Let’s get into everything we know so far about the LUMIX GH5 II. 

LUMIX GH5 II – Everything We Know So Far 

The LUMIX GH5 II promises to be a powerful hybrid camera, offering photo and video capabilities that surpass both the GH5 and GH5S. 

The camera uses the same 20.3MP live MOS sensor as the original GH5, with a key enhancement: Anti-Reflective (AR) coating. The AR coating reduces the risk of lens flare, ultimately enhancing image clarity and color reproduction. Additionally, the GH5 II uses the latest Venus Engine image processor, the same used by the powerful LUMIX S1H.  

While the GH5 II offers the same, strong still image capabilities as the GH5, the new processor helps the camera reach new heights in terms of video recording. The GH5 II can record DCI 4K 60p 4:2:0 10-bit video internally, even while simultaneously recording DCI 4K 60p 4:2:2 10-bit video via HDMI output. 

Like the GH5, the new model supports unlimited recording on all settings. This is especially helpful given one of the other new features added for the GH5 II: wireless live streaming. Using the LUMIX Sync app, you’ll be able to livestream from the camera directly to Facebook, YouTube, or any other platform that is RTMP/RTMPS compatible. This is a huge upgrade for online content creators. 

While you could purchase and install the V-Log L gamma on the original GH5, it comes pre-installed on the GH5 II, providing the camera with 12 stops of dynamic range. Additionally, the camera offers four new gamma presets that allow you to experiment with different, stylish color profiles: Cinelike D2, Cinelike V2, L. Classic Neo, and L. Monochrome S.  

Other notable features of the GH5 II include upgraded and improved autofocus and image stabilization systems, battery charging via the USB-C port, and longer battery life when using Panasonic’s high-capacity DMW-BLK22 battery pack. The camera can also use the older DMW-BLF19 battery packs used by the original GH5, albeit without the improved battery life.  

In terms of build, not much has changed. The GH5 II has the same approximate size and weight as the GH5. However, while both cameras use a 3,680k-dot OLED viewfinder with 0.76x magnification, the GH5 II viewfinder offers an ultra-fast display speed of 120fps. Which will be quite helpful if you’re ever tracking a fast-moving subject. Similarly, the GH5 II has a slightly smaller 3.0’’ 1840k-dot LCD display (the GH5’s is 3.2’’), though it’s been upgraded to offer higher luminosity and better color reproduction.  

Ultimately, everything we know so far about the LUMIX GH5 II indicates it offers a wide range of upgrades and enhancements when compared to the previous model.  

LUMIX GH5 vs GH5 II – Spec Comparison  

Comparing the technical specifications of the LUMIX GH5 vs GH5 II side-by-side helps identify some of the core differences between the two cameras. 

LUMIX GH5LUMIX GH5 II
Price$1,597.99 $1,697.99
Sensor size17.3 x 13.0 mm (Micro Four Thirds)17.3 x 13.0 mm (Micro Four Thirds)
Sensor typeLive MOS sensorLive MOS sensor
Total Pixels21.77 Megapixels21.77 Megapixels
Effective Pixels20.33 Megapixels20.33 Megapixels
Anti-Reflection Coating on SensorNoYes
Aspect Ratio4:34:3
Color FilterPrimary color filterPrimary color filter
Dust and Splash ResistantYesYes
Maximum Still Image Resolution (per Aspect Ratio)4:3: 4992x3744 (6K PHOTO)
3:2: 5184x3456 (6K PHOTO)
16:9: 3840x2160 (4K PHOTO)
1:1: 2880x2880 (4K PHOTO)
4:3: 4992x3744 (6K PHOTO)
3:2: 5184x3456 (6K PHOTO)
16:9: 3840x2160 (4K PHOTO)
1:1: 2880x2880 (4K PHOTO)
4K Video Yes
records up to UHD 4K 30p 4:2:2 10-bit internally and UHD 4K 60p 4:2:2 10-bit via HDMI output
Yes
records up to DCI 4K 60p 4:2:0 10-bit internally and can simultaneously record DCI 4K 60p 4:2: 2 10-bit via HDMI output
Unlimited Video Recording YesYes
Wireless Live StreamingNoYes
V-Log L GammaNo
Can be purchased separately and installed)
Yes
In-Body Image Stabilization5-stop, 5-Axis Dual I.S. 26.5-stop, 5-Axis Dual I.S. 2
AutofocusContrast AF System
Face/Eye Detection / Tracking / 225-Area / Custom Multi / 1-Area / Pinpoint
(Full area touch is available)
(Scalable AF frame size and flexible AF position)
Auto Detection (Face, Eye, Body, Animal) / Tracking / 225-Area / Zone (Vertical/Horizontal) / Zone (Square) / Zone (Oval) / 1-Area+ / 1-Area / Pinpoint / Custom 1, 2, 3
(Full area touch is available)
(Scalable AF frame size and flexible AF position)
Viewfinder3,680k-dot OLED Live View Finder with 0.76x magnification 3,680k-dot OLED Live View Finder with 0.76x magnification with display speed of 60fps or 120fps
Rear Monitor1,620k-dot free-angle, 3.2-inch TFT LCD monitor with static touch control1,840k-dot free-angle, 3.0-inch TFT LCD monitor with static touch control
Memory slots22
Recording MediaSD/SDHC/SDXC (Compatible with UHS-I/UHS-II UHS Speed Class 3 standard SDHC/SDXC cards)SD/SDHC/SDXC (Compatible with UHS-I/UHS-II UHS Speed Class 3 standard SDHC/SDXC Memory Cards and UHS-II Video Speed Class 90 standard SDXC Memory Cards)
USB-C ChargingNoYes
BatteryDMW-BLF19DMW-BLK22 (can also use DMW-BLF19)
Battery LifeApprox. 400 images (rear monitor), 380 images (LVF), 1,000 images (Power Save LVF mode*) with H-ES12060/DMW-BLF19 battery
Approx. 410 images (rear monitor), 400 images (LVF), 1,000 images (Power Save LVF mode*) with H-FS12060
*Under the test conditions specified by Panasonic based on CIPA standard. When the time to get in the sleep mode is set to 3 sec.
Approx. 400 images, 1200 images (Power Save LVF mode*) with H-ES12060 / DMW-BLK22 battery
Approx. 410 images, 1200 images (Power Save LVF mode*) with H-FS12060 / DMW-BLK22
*Under the test conditions specified by Panasonic based on CIPA standard. When the time to get in the sleep mode is set to 1 sec.
Dimensions (W X H X D)5.45 x 3.86 x 3.44 inches (138.5 x 98.1 x 87.4 mm) 5.45 x 3.86 x 3.44 inches (138.5 x 98.1 x 87.4 mm)
Weight (SD Card, Battery, Body)1.60 lb (725g)1.60 lb (727g)

LUMIX GH6 – Everything We Know So Far 

While less is known about the LUMIX GH6, Panasonic have released a few key pieces of information about the new LUMIX G flagship.  

The GH6 will use a new, high-speed Micro Four Thirds sensor and image processor. The camera will be capable of recording 4:2:2 10-bit DCI 4K/60p video internally, as well as 10-bit 5.7K 60p video. The GH6 will also support a 10-bit 4K 120p High-Frame Rate (HFR) and Variable Frame (VFR) for high-resolution slow-motion video. Like the GH5 and GH5 II, the camera will support unlimited video recording when used under the certified operating temperature. Panasonic estimates the retail price of the LUMIX GH6 will be close to $2,500. 

Given the announcement focused on the video capabilities of the GH6, it seems the new flagship model will primarily be targeted towards prosumer content creators and professional videographers. 

LUMIX GH5 II – The Verdict 

LUMIX GH5 II
The LUMIX GH5 II | Courtesy of Panasonic

If you already own a LUMIX GH5, there’s plenty to entice you to upgrade to GH5 II. Namely, the ability to internally record higher grade video, wireless live streaming, improved autofocus and image stabilization, longer battery life, and more color profiles.  

While some pro videographers may prefer to wait for the GH6 and its slightly better video capabilities, they’ll likely be waiting at least a few more months. That’s not to mention the sizable price difference, nor the fact we don’t really know much else about the GH6.  

At $1,697.99, the LUMIX GH5 II is only a little more expensive than the original GH5. So, if you’re in the market now for new hybrid camera, it’s the obvious choice. We know you won’t regret it. 

Ricoh Theta Z1 51GB Vs Insta360 One X2 | 360° Camera Comparison

Ricoh Theta Z1 51GB vs Insta360 One X2

From capturing live sports and action, to shooting a real estate virtual tour, there are numerous personal and professional applications for a 360° camera. As two of the latest and most popular models, the Ricoh Theta Z1 51GB and Insta360 One X2 are direct competitors. However, several key differences indicate they appeal to different kinds of photographers. In this post, we breakdown everything you need to know about the Ricoh Theta Z1 51GB vs Insta360 One X2, so you can make an informed decision about which 360° camera is right for you. 

Build

The build of the Ricoh Theta Z1 51GB vs Insta360 One X2 Cameras
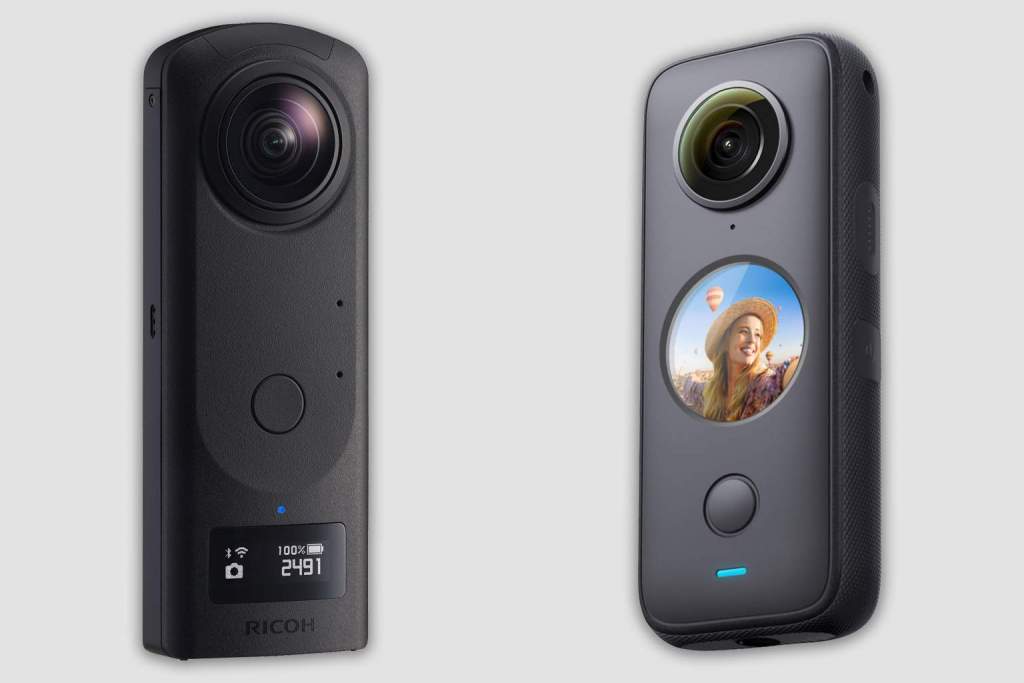
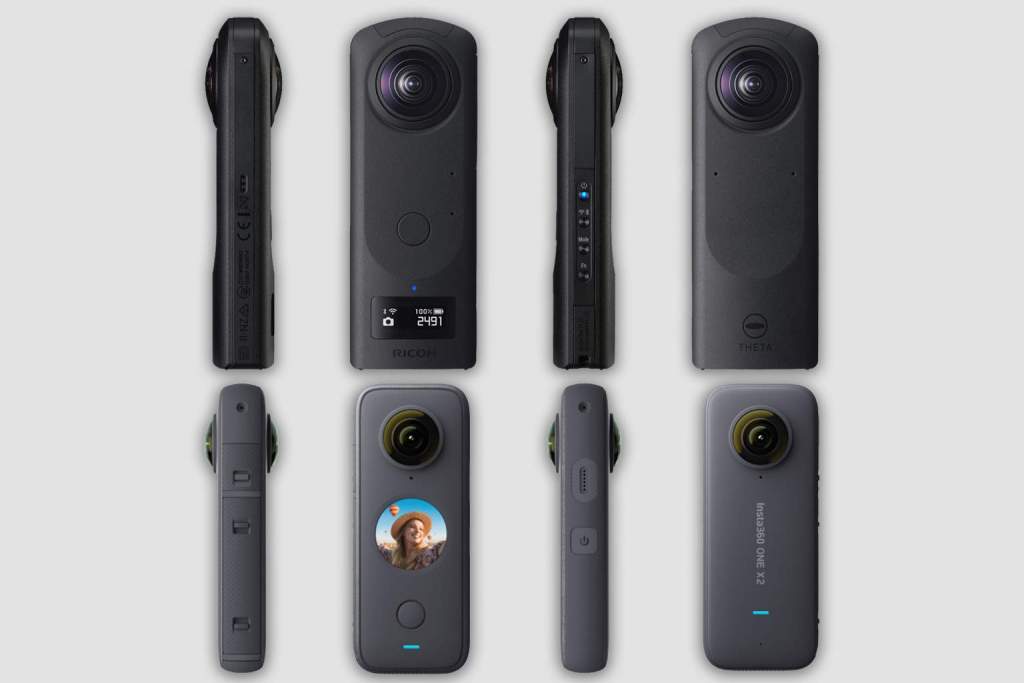
The Ricoh Theta Z1 51GB and Insta360 One X2 have comparable, pocket-sized builds. They both have a thin, rounded-rectangular shape, dual fisheye lenses, and a simple interface. Additionally, both cameras have a ¼-inch screw socket on the bottom for mounting to a tripod, drone, or gimbal.  However, there are a few important differences.  

Firstly, the Ricoh Theta Z1 51GB is slightly larger, weighing 6.42 oz (182g) and measuring 1.89 x 5.22 x 1.17 inches (48 x 133 x 30mm). On the front of the camera there is a shutter button and a small LCD panel that displays important information such as battery life and shooting mode. Four buttons on the side control power, connectivity, mode, and function.  The camera has a durable magnesium alloy encasing, though no IP weatherproof rating

Conversely, the Insta360 One X2 has IPX8 weather sealing (waterproof up to 33ft), weighs 5.25 oz (149g), and measures 1.82 x 4.45 x 1.17 inches (46 x 113 x 30mm). The One X2 has a shutter button and a large, circular touchscreen on its front interface. The touchscreen allows the user to navigate and adjust the camera’s settings and serves as a viewfinder. That is, you can see what you’re recording, and playback recorded clips. This is a nice advantage over the Theta Z1, which requires you to use the Ricoh Theta smartphone app

Camera System 

The Ricoh Theta Z1 51GB has a bigger build most likely due to its more advanced camera system. The camera is equipped with two, 1-inch back-illuminated CMOS sensors. The large, 23MP sensors help the Theta Z1 deliver crisp, high-resolution visuals. Additionally, the camera offers multiple apertures (2.1, 3.5, 5.6), and a flexible ISO range of 80-6400 for both stills and video. The Theta Z1 also offers better flexibility with exposure compensation and white balance. 

The Insta360 One X2 uses two, smaller 1/2.3-inch Sony CMOS sensors, and offers a single aperture stop (2), and smaller ISO range (100-3200). However, the camera does allow you to shoot in either 360° mode, or simply use one lens at a time for ultra-wide panoramic stills and video (Pano mode). The camera also supports both H.264 and H.265 video encoding. 

Both cameras can shoot in RAW (DNG format), however only the Theta Z1 can also export its stills as JPEGs, and its 360° videos as MP4s. The One X2 exports still images in the INSP format, and 360° videos in the INSV format, requiring you to use the Insta360 smartphone app or Insta360 Studio software to open and edit them.  

Image Quality

The Ricoh Theta Z1 51GB offers superior still image quality. The camera captures images with a 6720 x 3360 resolution, versus 6080 x 3040 for the Insta360 One X2. It’s also worth noting that the Theta Z1 uses the standard aspect ratio for still photography, 3:2. The One X2 uses 2:1 for its 360° images, a similar aspect ratio to the average smartphone camera.

Video is a different story. The Theta Z1 offers two resolution options: 4K (3840×1920) and 2K (1920×960). While 4K generally means a resolution of either 3840 x 2060 or 4096 x 2160, it technically refers to any resolution with approximately 4000 pixels on the horizontal axis.   

Meanwhile, the Insta360 One X2 captures video with a resolution up to 5.7K. Additionally, it has a video bitrate of 100Mbps, nearly twice the 56Mbps bitrate of the Theta Z1. A higher bitrate means more detail is processed in the image. As a result, despite having a smaller sensor, the larger resolution and bitrate mean you’ll get a higher-quality video output from the Insta360 One X2. 

Sound  

Both cameras offer 4 channel sound recording, with 2 microphones on each side of the camera. This allows them to capture a larger, 360° soundscape to match the recorded visuals.  

Storage 

The original Ricoh Theta Z1 was released in May 2019 with 19GB of internal storage. After selling out internationally in February of this year, Ricoh launched a new version of the camera with 51GB of internal storage. The camera can now store over 6000 JPEG images at a time, or approximately 110 minutes of 4K video.  

The Insta360 One X2 uses a microSD card for storage. Insta360 advises it should be a UHS-I V30 MicroSDXC or MicroSDUC. We recommend the SanDisk Extreme PRO UHS-I V30 MicroSDXC, which is available in 64GB, 128GB, and 256GB sizes. It’s also good practice to format the card when you first insert it into the camera, to ensure its optimized to record for the One X2.  

Accessories 

Both cameras come with a soft carry case and USB-A to USB-C charging cable. While not included with either model, we recommend investing in a lens guard or protective filter. Due to the bulbous nature of the lenses on both models, you should never place either camera lens-down on a hard surface, as it will likely scratch or damage the lens. You also shouldn’t use a tripod or monopod that will easily fall or blow over. 

For the Ricoh Theta Z1 51GB, we recommend the Ricoh TL-2 lens cap and the Ricoh TD-1 monopod. For the Insta360 One X2, we recommend the Sticky Lens Guards and the Bullet Time Tripod Handle, which doubles as a selfie stick.  

Insta360 also manufactures several other cool accessories to pair with the One X2. These include the Invisible Selfie Stick, which digitally removes itself from your photos and videos, and the Bullet Time Cord, which allows you to swing the One X2 on a 43-inch retractable cord. 

Spec Comparison 

The chart below shows a side-by-side comparison of the technical specifications of the Ricoh Theta Z1 51GB vs Insta360 One X2.

Ricoh Theta Z1 51GBInsta360 ONE X2
Price$1,046.95$429.99
Sensor Size2 x 1.0-Inch Back-Illuminated CMOS Sensors2 x 1/2.3-Inch Sony CMOS Sensors
Lenses22
Aperture Range2.1, 3.5, 5.62
Still Image Resolution and Aspect Ratio6720x3360 (3:2)360: 6080x3040 (2:1)
Pano: 4320x1440 (3:1)
Video Resolution & Frame Rate4K (3840x1920): 29.97fps
2K (1920x960): 29.97fps
360:
5.7K: 30fps, 25fps, 24fps
4K: 50fps, 30fps
3K: 100fps

Wide Angle (Steady Cam Mode):
2560x1440: 50fps, 30fps
1920x1080: 50fps, 30fps
Video EncodingH.264H.264, H.265
Video Bit Rate4K (3840x1920): 56Mbps
2K (1920x960): 16Mbps
100Mbps
File FormatStill image: RAW(DNG), JPEG(Exif Ver2.3)

Video: MP4 (Image: MPEG-4 AVC/H.264, Audio: AAC-LC (mono) + Linear PCM (4ch spatial audio))
Live streaming: Image: H.264, Audio: Linear PCM(4ch)
Still image: INSP (can be exported via mobile app or desktop Studio), RAW (DNG, must be edited on desktop)

Video:
Steady Cam: MP4
360: INSV
Exposure CompensationStill image/Video: Manual compensation(-2.0 to +2.0 EV, 1/3 EV steps)±4EV
ISOStill image/video: (Auto) ISO 80 to 6400 (Can set upper limit) ISO 200 to 6400 (Manual mode) ISO 80 to 6400 Live streaming: ISO 80 to 6400Auto, 100-3200
White BalanceStill image/Video: Auto, Outdoor, Shade, Cloudy, Incandescent light 1, Incandescent light 2, Daylight color fluorescent light, Natural white fluorescent light, White fluorescent light, Light bulb color fluorescent light, Color temperature settings (2500 to 10000 K) Live streaming: AutoAuto, 2700K, 4000K, 5000K, 6500K, 7500K
Exposure Control ModesProgram AE, Aperture priority AE, Shutter priority AE, ISO priority AE, ManualPhoto: Auto, Manual (Shutter 1/8000s-120s, ISO 100-3200), Shutter Priority (1/8000s-1s), ISO Priority (100-3200), Isolated Exposure Video: Auto, Manual (Shutter 1/8000s-1/30s, ISO 100-3200), Shutter Priority (1/8000s-1/30s), ISO Priority (100-3200), Isolated Exposure
Microphone4-Channel Microphone4-Channel Microphone
Storage51GB Internal Storage

Still image:
RAW+: Approx. 900 photos
JPEG: Approx. 6350 photos

Video (time per recording):
4K: Max. 5 minutes
2K: 25 minutes

Video (total recording time):
4K, H.264: approx. 110 minutes
2K, H.264: approx. 360 minutes
UHS-I V30 speed class, exFAT format MicroSD cards with a max storage of 1TB are recommended.
USBType-C, 3.0Type-C, 2.0

Note: This version only supports wired connection to Android devices (via Micro-USB or Type-C). It does not support wired connection to iOS devices. Full wireless support is available for both iOS and Android.
Bluetooth Version4.24.2
Wi-Fi802.11 a/b/g/n/ac (2.4GHz/5GHz)802.11 a/b/g/n/ac (2.4GHz/5GHz)
Battery LifeStill image: Approx. 300 photos Video: Approx. 60 minutesVideo (5.7K at 30fps): 80 minutes
Usage Temperature Range32°F to 104°F (0°C - 40°C)-4°F to 104°F (-20℃ to 40℃)
Weight6.42 oz (182g)5.25 oz (149g)
Dimensions (W x H x D)1.89 x 5.22 x 1.17 Inches1.82 x 4.45 x 1.17 Inches

The Verdict 

Ricoh Theta Z1 51GB vs Insta360 One X2

Housing a superior camera system, and capable of capturing exceptionally high-definition stills, the Ricoh Theta Z1 51GB is certainly worth its $1,046.95 price tag. It’s a great option for professionals, such as real estate photographers that need high-quality 360° images for a virtual property tour. 

On the other hand, the Insta360 One X2 offers a superior video performance. With a smaller build and smaller price tag of $429.99, the waterproof camera is clearly targeted at a wider consumer market. Whether you’re using it professionally or to record your next vacation, the One X2 makes it easy to capture high-definition 360° or wide-angle video. 

Concluding our Ricoh Theta Z1 51GB vs Insta360 One X2 comparison, we hope it’s clear which 360° camera is better suited to your needs. Of course, given their similarly impressive capabilities, we’re confident you’ll be happy with either one.

Everything You Need To Know About Lens Filters

Everything You Need to Know About Lens Filters
A 77mm NiSi HUC circular polarizing filter | Courtesy of NiSi

A camera lens filter is a commonly used photography and cinematography accessory. While lens filters initially served a singular purpose – to filter out ultraviolet light – modern filters serve a diverse range of applications. We’ve broken down everything you need to know, including the different types of filters and when and where to use them. 

What is a Lens Filter?

Different filters yield different effects. However, the primary purpose of all lens filters is to alter the transmission of light through the lens.

Technically speaking, light is a type of electromagnetic radiation. Electromagnetic radiation travels in waves of varying frequencies, spanning a range called the electromagnetic spectrum.

Electromagnetic Spectrum
The electromagnetic spectrum | Courtesy of NASA

The distance between waves (called a wavelength) at certain points along the spectrum indicates different types of radiation. For example, visible light wavelengths are typically between 400 and 700 nanometers. Other types of light, such as ultraviolet (UV) and infrared (IR), have shorter and longer wavelengths respectively. 

In the early days of photography, it was discovered that film was sensitive to UV light. While imperceptible to the human eye, UV light would add haziness to photos captured on black & white film, and a blueish hue to color film photos. To combat these effects, filters made of transparent materials such as glass and resin were designed to cover the front of lenses and prevent light with UV wavelengths from entering the camera and being exposed to the film.

Nowadays, UV filters are less critical. Film stock is created with less sensitivity, digital cameras have UV-filtration built into their sensors, and modern lenses feature front element coatings that also filter UV light. Not to mention the wondrous things that can be done to an image using editing software like Lightroom.

UV filters are still used, though primarily as a means of protecting the lens, rather than for the purposes of light filtration. Other types of lens filters have also been developed and are regularly utilized by amateur and professional photographers and filmmakers. These include polarizing filters, neutral density filters, color filters, light pollution filters, and others.

Lens Filter Size & Quality

Nisi Lens Filters
Courtesy of NiSi

Different types of filters serve different applications. We’ve broken them down below, but first, let’s review a few things to keep in mind before you buy. 

Quality 

We recommend strictly investing in high quality lens filters.  Because the filter is placed over your lens, there is a significant risk of image interference. A poor-quality lens filter, regardless of type, may incidentally cause lens flare or image distortion.

Reputable filter brands such as NiSi exclusively use high quality optical glass for their filters. This ensures the filter acts like an extension of your lens rather than a shield, reducing the risk of distortion or flare. With a standard thickness of just 2mm, their photography filters also pose less chance of vignetting or reducing sharpness. Additionally, all their filters feature a coating that keep reflectivity low and make them easier to clean.

Size 

Lenses come in different shapes and sizes, so lens filters do too. There are circular filters that screw onto the lens, as well as square and rectangular filters that require an external holder to mount them to the lens. 

Most lenses have a filter thread around the circumference of their front element, allowing circular filters with the same diameter to be screwed on and attached. You may have noticed ‘filter size’ as a technical specification listed in the marketing material for most lenses. For example, the Sony 24-70mm F/2.8 GM filter size is 82mm. This means it should only be fitted with 82mm lens filters.

The most common circular filter sizes are 49mm, 55mm, 62mm, 67mm, 72mm, 77mm, and 82mm.  However, these are certainly not the only options. Given the variation in lens size and shape, if you own multiple lenses, it’s likely you will require filters of multiple different sizes.

Lens Filter Types

While new kinds of filters are still being developed, we’ve broken down seven of the most common lens filters below.

UV Filters 

NiSi 82mm Cut-395 UV Filter
NiSi 82mm Cut-395 UV Filter | Courtesy of NiSi

The OG lens filter, designed to prevent ultraviolet wavelengths from entering your lens. While you may still find it beneficial to use a UV filter if you shoot on film, digital sensors and modern lens coatings have essentially negated UV filters. Today, UV filters are primarily used as a means of protecting your lens (see protection filters below). 

UV filters should not be confused with UV Pass filters, which serve the opposite purpose. They permit UV light rays to enter the lens, while blocking visible and infrared light, in order to produce uniquely colored imagery. An IR pass filter offers the same function, but for infrared light.

Protection Filters 

Protection filters are exactly what they sound like. They’re designed to protect your lens from scratches, fingerprints, water, dust, sand, and other contaminants they may be exposed to while in use. While many photographers use UV filters, there are protection filters that don’t filter the light, strictly serving as a barrier between your lens and the world. 

There is rigorous debate in the photography community over the usefulness of protection filters. Some argue the risk to image quality isn’t worth the protection the filter offers. Others counter that only inferior lens filters disrupt image quality, while a high quality protection filter prevents permanent damage, another threat to overall image quality. 

Some photographers prefer to use a lens hood to protect their lens without the risk of distortion or flare. However, a lens hood cannot protect the lens from contaminants the same way a protection filter can.

Ultimately, it’s a question of personal preference. While using a lens filter can impact the quality of your imagery, investing in a high quality brand like NiSi greatly mitigates the risk of distortion and lens flare.

Polarizing Filters 

Images captured with and without a NiSi CPL circular polarizing filter | Courtesy of NiSi

Polarizing lens filters are the most used filters after UV/protection filters. Particularly popular with landscape photographers, they serve three key purposes: to reduce lens flare, increase color saturation, and remove reflection from non-metallic surfaces. 

Let’s briefly breakdown how a polarizing filter works. Light travels in all directions. When waves of light hit a flat, reflective surface, they tend to reflect in a single, concentrated direction, producing a glare effect. For example, imagine a lake on a bright day. The water is reflecting a harsh, white light that’s hard to look at. This is polarized light.

A polarizer filter features a layer of gel sandwiched between two layers of glass. The nanostructure of the gel allows it to absorb light flowing in a specific direction, while enabling other light to enter the lens.  Rotating the filter allows you to dictate what angle of light is absorbed. The result is that instead of seeing a harsh glare on our hypothetical lake, when viewed through a polarizer filter at the correct angle, the lake would appear as it’s natural, blue color. 

The unique filtration of a polarizer translates to enhanced image quality, especially when photographing outdoors. There’s less risk of lens flare, colors are more vivid and saturated, and non-metallic surfaces display their natural tones instead of reflective glare. These effects are hard to produce after the fact using editing software, which is why polarizing filters remain a popular accessory for photographers.

The color tone of a polarized image generally leans a little warm, though this varies depending on the brand and filter you use. For example, NiSi manufactures multiple types of circular polarizer filters, including a polarizer optimized for landscape photography and a  true color neutral polarizer.

Neutral Density Filters

Photo captured using NiSi ND64 and NiSi CPL filters
Photo captured using NiSi ND64 Neutral Density Filter with NiSi CPL Circular Polarizing Filter | Courtesy of NiSi

Neutral density filters block light traveling in all directions from entering the lens. ND filters come in a range of intensities, depending on how much light you want to prevent from entering your lens. 

Photographers typically control how much light enters the lens using the aperture, ISO, and shutter speed settings on their camera – also known as the exposure triangle. However, in harsh light conditions, it can be hard to find the perfect equilibrium between the three settings to produce a high quality image. A ND filter provides photographers with a fourth means of controlling the exposure. 

For example, imagine a portrait photographer taking photos outside on a sunny day. They want a sharp, close-up shot of their subject’s face with a creamy, bokeh-filled background. The easiest way to generate this effect is to use a wide aperture, such as f/2.8. However, because it’s bright outside, a f/2.8 aperture would allow too much light to enter the lens, resulting in an over-exposed photograph. 

When utilizing a ND filter, less light will enter the lens. This allows the photographer to use a wide aperture and achieve their intended effect. Similarly, when shooting a long exposure photograph, which requires a slow shutter speed, a ND filter again allows less light to enter the lens, preventing an over-exposed image.

The density of the filter is measured in stops, and dictates how much light enters the lens.  For example, a 10-stop filter blocks more light than a 6-stop filter. Variable ND filters offer a range of light control stops, adjusted by rotating the filter. 

Graduated Neutral Density Filter 

NiSi Hard Nano IR GND8 (0.9) - 3-Stop Hard Graduated Neutral Density Filter
NiSi Nano IR GND8 (0.9) – 3-Stop Hard Graduated Neutral Density Filter | Courtesy of NiSi

A graduated neutral density filter offers a partial light filtration. The density varies over the area of the filter. This allows you to block light from a specific portion of your frame. 

For example, imagine photographing the beach on a clear day with the sun in frame. The sun will emanate a bright, uneven amount of light in your image. Adjusting your exposure settings to reduce the brightness of the sun will make the ocean and beach look dark. Alternatively, adjusting the settings for a nice shot of the beach means the sun casts a bright, distracting light at the top of the image. 

Utilizing a graduated ND filter allows you to maintain optimal settings for a photo of the beach, while diluting enough of the sun’s light that it doesn’t disrupt the rest of the image. 

Graduated ND filters come in multiple variations. For example, NiSi offers four different graduations for their rectangular Nano IR GND filter: hard, medium, soft, and reverse. The reverse filter offers a clear top and bottom, and dense middle.

Color Filters 

Leica E49 color filters for pairing with the Q2 Monochrom
Leica E49 color filters for pairing with the Q2 Monochrom | Courtesy of Leica

Color lens filters are an easy way to add a unique color profile to your photos before you even hit the shutter. While color grading can also be done quite effectively in post-production, a color filter arguably produces a more natural tone. Of course, the downside is that you’re somewhat locked into the color you choose.

Color filters are also used for black & white photography, which might sound contradictory. However, utilizing a color filter alters the tone of certain colors, helping them to stand out from similar colors once the photo is in black & white. For example, an orange color filter brings out red and yellowish hues. When utilized for a black & white portrait, it will make your subject’s skin look brighter and smoother, especially if contrasted with a dark or cool colored background. 

Leica offers an orange, green, and yellow filter for pairing with the Q2 Monochrom, their 47MP black & white mirrorless camera.

Light Pollution Filters

Photos by Brendan van Son | Courtesy of NiSi

You guessed it; light pollution filters filter out light pollution. If you’re wondering what that looks like in a photograph, it’s the hazy, smog-like quality you may have seen in photos of a skyline or urban area taken at night. Additionally, it also reduces clarity in photos of the night sky, aka astrophotography.

Light pollution filters like the NiSi Natural Night filter are specifically designed to filter out wavelengths from common sources of light pollution, such as streetlamps.  The end result is clearer imagery with stronger contrast and definition.

Square & Rectangular Filters

While most photographers opt to use circular filters that screw on to their lens, square and rectangular-shaped filters are also available. They are typically attached to the lens using a holder that mounts on the front of the lens, like the NiSi P49 for lenses with a 49mm thread size.

Square and rectangular filters are arguably more versatile. Using low-cost adaptor rings, you can mount the holder (and thus, all your square filters) to multiple lenses with varying filter thread sizes. Additionally, holders like the NiSi P49 can stack multiple filters for simultaneous use.

Square filters are also well suited for use with ultra-wide-angle lenses. The front element of these lenses is often quite curved, resulting in vignetting when used with a circular filter. A square lens extends fully over the edges of the front element, reducing this risk. 

Special Effect Filters

Photo captured with NiSi Cinema Rotating 82mm Allure Streak BLUE lens filter
Photo captured with NiSi Cinema Rotating 82mm Allure Streak BLUE lens filter | Courtesy of NiSi

There are numerous other types of lens filters that can be used to control how light flows through your lens into the camera. This includes filters that can diffuse the light to produce a cinematic, halation effect. 

The Unfiltered Truth

Lens filters are an important accessory for photographers, videographers, and cinematographers. Just like cameras and lenses, you get what you pay for. A low-cost, low-quality lens filter can have detrimental effects on your photos, while professional-grade filters produced by brands like NiSi can be used effectively to enhance your imagery.

We hope this guide has given you an idea of the different types of filters available, and the circumstances and styles that demand their use. If you still have questions about lens filters, let us know in the comments below.

The ZEISS Look – Why Every Photographer Should Try a ZEISS Lens

The ZEISS Look - Why Every Photographer Should Try a ZEISS Lens
The ZEISS Batis line of lenses for Sony E-mount cameras. | Courtesy of ZEISS

Every modern camera lens owes something to ZEISS. The optics brand was an early pioneer of lens technology, thanks in no small part to its eponymous founder, Carl Zeiss, a 19th Century optician and businessman. Today, they continue to manufacture and sell high-quality lenses that offer the distinct ZEISS look; a unique, unrivaled image quality defined by its sharpness, color, and contrast. 

Photographers that are seeking to identify their own unique visual style should experiment with lenses from the various leading brands, especially ZEISS. You may find that the ZEISS look is more conducive to the visual style you’re trying to produce in your photos than the image quality offered by a competing brand. 

We’ve broken down what defines the ZEISS look below, and how to determine which ZEISS lens may be right for you.

A Brief History of ZEISS 

Carl Zeiss
Carl Zeiss, circa 1880 | Courtesy of ZEISS

Carl Zeiss was born in Weimar, Germany in 1816. Growing up amidst the industrial revolution, he spent much of his early life studying machinery and mechanical engineering. In 1846, he opened his own workshop, where he eventually started making his own microscopes.

By 1866, the workshop had sold over 1,000 microscopes, and Zeiss was eager to ensure the longevity of its success. He hired Ernst Abbe, a physicist, to help the workshop produce better quality microscopes. Abbe’s scientific approach led him to make multiple, major contributions to the field of optical science, and kept the Zeiss workshop at the forefront of innovation.

By the time of Carl Zeiss’ death in 1888, his once-small workshop had become a world leading manufacturer of microscopes and optical glass. The company began manufacturing camera lenses and binoculars in the 1890s, and continued to make lasting contributions to the field of optical science. 

In 1935, ZEISS was the first manufacturer to invent and apply an anti-reflective coating to the front element of their lenses to prevent flare and ghosting. In 1969, they supplied NASA with lenses specifically designed for use in space in order to capture man’s first moments on the moon. 

More recently, in 1996, ZEISS partnered with Sony. The inclusion of their glass designs in many of Sony’s camera, lens, and smartphone products since then has helped ZEISS garner widespread recognition as a manufacturer of high-quality optics.

Today, the ZEISS brand continues to be defined by a focus on innovation and technical advancement. In 2020, 13% of the company’s annual $6.3 billion revenue was invested in research and development.  

The ZEISS Look

ZEISS’s legacy of constant innovation has ensured their lenses continue to be of the highest quality. As a result, it’s not unusual to encounter a photographer that primarily shoots on ZEISS lenses.  Of course, they also offer a tangible difference – the ZEISS look. 

As mentioned, the ZEISS look is the distinct image quality offered by their lenses, defined by its color, sharpness, and contrast. We’ve broken down how each of these qualities contribute to the ZEISS look below.

Color Rendition

Color rendition is an integral element of the ZEISS look
Courtesy of ZEISS

The color rendition of a photograph can vary depending on the lens, and lens brand, you use to capture the image. For example, a photo captured on a Fujifilm lens may have slightly cooler tones; a Canon lens, a little warmer. 

By comparison, the ZEISS color rendition is relatively neutral. That isn’t to say the resulting imagery is bland; on the contrary, ZEISS lenses reproduce colors that look and feel natural and realistic.

This is primarily thanks to the high contrast offered by a ZEISS lens (more on this below), in addition to the anti-reflective T* Coating that’s standard on every lens. The coating enhances the transmission of light through the lens, reducing flare and ghosting, and enabling it to achieve a remarkable level of clarity in each image. 

Sharpness

Sharpness is an integral element of the ZEISS look
Courtesy of ZEISS

In addition to superb color reproduction, the clarity and high contrast of a ZEISS lens also helps achieve ultra-sharp imagery. The focus mechanism that ZEISS lenses use also plays a part. 

ZEISS is unique in that they are one of a few major lens brands that still produces manual focus lenses. That is, lenses that cannot be autofocused. This isn’t controversial; many professional photographers prefer to exclusively use manual focus, ensuring they are in full creative control over their imagery.

Additionally, autofocusing lenses use a different mechanism that’s arguably less accurate. Bertram Hönlinger, an optics expert at ZEISS, explains: 

“With autofocus lenses it is important that the parts are light so the motor can work fast. With manual focus lenses, we have a lot more design freedom in that regard. That means we can use more robust, long-lasting materials such as metal for the internal lens movements.”

The helicoid mechanism inside ZEISS lenses affords the photographer an unrivaled level of control. It makes it far easier to select the precise, accurate focus point, allowing you to capture incredibly crisp, clear imagery. 

High Micro Contrast – The ZEISS ‘Pop’

High micro contrast is an integral element of the ZEISS look
Courtesy of ZEISS

High micro contrast is perhaps the defining element of the ZEISS look.

Contrast is an important parameter for measuring image quality. It refers to the ratio of light and dark colors in an image, and thus plays a significant role in giving the image definition. Micro contrast simply refers to the level of contrast over the entire image field. A photo with high micro contrast has greater tonal variation over the entire image, down to the individual pixels.

High micro contrast translates to better definition and depth in your imagery, ultimately helping your subject stand out from other elements in the image. This captivating visual quality is also called 3D pop, or the ZEISS pop.

High micro contrast also helps ZEISS lenses achieve better color rendition and makes focusing easier. Even ZEISS autofocus lenses offer superior focusing precision thanks to the high micro contrast generated by the lens.

The overall combination of neutral colors, sharpness, and high micro contrast means that images captured on a ZEISS lens have a distinct look. At the very least, this should interest photographers that are eager to experiment with how these qualities complement their own visual style. 

Which ZEISS Lens Should I Try? 

ZEISS lenses have a sophisticated optical construction.
The optical construction of ZEISS Batis Lenses | Courtesy of ZEISS

ZEISS manufactures a diverse range of camera lenses, divided into two collections: photography and cinematography. Within the photography collection, there are seven product lines: Batis, Loxia, Touit, Milvus, Otus, Classic, and ZM. 

The Batis, Loxia, and Touit lines are designed for mirrorless camera systems. The Batis line features five, full-frame, autofocus prime lenses designed for use with Sony E-mount cameras. Each Batis lens is constructed with aspheric elements and special glass with anomalous partial dispersion. The result is fantastic, crisp imagery with the distinctive ZEISS look. 

Like the Batis line, Loxia lenses are also full-frame primes designed for use with Sony E-mount cameras. However, they are manual focus lenses. Loxia lenses also feature an aperture ring, which can be ‘de-clicked’ for smooth adjustment when shooting video. 

The three Touit lenses are designed for APS-C format mirrorless cameras and are available in Sony E-mount and Fujifilm X-mount. Meanwhile, the Milvus, Otus, and Classic lines are all full-frame, manual focus lenses designed for SLR cameras. Finally, the ZM line features ten full-frame, manual focus lenses for rangefinder cameras (Leica M-mount). If you also shoot video, the Loxia, Milvus, and Otus lenses are optimized for both still and motion capture.

Like any lens brand, there is some variation in price across the range, depending on the focal length and construction of the lens. However, there is an overall quality to ZEISS lenses that means you are unlikely to be disappointed, whichever lens you choose. 

New York City based photographers are invited to try using a ZEISS lens at our upcoming photowalk event in Prospect Park, Brooklyn, on Wednesday June 26, 2021. You can learn more about the event here

Mastering Maternity Photography with Alexa Klorman

Mastering Maternity Photography with Alexa Klorman
Photo by Alexa Klorman

Alexa Klorman, owner of Alexa Drew Photography, specializes in family, newborn, and maternity photography. While she also dabbles in wedding and event photography, like most photographers, her event line item zeroed out last year due to the COVID-19 pandemic. 

Klorman is based in New York City, so when the pandemic hit, she was forced to temporarily close her business.  Once the curve of cases started to flatten, she began working on a plan to re-open her business. This proved difficult, as the pandemic introduced a plethora of new reasons for clients to feel anxious about a photoshoot.  

Klorman embraced the challenge. Working with newborns – and new parents – on a daily basis for the better half of a decade, Klorman has mastered the art of making people feel comfortable on camera. We spoke with her last week about her career, and how she cultivates a safe, fun environment for every shoot. 

Getting Started 

Photographer Alexa Klorman specializes in newborn, family, and maternity photography
Alexa Klorman

In 2010, Klorman was fresh out of college and working for a media agency. Eager to pay off her student loans, Klorman started moonlighting as a photographer as a means of generating additional income. She’d learned the basics of photography from her high school darkroom before eventually teaching herself to shoot digital.

Klorman got started by asking a coworker if she could photograph her baby. Klorman offered to do it for free in exchange for using the photos as the foundation for an online portfolio website. Her coworker agreed, and the rest is history.

“I never gave a free session after that,” Klorman says with a smile. She continued working at the media agency for a few years, before transitioning to a part-time position, and eventually leaving to focus full-time on her photography business. 

Finding a Niche

A sample of Alexa Klorman's maternity photography work
Photo by Alexa Klorman

Klorman naturally gravitated to family and maternity photography. She loves working with families, especially children and babies, having spent a lot of time babysitting in high school, in addition to attending camps and working as a camp counselor.

“Being around children is always something that’s just been part of my life, so it was something that I was very comfortable with professionally,” Klorman says. She points out most clients want a photographer that knows how to work with children. “It has to be someone who has all the tricks up their sleeves and knows how to engage your children naturally.”

It was also important to Klorman that she find a niche that matched her lifestyle. She was hesitant to pursue wedding or event photography exclusively, as she didn’t want to spend every weekend working.

“I figured newborns would be a nice way to go because you could schedule during the week.” 

This strategy paid off. Today, Klorman schedules newborn and maternity shoots during the week, although still finds herself working weekends for family shoots and the occasional wedding. However, it has allowed her to be more selective about the work she accepts.

Specializing in family, newborn, and maternity photography, Klorman is also well positioned to establish long-term relationships with her clients. She offers a joint maternity and newborn package for clients that anticipate they’ll want another photoshoot once their child is born. Klorman is obviously doing something right, as today almost all her new customers come courtesy of client referrals. 

Client Relations & Pipeline 

Klorman stresses how important it is to be transparent with clients about your style, services, and pricing. She finds maintaining an up-to-date online presence is the best way to guarantee a new client knows what to expect before they reach out. 

“Because I have a lot of photos that are public on my social media, I find that generally when I’m receiving an inquiry, it’s from someone who has a general sense of what the style is,” Klorman says. “So, they’re not coming in blind and needing a lot of information about what my photos looks like because there’s so much that they could see, whether it’s on my website or my social media.”

Of course, Klorman still fields the occasional inquiry that doesn’t fit with her look. For example, when a prospective client wants to incorporate props into their shoot, such as a basket. Klorman gently advises that she’s not the photographer they want to hire.

“It’s just not me, and I wouldn’t want a client to do a photo shoot with me and then be disappointed that I didn’t offer that type of photo,” Klorman says. “I don’t run into that issue a lot because I’m really transparent about what I offer.”

Making People Feel Comfortable

A sample of Alexa Klorman's family photography work.
Photo by Alexa Klorman

Klorman says the first thing a photographer should do is “make sure everyone knows what to do with their hands.”

“When I’m in front of the camera, I’m always like, ‘where do my hands go?’ It’s really awkward,” Klorman says. Additionally, she says most people are unsure where to put their weight.

“I think giving people guidance on how to pose is helpful because then they will be at ease knowing that you are being mindful of that,” Klorman says. “Instead of just standing and posing for the camera, they’ll know, okay, my photographer is being mindful of how I am going to look in this photo. And that, I find, eases people.”

Klorman has a game plan going into every shoot about the suggestions she’ll make, but acknowledges that “every family is different.”

“I work with clients where the family is mom and dad, mom and mom, dad and dad, just mom, just dad,” Klorman says, explaining that every dynamic demands different direction. “It takes a few minutes to get the vibe, and I’ll adjust my approach based on what the family is like.”

Most importantly, Klorman tries to be a friend more than a photographer.

“Being conversational and having a sense of humor will create a calming environment for someone to take photos with.”

COVID-19 Policy Sheet

As Klorman prepared to re-open her business during the pandemic, she knew it would be even more difficult to make her clients feel comfortable during a shoot. Klorman opted to implement strict protocols to ensure the safety of her and her clients; a decision that ultimately paid off.

“I had a couple of clients find me because they were specifically looking for photographers who had listed out what their policies were,” Klorman says. While she also had to turn down some jobs, Klorman says having firm rules ultimately benefited her business. 

“If you have a policy sheet that you’re living by, and that you made public and made everyone aware of, I think that it made everyone feel a little bit safer working with you.”

The Dress Code

A sample of Alexa Klorman's newborn photography work.
Photo by Alexa Klorman

Klorman says another source of anxiety for some clients is what they should wear. Her advice is simple: “If you feel good in it, that’s what you should be wearing.”

“I provide tips and suggestions for how to dress, what type of fabric to wear in order to make a family feel like they’re looking their best,” Klorman says. She particularly enjoys working with expectant mothers to make them feel comfortable.

“Even though your body might look and feel different, it’s still beautiful, and it’s still serving a really beautiful, important purpose,” Klorman tells expectant mothers. She generally recommends silky materials, or loose cotton, with light colors such as pale pink or blue. However, these are always just suggestions.   

“I always say, don’t try to push yourself to wear something that doesn’t feel comfortable, because then you’re not going to look comfortable.” 

For men, Klorman’s go-to advice is to dress as if they are hosting friends for dinner. 

“You’re not going to wear a suit because you’re in your apartment, but you’re not going to wear your sweatpants,” Klorman explains. “Let’s find that happy medium of an elevated casual look that is appropriate in your home but is something that’s nice and is going to photograph well.”  

Working with Children

A sample of Alexa Klorman's family photography work.
Photo by Alexa Klorman

Working with children is an integral part of Klorman’s work. She says many of her clients are worried about how their child will behave and are looking for a photographer who “has a strategy and a specific approach.” 

“Little kids can get your vibe from a mile away. You have to show up ready to have fun and ready to run around,” Klorman says. “You have to figure out how to get smiles out of that kid and that is definitely… It can be challenging, but it’s also so satisfying when you make it work.”

Klorman has developed a playbook of strategies for engaging kids that she draws on when necessary. 

“One thing that a child will find fun at a shoot, a different child at the next shoot might not really be interested in, so you have to come up with a whole other list of tricks to try to get them to be into it and having fun at the shoot,” Klorman says.

“It’s your responsibility to make sure that you still get the photos that you promised the client. But it’s a fun challenge.”

Production & Post-Production 

Klorman shoots on a Nikon D750, an FX-format (full-frame) DSLR. She primarily uses three lenses; a Nikon Nikkor 24-70mm F2.8, a Sigma 50mm F1.4 HSM Art, and a Nikkor 85mm F1.4.  Klorman also carries a Nikon SB900 flash for indoor shoots. In addition to her camera gear, Klorman brings a backdrop, along with some swaddles, headbands, and onesies for newborn shoots.

When it comes to choosing a location, Klorman finds most clients want to shoot inside their home or have a specific location in mind that’s sentimental to them. Klorman also has a list of locations she can recommend.

“If it’s a new location and I’ve never shot it before, I’ll usually just arrive 15 minutes early to walk through, and then I’ll mentally create a list of three spots that I want to make sure we hit during the shoot.” 

Following a shoot, Klorman edits the photos in Lightroom in both color and black and white. Then she uploads the photos to a private gallery link via Zenfolio, which also powers her website. 

Creating an Experience

A sample of Alexa Klorman's newborn photography work.
Photo by Alexa Klorman

While Klorman provides a very tangible service, she uses less-concrete metrics to measure her success.  Namely, whether the client had a fun, memorable experience. 

“It’s your job to make someone feel like they’re having a good time and create an environment where someone is actually enjoying themselves,” Klorman says. “And then the photos will speak for themselves.”

Her “favorite, favorite, favorite” moment happens at the end of most shoots. When Klorman turns off her camera, and a person who was initially not thrilled to be there says, ‘that was a lot more fun than I thought it was going to be.’ 

“That’s what it should be. It’s just you hanging out with your family, playing and kissing and tickling and running around, and smiling and having a great time, and having someone capture photos. It should be really fun. It shouldn’t be torturous.” 

___

We hope you enjoyed our interview with Alexa Klorman, owner of Alexa Drew Photography. Her website is alexadrewphotography.com and her Instagram handle is @alexadrewphotography

Sigma 85mm F1.4 Art vs Sony 85mm F1.4 GM Lens Comparison

Sigma 85mm F1.4 Art vs Sony 85mm F1.4 GM

Sony E-mount shooters in the market for an 85mm prime lens face a difficult choice.  The Sony 85mm F1.4 GM or the Sigma 85mm F1.4 DG DN Art. Both lenses have been celebrated for their build and performance capabilities. However, if you’re wondering if one of these models is superior to the other, you’re not the only one. We decided to compare the Sigma 85mm F1.4 Art vs Sony 85mm F11.4 GM to find out which lens is best. 


The Backstory 


The Brands 


Over the last ten years, Sony has established themselves as one of the leading manufacturers of full frame, mirrorless cameras. For this reason, some photographers prefer to exclusively pair their Sony camera with Sony lenses. After all, who would be better placed to produce a lens that matches the camera’s abilities than the same manufacturer? Of course, it’s not that simple. 


Sigma is not new to the lens game. In fact, they’ve been developing high-quality lenses since the 1960s, far longer than Sony. Over the past 60 years they’ve cultivated a reputation for excellence that has seen the family-owned company become the world’s largest independent lens manufacturer.  


In recent years, both brands have released a multitude of high-powered lenses for full frame mirrorless cameras, particularly in their respective premium lens lines. That is, the Sony G Master line and the Sigma Art line.  


The Lenses


The Sony 85mm F1.4 GM lens was released in early 2016 to instant acclaim. The Sigma 85mm F1.4 HSM Art lens soon followed, although it was not immediately available in Sony E-mount or L-mount. Sigma remedied this in mid-2020 when they announced the Sigma 85mm F1.4 DG DN Art; a new, upgraded version of the lens that was specifically designed for full frame, mirrorless cameras. 


Suddenly, E-mount and L-mount shooters had a new 85mm prime lens to consider. The Sony 85mm F1.4 GM is a fantastic lens, but it was already four years old when the new Sigma model was released. However, Sony are also known for future-proofing their products. They haven’t released a new 85mm F1.4 GM lens because, frankly, they don’t need to. The lens easily competes with newer alternatives. The 85mm F1.4 GM is even one of few lenses that can keep up with the Sony a1, Sony’s new 50MP camera that boasts a 30fps continuous shooting speed. 


Suffice to say, the Sigma 85mm F1.4 Art vs Sony 85mm F11.4 GM contest has sparked rigorous debate in the photography community. By closely comparing the two lenses, we’ve identified the strengths and weaknesses of each model. We hope the comparison below helps you determine which lens is right for you. 


The Comparison


In addition to comparing the build and technical specifications of the Sigma 85mm F1.4 Art vs Sony 85mm F1.4 GM, we wanted to see how the lenses performed in the field. 85mm is an excellent focal length for portraiture, so we took the lenses to a local park for a small portrait photography shoot. We paired the lenses with a Sony a7 III.


Build


Sigma 85mm F1.4 Art vs Sony 85mm F1.4 GM Build Comparison

Each lens is housed in a durable, aluminum body sealed against dust and moisture. In addition to a focus ring and AF/MF switch, both models are equipped with a lockable lens hood, customizable AFL buttonaperture ring, and aperture click switch. Additionally, the Sigma 85mm offers an aperture lock switch, although this isn’t its only advantage. 


The Sigma 85mm F1.4 is lighter and more compact than the Sony 85mm F1.4. The Sigma lens weighs 22.2 oz (630g), versus 28.92 oz (820g) for the Sony lens. Sony’s E-mount cameras, especially the a7C, are designed to be ultra-compact, so it’s a nice advantage when the lens you’re using is equally light and small. 


The optical construction of both lenses is also impressive. The Sony 85mm F1.4 utilizes 11 glass elements in 8 groups, including 3 Extra-Low Dispersion (ED) glass elements and a single extreme aspherical (XA) element. The front element also has a Nano AR Coating for suppressing flare and ghosting. Meanwhile, the Sigma 85mm F1.4 uses 15 elements in 11 groups, with 5 Special Low Dispersion (SLD) elements and 1 aspherical element. These comparable optics ensure both lenses deliver clear, crisp visuals. 


Autofocus 


Sony cameras are known for their superior autofocus capabilities. However, any camera is limited to what the lens it’s paired with can handle. Thankfully, both the Sony and Sigma 85mm F1.4 lenses are equipped with advanced autofocusing mechanisms that allow them to keep up with Sony’s in-camera autofocus system.  


The Sony 85mm F1.4 uses an RDSSM (Ring Drive Super Sonic wave Motor) to drive its autofocus mechanism. The piezoelectric motor works in conjunction with dual sensors that detect rotation and lens group position to achieve fast, precise autofocus. The Sigma 85mm F1.4 utilizes a stepping motor for autofocus that is similarly fast and accurate.  


Testing out the lenses in the field, the difference between their autofocus performance was negligible. Both lenses worked excellently with the a7 III’s autofocus, including the Eye AF functionality.  The biggest distinction was that the Sony lens emits an audible grinding sound while autofocusing. The noise didn’t disrupt or interfere with our shoot; at worst it’s slightly irritating. But the Sigma lens was practically silent in comparison.


Image Quality 


Both the Sigma 85mm F1.4 and the Sony 85mm F1.4 yielded images of excellent quality. The portraits we captured were tack-sharp on the subject, with excellent contrast and color reproduction. Most of the images also had smooth, pleasing bokeh, courtesy of the 11-blade diaphragm of each lens. We didn’t encounter any issues with aberrations, ghosting, or flare.  


If there is any difference in terms of overall image quality output, it’s minor. We took great photos (and some not-so-great ones) using both lenses, and generally found they were easy to handle, pairing well with the a7 III. 


Price 


When it comes to price, the Sigma 85mm F1.4 DG DN Art has the advantage. The lens currently costs $1,199. That’s $600 cheaper than the Sony 85mm F1.4 GM, which is currently available for $1,798.


Spec Comparison 


Comparing the technical specs of the Sigma 85mm F1.4 Art vs Sony 85mm F11.4 GM side-by-side helps clarify the minor differences between the two lenses. 


Sony 85mm F1.4 GMSigma 85mm F1.4 DG DN Art
Price$1,798 $1,199
Size35mm Full-Frame35mm Full-Frame
MountsSony E-mountSony E-mount, L-mount
Focal Length85mm85mm
Construction11 elements in 8 groups15 elements in 11 groups
Aperture Range1.4-161.4-16
Aperture Blades1111
Minimum Focusing Distance31.4 inches (80cm)33.5 inches (85cm)
Angle of View29°28.6°
Filter Size77mm77mm
Maximum Magnification Ratio0.12x0.12x
Dimensions3.5 x 4.2 inches (89.5 x 107.5 mm)3.3 x 3.7 inches (82.8 x 94.1 mm)
Weight28.92 oz (820g)22.2 oz (630g)


The Verdict 


The Sigma 85mm F1.4 Art vs Sony 85mm F1.4 GM is a tough contest. Given that the Sigma lens closely compares to the Sony in terms of performance, while offering a smaller body and more affordable price tag, we feel it is the better value lens. However, given that both lenses offer fantastic performance capabilities housed in a sophisticated build, there is no wrong choice. Either lens would make a great addition to any E-mount or L-mount photographers camera bag.

Fujifilm GFX100S Review | Hands-On with Fujifilm’s New Medium Format Camera

The GFX100S is Fujifilm’s latest medium format mirrorless camera, a follow-up to their popular 2019 release, the GFX100. We recently had the opportunity to try out the new camera, which started shipping this week. Here’s our Fujifilm GFX100S review.

When the GFX100S was announced earlier this year, the technical specifications revealed it shares the same sensor and image processor as the GFX100. However, there were also several upgrades that immediately caught our eye. Namely, a lighter, more compact build and a significantly lower price tag. To read more about how the new camera compares to its predecessor, check out our GFX100S vs GFX100 comparison post.

As a medium format camera, the GFX100S is ideal for studio use. So, we decided to set up a mock still life photography shoot inside our studio and put the new camera to the test. 

Build

the Fujifilm GFX100S build compared to the GFX100
The GFX100S build compared to the GFX100 | Courtesy of Fujifilm

The GFX100S is remarkably smaller and lighter than most medium format cameras. The camera weighs 31.7oz (900g) when loaded with a battery and memory card, and measures approximately 5.9 x 4.1 x 3.4 inches. For comparison, the GFX100 weighs 49.4 oz (1,400g) and measures 6.15 x 6.44 x 4.05 inches when fitted with its detachable EVF.

In fact, the build of the GFX100S generally feels closer to a full frame camera than a medium format model.  New features include a built-in EVF, a more ergonomic, contoured hand grip, a PASM dial with six customizable positions, and a switch for toggling between stills and video recording. Additionally, the focus lever on the back of the camera has been updated, along with the internal firmware, to make it easier to select the right focus point. The camera also has two UHS-II SD card slots and uses a single NP-W235 battery, the same used by the X-T4.

Another reason the GFX100S is more compact than the previous model is its updated, 5 axis in-body image stabilization system. The new IBIS is 20% smaller than the system used in the GFX100 and offers up to 6 stops of compensation (instead of 5.5 on the GFX100).

The GFX100S is still stocky in comparison to powerful full frame competitors like the Sony a1 and Canon EOS R5. It’s about 5.75oz (163g) heavier, and a little larger than both models. However, that’s perhaps an unfair comparison given the GFX100S is equipped with a larger, higher resolution sensor.

Overall, the GFX100S is an impressively built camera that incorporates the ergonomic and user-friendly design features of a full frame camera while housing the powerful components of a medium format model.

Performance

The GFX100S uses a 102MP BSI-CMOS 1.7 x 1.3’’ sensor and quad-core image processor, enabling it to capture truly breathtaking visuals. The dynamic range is outstanding, resulting in an incredible level of detail in every image. Using the camera’s Pixel Shift Multi-Shot function, which combines 16 RAW files to create a single image, you can even capture a photo with a 400MP resolution.

Of course, these capabilities are consistent with the previous model. What makes the GFX100S special is how it exceeds the expectations of the GFX100 and all other medium format models.

Firstly, the new compact build and enhanced IBIS compensation makes it a lot easier to operate handheld. Sure, it’s a little heavy to carry around outside for hours on end, but it’s perfect for use inside a studio. Using the add-on metal hand grip also makes it more comfortable to handle.

Additionally, the video capabilities of the new camera are stunning. You can shoot DCI 4K video at up to 30p 4:2:0 10-bit internally, or up to 4:2:2 10-bit externally via HDMI. 10-bit F-Log or Hybrid Gamma Log (HLG) profiles are also supported internally, or 12-bit ProRes RAW externally. There are medium format cameras four times the price of the GFX100S that don’t support any kind of video recording, let alone able to shoot cinema-grade 4K footage.

The autofocus algorithm for movement tracking and face and eye detection has also been updated and improved for the GFX100S. While we primarily shot a still life set, it was clear the camera would also be a great choice for portraiture. Especially if pairing the camera with Fujifilm’s new 80mm F1.7 R WR lens.

Another cool feature is the addition of a new Film Simulation mode, Nostalgic Neg, which automatically applies a saturated, soft-toned color grade for stills and video.  

Price 

The GFX100S is available for pre-order now for $5,999.95. That makes it significantly more affordable than the GFX100 ($9,999), and slightly more affordable than the Sony a1 ($6,498). Given the camera’s impressive build and performance capabilities, this is an incredible price.

The Verdict

Concluding our Fujifilm GFX100S review, it’s clear the GFX100S is an incredible camera. High powered, easy to handle, and competitively priced, it’s already one of the best camera models released this year. If you’re in the market for a new, ultra-high resolution camera, the GFX100S is a fantastic choice.

Sigma 35mm F1.4 DG DN Art Lens Review

Sigma’s new 35mm F1.4 DG DN Art Lens is an updated version of their most popular Art lens, the Sigma 35mm F1.4 DG HSM Art. The new lens is exclusively for mirrorless cameras – more specifically, Sony E-mount and L-mount cameras. Courtesy of Sigma, we were given early access to the lens so we could put it to the test and see how it performedHere’s our Sigma 35mm F1.4 DG DN Art lens review.  

 Build 

Sigma 35mm F1.4 DG DN Art Lens
The Sigma 35mm F1.4 DG DN Art Lens

While the new model is an updated version of the Sigma 35mm F1.4 DG HSM Art lens, its build more closely resembles the Sigma 85mm F1.4 DG DN Art lens 

Like the 85mm, the new lens has an aperture ring, aperture click switch, aperture lock switch, customizable AFL button, and a focus ring and switch. Additionally, the lens has a petal-type locking lens hood with a rubber grip, and a durable, dust and splashproof aluminum build with rubber sealing around the mount. The front element also has a water and oil repellant coating. In short, it looks and feels like a high quality, premium lens. 

The new lens has a 67mm filter size, the same as the previously released E-mount and L-mount versions of the 35mm F1.4 DG HSM Art lens. It’s also considerably lighter, weighing 22.8oz (645g) versus 26.6oz (755g).  However, while lightweight in comparison to the original model, it’s still slightly heavier than the 85mm F1.4 Art lens (22.2oz/630g), and considerably heavier than the 35mm F2 Contemporary (11.5oz/325g) lens that was released earlier this year.

The optical construction of the new lens has also been updated compared to the original 35mm F1.4 Art lens.  The new model uses 15 elements in 11 groups, incorporating Special Low Dispersion (SLD) and Extraordinary Low Dispersion (ELD) elements along with one ‘F’ Low Dispersion element and two aspherical elements. The end result is a sophisticated optical performance consistent with the other, more recent lenses in the Art line. 

Performance

Photo of a goose taken using the Sigma 35mm F1.4 DG DN Art Lens
Photo captured using the Sigma 35mm F1.4 DG DN Art Lens and a Sony a7 III | Photo by Jonny Carrillo

It’s finally starting to feel like Spring in New York City, so we took the Sigma 35mm F1.4 DG DN Art lens out for a spin in Brooklyn’s Botanical Gardens. While the cherry blossoms have only just started to bloom, the colorful, floral scenery made for perfect camera fodder. We paired the new lens with a Sony a7 III.

We’ve said it before, and we’ll say it again: 35mm is perhaps the most versatile prime focal length. You can use it for almost any style. If you’re shooting portraiture, it’s a great option if you want a little more background in your frame. Alternatively, landscape photographers may use a 35mm lens when they want to capture a vast scene without visible perception distortion.

We had a great time using Sigma’s new 35mm lens to capture a variety of different styles. The lens has a minimum focusing distance of just 11.8 inches (30cm), so we could get remarkably close to a subject and still capture a tack-sharp, visually stunning photograph. Thanks to its 11-blade diaphragm and low aperture range, the lens also output smooth, round bokeh that was pleasing to the eye.

Another key feature of the new lens is an updated focusing mechanism. The new stepping motor system controls a single lens element, allowing the autofocus to be quiet, quick, and accurate. It’s not quite as responsive as the autofocus we’ve seen on some of Sony’s GM lenses, but it’s certainly reliable. We also appreciated the smooth, precise movement of the lens rings, allowing us to quickly and accurately adjust the focus and aperture while shooting. Overall, the lens performance was excellent.

Price

The new 35mm F1.4 lens is available for pre-order now for $899. That places it firmly in the medium price range, between Sigma’s 35mm F2 DG DN Contemporary lens ($639) and their 35mm F1.2 DG DN Art lens ($1,499). Given the new lens also offers a comparable build and performance to the $1,199 Sigma 85mm F1.4 DG DN Art lens, we’re calling it a great value model.

Should I Buy This Lens?

That concludes our Sigma 35mm F1.4 DG DN Art lens review. If you already own the Sony E-mount or L-mount modified version of the original 35mm F1.4 Art lens, you should definitely consider upgrading. The new lens offers a better build and performance yet is still competitively priced.

If you don’t own a 35mm lens yet, the new model is a worthwhile investment. Offering versatile performance capabilities housed within a high-quality build, you’ll get plenty of use out of this fantastic addition to the Sigma Art line. 

Novation Circuit Tracks vs Circuit – Worth The Upgrade?

Novation Circuit Tracks vs Circuit

When the Novation Circuit Tracks groovebox was announced earlier this year, it was music to the ears of musicians, DJs, and producers everywhere. It’s an updated version of the popular Novation Circuit groovebox, which came out in 2015. After five years, a new model was not only expected, but highly anticipated. We’ve taken a deep dive into the features and technical specs of the Circuit Tracks to see what has and hasn’t changed since the previous model. Here’s our Novation Circuit Tracks vs Circuit groovebox comparison guide. 

The Novation Circuit Legacy

Novation is a big name in the audio world. They produce a fantastic range of synthesizers, MIDI keyboard and grid controllers, and related software and accessories.

The original Novation Circuit stands out as one of their best releases. The groovebox is a synthesizer, sequencer, and drum machine all-in-one, allowing you to create electronic music without using a DAW.  The Circuit’s dynamic, straight-forward workflow makes it incredibly easy to start making music. Meanwhile, its user-friendly interface and relatively affordable price tag made it instantly appealing to musicians and producers of all skill levels. The Circuit even has its own dedicated subreddit; an honor bestowed on only the most popular of products.

Suffice to say, the Circuit Tracks has big shoes to fill. Let’s see how it compares.

What Hasn’t Changed

Like its predecessor, the Circuit Tracks is portable, powerful, and easy to use. The original Circuit is a 6-track instrument, offering 2 six-note polyphonic synth tracks and 4 monophonic drum tracks. The Circuit Tracks has 8 tracks, but utilizes the same synth engines and drum tracks as the original. 

Some users may be disappointed that more drum and synth tracks weren’t added to the new model. However, this would likely drive up the price, making the groovebox less accessible for beginner and intermediate musicians. Besides, like the original, the Circuit Tracks is remarkably versatile. It’s a great standalone instrument, but can also be used effectively as a sequencer for a bigger setup by connecting it to other instruments and a DAW. In fact, these capabilities have been expanded for the Circuit Tracks (more on this below). 

In terms of build, not much has changed. Both the Circuit and Circuit Tracks are 9.45’’ (240mm) wide, although the new model is slightly thinner, taller, and sleeker. Likewise, the screen-less user interface is just as simple and easy to use as on the previous model. It consists of a grid of 32 RGB velocity sensitive pads surrounded by 28 function buttons, with 10 encoder knobs sitting on top, including a dedicated knob for the master filter and master volume. 

What’s New

Novation Circuit Tracks groovebox
Courtesy of Novation

2 MIDI Tracks + Full-Size MIDI I/O

The new Circuit model is an 8-track instrument, thanks to two new MIDI tracks and a new, full size MIDI I/O. 

The MIDI tracks behave similarly to the synthesizer tracks. However, instead of controlling the two built-in synth engines, they are used for controlling external instruments or software connected via MIDI to the groovebox. This means you can connect additional synthesizers to the Circuit Tracks without sacrificing the internal synth engines like you’d need to on the original Circuit.

2 Mono Audio Inputs

Additionally, the Circuit Tracks offers two mono audio inputs (which can also be used as a single stereo input). This allows you to feed external line level audio into the groovebox so you can mix it and apply sound effects. 

The new MIDI tracks and audio input capabilities make the Circuit Tracks a formidable device.  Enabling you to both sequence and mix external synths means you can use the Circuit Tracks as the centerpiece of an advanced setup. Don’t let its compact build and clean interface fool you; This groovebox may be great for beginners, but it’s not only for beginners. 

Expandable Storage via MicroSD

One of the coolest features of the Circuit Tracks is the new MicroSD slot on the back of the unit. This allows you to save thousands of projects, synth patches, and samples to a removable MicroSD card.  This is a big advantage over the previous model, which only allows you to store a single pack of 32 projects at a time using the internal memory. 

Not only does the Circuit Tracks allow you to save and access up to 31 additional packs via MicroSD, each pack also offers up to 64 project slots. The groovebox doesn’t come with a MicroSD card, however you can see the cards the Circuit Tracks is compatible with by clicking here

32-Step Sequencing & Scenes

The original Circuit allows you to sequence 8 patterns of 16 steps each, or up to 128 steps when the patterns are chained. The Circuit Tracks enables 32-step patterns, or up to 256 steps when chained. 

Another new feature on the Circuit Tracks allows you to assign multiple patterns and pattern chains within a project to a single pad, called a scene. Scenes can also be chained to one another, allowing you to create longer, more complex sequences for full-length arrangements.

Powered by USB-C & Built-In Rechargeable Battery

Like the original Circuit, the Circuit Tracks can run on a wired power supply or on battery. Unlike the original, the Circuit Tracks charges via USB-C (instead of a power cable), and uses a built-in rechargeable lithium-ion battery instead of (6) AA batteries.  

The new battery offers up to 4 hours of use. While the previous model could squeeze up to 5 hours out of its six AA batteries, replacing the batteries was inconvenient. It’s far easier to simply recharge the built-in battery by connecting the Circuit Tracks to your computer via USB (a USB-A to USB-C cable is included). 

Built-In Speaker Removed

Perhaps the only feature that the original Circuit has that is not included in the Circuit Tracks is the built-in speaker. The speaker isn’t great quality, but it was convenient knowing you could take the Circuit anywhere and play music out loud without having to bring your own speakers with you.

For the Circuit Tracks, you’ll have to hook up external speakers or use headphones. Given that most groovebox users likely already utilize one or both these options when playing, this shouldn’t be a dealbreaker. At worst, it’s a minor inconvenience. The headphones socket has also been moved from the front of the unit to the back. 

Price

The Circuit Tracks is currently priced $399.99. That’s only slightly more expensive than what the original Circuit was selling for several months ago. Given that it offers all the same advantages with several, key upgrades, that’s great value.

Spec Comparison

Here’s a side-by-side spec comparison of the Novation Circuit Tracks vs Circuit grooveboxes. 

CircuitCircuit Tracks
Synth Tracks22
Drum Tracks44
MIDI Tracks02
32 RGB Backlit Velocity Sensitive PadsYesYes
28 RGB Backlit Function ButtonsYesYes
8 Encoder Knobs with RGB IndicatorsYesYes
Dedicated Master Filter and Master Volume ButtonsYesYes
Audio InputNo2 x Mono (with FX Send & Side Chain)
Click TrackNoYes
Pattern LengthUp to 16 Steps (128 when chained)Up to 32 Steps (256 when chained)
Projects (per pack)3264
Scenes016 Per Project
MIDI I/O & Sync3.5mm MIDI In and OutFull-size MIDI In, Out and Through, Sync Out
Expandable StorageNoYes using MicroSD Slot (MicroSD card not included)
3.5mm Headphone JackYesYes
USB TypeUSB-B 2.0USB-C 2.0
Powered via USBNoYes
Power Supply IncludedYes (Maximum power consumption 12V DC 600mA)Yes (USB-C cable included)
Battery Power Option6 x AA Batteries (Included)Built-in Rechargable Lithium-ion Battery (charge via USB-C port)
Battery Power Life5 Hours4 Hours
Dimensions (W x D x H)(240mm x 200mm x 35mm)240mm x 210mm x 30mm
Weight2.09 lbs (948g)1.72 lbs (780g)

Worth the Upgrade?

Novation Circuit Tracks groovebox
Courtesy of Novation

The Circuit Tracks is a fantastic groovebox. Maintaining the usability, versatility, and affordability of its predecessor, while significantly expanding its capabilities, the Circuit Tracks is well worth its price tag. Whether you’re purchasing your first groovebox, or upgrading from the original Circuit, you won’t be disappointed.