Home Blog Page 24

Tamron 17-28mm f/2.8 | Surprisingly Small Ultra-Wide-Angle Lens

We’re all accustomed to hauling around heavy lenses. Today, Tamron made our lives a little easier with the announcement of a little lens: the Tamron 17-28mm f/2.8 Di III RXD. This tiny, ultra-wide-angle model was made with Sony E-mount full-frame mirrorless cameras in mind. 

You can pre-order this lens now and it will officially be available on July 25, 2019 for $899.00.

Specs | What sets the Tamron 17-28mm f/2.8 apart?

Apart from its overall quality (we’ll get there in a second), this lens is notable because of its size. The model A046 features a surprising filter diameter of Ø67mm. It’s also the lightest large aperture, wide-angle zoom lens in its class. The 17-28mm f/2.8 Di III RXD’s compact body is only 3.9 in. long and weighs 14.8 oz.

Features

As mentioned above, this lens is a large aperture, ultra-wide-angle model; Tamron created it for Sony E-mount full-frame mirrorless cameras. In addition to its small stature, it has excellent image quality—it utilizes camera body compensation to get a high MTF performance. It also boasts 7.5” minimum object shooting distance.

In terms of construction, the Tamron 17-28mm f/2.8 has a protective fluorine coating on its glass elements as well as a moisture-resistant construction. This lens also comes complete with an RXD stepping motor to keep it quick and quiet.

That sums up our first look at the Tamron 17-28mm f/2.8! Keep an eye out for more info and pre-order yours here.

LaCie 2big RAID Overview – The Best RAID Drive?

Photographers, videographers, and musicians understand the curse of having too much digital content and not enough storage space. It gets even more difficult when you have to find an external storage drive that you actually trust. That’s why we were so excited to try out the LaCie 2big RAID.

This is LaCie’s latest dual-hard drive desktop storage system. In this post, we review its key features, specs, pros, and cons. But first…

What’s a RAID Drive?

RAID stands for “Redundant Array of Independent Disks.” Much like Transformers, a RAID drive combines multiple separate drives together to create a larger, faster, more versatile solution. Except, of course, LaCie is combining hard drives, not aliens. In total, the 2big RAID contains two stacked, interchangeable drives.

A big pro for RAID drives is that you can format them in very specific ways to fit your needs. That said, the software that comes with the LaCie 2big RAID only lets you format this model three ways: 

  • RAID 0: the two drives function as one. This offers the fastest speeds and largest possible capacity.
  • RAID 1: the two drives mirror each other. So, when you copy data onto the 2big it’s automatically backed up onto both disks simultaneously. This results in a slower transfer process but it’s great if you’re paranoid about losing your data.
  • JABOD (just a bunch of drives): the two drives function independently inside one enclosure.

Key Features | LaCie 2big RAID 

Storage

The LaCie 2big RAID comes in 4 TB, 8 TB, and 16 TB iterations. To be clear, that storage is for both drives combined. For example, if you get the 4 TB model it will be split into two 2 TB IronWolf Pro drives.

Connectivity

This particular model has a very straightforward USB-C connection. This is convenient for two main reasons. First, it’s fast—it offers transfer speeds of up to 440 MB/s. Second, USB-C is increasingly becoming the standard form of connectivity for major electronics brands. So, you’ll get some decent mileage out of this model in the coming years.

If you want additional built-in connectivity, we suggest you check out the LaCie 2big Dock Thunderbolt 3. It has dual Thunderbolt 3 ports as well as SD and CompactFlash slots.

LaCie 2big RAID Desktop
Courtesy of Videomaker.com

Interchangeable Hard Drives

As mentioned above, this model contains two IronWolf Pro enterprise-class hard drives which have a 7200-RPM/64MB cache. In addition to being incredibly fast, the drives can also be hot-swapped.

Now, let’s talk about “hot-swappable chassis.” First of all, this sounds like a phrase my grandmother would yell in place of a curse word (i.e. “hot-swappable chassis, this pan is scalding”). In reality, it has usability implications for the LaCie 2big RAID.

This term indicates that the device’s interchangeable drives can be switched out while the 2big RAID is still on. The biggest benefit here is convenience; you don’t have to waste time turning the device on and off to switch out hard drives.

Summary

The LaCie 2big RAID drive is a reliable, versatile solution for creatives interested in expanding their storage space. It’s incredibly convenient to use thanks to its hot-swappable chassis and drive formatting options.

If you’re interested in learning about LaCie’s other products, check out our reviews of the LaCie Portable SSD and LaCie d2 Professional External Hard Drive.

5 Tips For Taking Authentic Family Portraits With Raquel Frechette

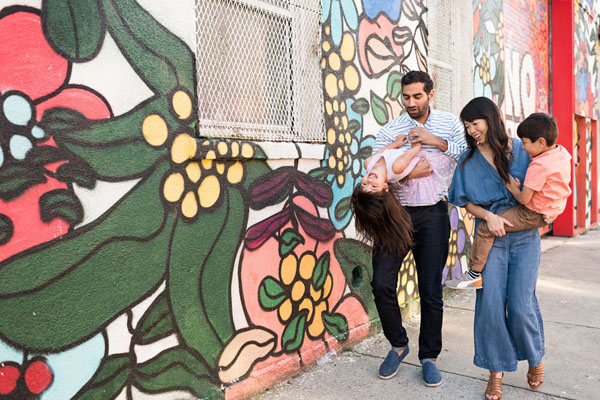
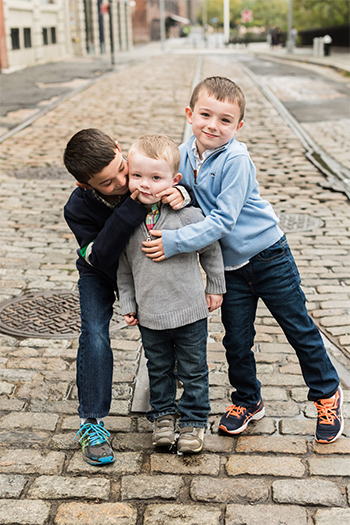
There are hundreds of family portrait photographers in New York City and many of them have hyper-specific bailiwicks. The list includes superhero cosplay specialists, fertility goddess maternity photographers, ironic glam shot experts—the list is extensive. However, one specialty is noticeably absent: photographers who make your family look like your family. No gimmicks or stiff, awkward looking poses, but your beautiful, loveable, often imperfect family just as they are. Where are the authentic family portraits?

I caught up with photographer Raquel Frechette—a master of the perfectly imperfect family portraits—to discuss her process and approach for avoiding cheesy family photo pitfalls.

1. Minimal Direction

Photographers instinctively want to direct portrait sessions—they have a specific set of shots that they want to get and position the family accordingly. This checklist approach to portraiture gets the job done. However, it isn’t ideal if you want to capture the feel of a family.

“The way to get [authenticity] is by creating an environment where people feel like they can be themselves and hang out with their kids,” Raquel explained. “In more of a playful, ‘we are just hanging out as a family’ sort of way, versus,” she sat up stiffly, “a ‘we are getting our photos taken now,’ sort of way.”

Authentic Family Portraits

2. Choose Familiar Spaces

When asked about her favorite places to shoot, Raquel underlined the importance of choosing locations the family is familiar with. Her game plan is often to start at a client’s home. Then, go for a walk around their neighborhood and stop at a coffee shop or playground the family frequents. Not only does it make the client’s photoshoot experience more personal but it also adds a unique edge to the resulting photos.

“It’s really nice to incorporate home in peoples’ photos because it makes it more meaningful; it’s where they spend all their time so you can [better include] elements of their lives.” Years later, when clients look at their photos they’ll remember that homeyness rather than think this is pretty, but we have nothing to do with this place.

“The nice thing about home is, it’s everybody’s natural, comfortable, environment. So, I think immediately it just takes the stress down a little for everybody, both the kids and the parents.”

3. Manage Parental Expectations

One of the things that struck me most about Raquel’s photos is how thrilled the kids look to be in front of the camera (not clown happy, but really happy). When we sat down, I asked if she has any tips and tricks for parents about prepping their kid(s) for a shoot.

“I mean, I think a lot of it isn’t even prepping kids. It’s prepping the parents,” she chuckled. “Kids are going to be who they are. You can’t tell a kid not to react a certain way.” She’s dealt with children who instantly want to be her best friend and others who mistrust her at first sight. Either way, she needs to be ready for whatever the child brings to the table.

“When I talk to parents I say ‘don’t worry, your kid can show up however your kid wants to show up that day and we’re going to work with it. You guys need to be relaxed, need to roll with the punches. Don’t worry if your kid is not doing what they’re supposed to be doing.’ I’m ready for all that stuff. What I’m not ready for are parents who look upset because their kid is not doing what I asked them to do, or constantly fussing over their clothes, or worried that they’re not behaving.”

“If parents are just laughing the whole time and smiling, and like ‘look how ridiculous my kid is,’ then that’s going to be beautiful in the photo.”

There is also the issue of parental preconditioning. “Parents can sometimes feel awkward about getting their photos taken because they’ve had wedding photos before where they’re the center. But when you throw a child into the mix, there’s so much unpredictability and so much that is being dictated and led by the child. You can’t really pose.”

“I’ve yet to walk out of a session saying, ‘sorry, nothing. We’ve got to do this again.’ That doesn’t happen. But, you know, people are human, they’re going to come with whatever stuff they have to the session. That’s my job is to work with whoever these people are and whatever they bring.”

4. Know Your Equipment & Read The Room

There are two levels of knowledge behind a good shot: technical intelligence and emotional intelligence. Photographers have to work to understand both but technical knowledge is a bit more straightforward.

“I would say shoot as much as you can,” Raquel said about mastering her craft. “Shoot as much as you can, in as many different environments you can, in as many lighting situations as you can. It’s all practice.” When your equipment is an extension of yourself, you can focus more of your attention on your subjects.

“You don’t even want to be thinking about the technical,” she explained. “When I go into a session, I have an hour… So, I’ve got to assess the situation extremely quickly and figure out who these people are. What are they about? What’s going to work for them? what’s not going to work for them? Is this a shy kid or an outgoing kid?”

“How do I need to modify my behavior, my approach, in order to make this thing happen? Because at the end of the day, I need to deliver photos, regardless of if the light is bad, or if the kid is crying.”

5. The Less Gear, The Better

Raquel travels light. While on a shoot, she usually only has one camera body with her (a Nikon D810) and three lenses: an 85mm, 50mm, 35mm. She also removes lighting equipment from the equation.

“I know what I am trying to accomplish, but there’s so much unpredictability that I need to be able to shift very fast. So, I try to keep things minimal and natural light just makes it easier.”

However, her methods aren’t without limitation. “There are some days where I have to cancel because the light is just bad. Or if I want to shoot in a person’s home I have to be right up against the windows because their place is darker and doesn’t get a lot of light. I find that I’m most creative when I have the most restrictions.”

“So, that would be my other advice; try really hard lighting situations and see what you can do. See what you can push your equipment to do.”

Do you have any tips for taking authentic family portraits? Leave them in the comments below!

Focusrite Scarlett 6i6 2nd Gen | Review & Photos

Focusrite Feature 1

There are dozens of audio interfaces to consider when choosing a model for your studio. However, one of Focus’s most popular interfaces is the Focusrite Scarlett 6i6 2nd gen (and with good reason). It has a very straightforward interface with strong specifications and easy-to-use controls. In this overview, we give a brief explanation of audio interfaces and dig into the 6i6’s specs and features.

Focusrite Scarlett 6i6 2nd Gen product image
Courtesy of Focusrite
What is an audio interface?
 

Think of an audio interface as a technologically advanced adapter. For example, you can’t plug your guitar directly into your computer. Instead, you plug it into an audio interface that can connect and communicate with recording software on your Mac or PC. The interface is the middle man. The same applies to studio monitors which also plug into an audio interface.

As a point of clarification, people often confuse interfaces with mixers but they’re two completely different things. While you plug instruments and microphones into both, mixers are used more for live performances and don’t have extra connections like USB, XLR, or MIDI ports. On the other hand, a digital interface usually does have those ports and is used in a studio setting to connect your computer with your instruments.

Who Uses The Scarlett 6i6?

Bands and recording artists who have a home studio love the Scarlett 6i6. It’s a fan favorite because of its versatility; the audio interface allows for more than one instrument or vocalist to record at a time. Similarly, two producers can listen in simultaneously.

In total, the Focusrite Scarlett 6i6 2nd gen has:

  • 4 analog inputs
  • 4 main outputs which can be mono outputs or stereo pairs
  • 2 natural sounding mic preamps
  • 2 ¼ inch jacks that can take a balanced or unbalanced connection
  • 1 MIDI in and 1 MIDI out
  • 1 SPDIF in and 1 SPDIF out

It also features a large level-control knob for adjustments to your monitor levels. This is especially helpful when you have your hands full with an instrument and need to make a real-time change.

Focusrite Scarlett 6i6 2nd Gen front and back

Why We Love The Scarlett 6i6

There are a few key reasons why people keep coming back to the Scarlett 6i6 (and Focusrite) for their audio interface needs. First and foremost, of course, is quality. The 6i6 has class-leading digital conversion at up to 24-bit/192kHz.

Second, it’s incredibly intuitive. The interface is straightforward and the device itself is ready to use almost immediately after being plugged in. However, the winning combination that makes this a wise buy is the Focusrite 6i6 in conjunction with its accompanying software.

Bonus Plug-ins

When you purchase a Focusrite Scarlet 6i6 you also get Ableton Live Lite, Avid Pro Tools First Focusrite Creative Pack, Loopmasters, Focusrite Control, XLN Audio Addictive Keys, Focusrite Red Plug-in Suite, and the Softube Time and Tone bundle. That’s everything you need and more to start recording and editing immediately.

XLN Audio Addictive Keys

The average piano keyboard usually has a few different profiles like electric, grand piano, and synth. On the other hand, Addictive Keys connects with your digital keyboard and offers dozens of piano profiles and a seemingly endless list of granular adjustments to your sound.

Avid Pro Tools | First Focusrite Creative Pack

The First Focusrite Creative Pack is an entry-level music-making bundle for novice producers, instrumentalists, and singer-songwriters. It includes Pro Tools First, Eleven Lite, Black Op Distortion, Gray Compressor, Five-band Graphic EQ, Flanger, Vibe Phaser, Roto Speaker, Sci-Fi, Studio Reverb, Tape Echo, and InTune.

Loopmasters

The Focusrite Scarlett 6i6 comes with 2GB of royalty-free sample libraries from Loopmasters. The site provides sample audio libraries for producers and musicians who need additional professional assets to round out their sound.

Focusrite Control

Each output of your Focusrite audio interface has its own individual mixer. Focusrite Control is the software that lets you create custom mixes for each of those audio interface outputs. From Control, you can work with output levels, control mute and dim, metering, and a whole lot more.

Softube Time and Tone bundle

The Softube Time and Tone bundle is made up of four plug-ins: a reverb, a delay, a mastering tool, and distortion. Use these plug-ins with the other software that accompanies the Scarlett 6i6 to bring a new layer of professionalism to your mixes.

Ableton Live Lite

This program is a DAW (digital audio workstation) primarily utilized for track creation and live performances on MIDI pads. Ableton Live Lite, which—while lacking some of the functionality provided by paid versions of Ableton Live—does an amazing job. This is especially true if you’re just starting out in electronic music.

Focusrite Red Plug-in Suite

The Red Plug-in Suite replicates the functionality of Focusrite’s Red range equalizer and compressor. This suite gives you detailed, dynamic and tonal control of your mix without buying the additional hardware.

Focusrite Plug-in Collective

Not to be confused with the Red Plug-in Suite, the Focusrite Plug-in Collective is your portal to exclusive deals, tutorials, and the latest editing software from Focusrite and the Focusrite community.

Look & Feel

Quite frankly, the Focusrite Scarlett 6i6 looks good on your desk. It shouldn’t matter but it does. The device ways in at 1.22kg and is 5.0cm x 19.5cm x 21.2cm (H x W x D). Plus, it adds a little pop of color to your workspace with its signature brushed red aluminum finish.

We hope this overview of the Focusrite Scarlett 6i6 2nd gen helped you in your search for the perfect audio interface. Let us know if you have any questions in the comments below!


What’s The Best Instant Camera of 2019? Fujifilm, Polaroid, Canon, and Minolta

Congratulations, everyone, we did it. We made it through winter. Welcome to summertime, a glorious three months of joy, warmth, and BBQ. If you’re one of the cool kids, you’re probably in the market for a fancy new instant camera. Well, you’re in luck. In this post, we help you find the best instant camera for your needs and compare the most popular models out now: the Canon Ivy Cliq+, Minolta Instapix MMCP10, Polaroid OneStep+, and Fujifilm SQ20.

Canon Ivy Cliq+

  • Price: $159.00
  • Colors: Sapphire Blue, Pearl White, Ruby Red

The Canon Ivy Cliq+ is an 8MP camera and printer with a built-in 2″ selfie mirror and 8″ LED ring light. It produces 2×3” prints on sticker paper—you can remove the back and use it as a sticker or keep the back on and treat it like a normal instant photo.

One of the pros of the Canon Ivy Cliq+ is its Canon Mini Print app. Once you connect the camera with your phone you can print images from your smartphone’s camera roll. Via the app, you can also edit your pics, add cool effects, and even control the camera’s shutter and self-timer.

Another perk is that the Canon Ivy utilizes zink printing technology, eliminating the need for ink cartridges. Simply load your film and it’s ready to go!

Minolta Instapix MNCP10 Instant Print Camera


  • Price: $139.99
  • Colors: Purple, Blue, Charcoal, Coral Pink, Gray

The Minolta Instapix MNCP10 is a 10MP camera and printer that comes equipped with a viewfinder and 1.7” LCD display. It utilizes “4PASS printing technology”; basically, that means this camera prints each color individually then finishes with a layer of lamination. The resulting print is waterproof, smudge-proof, but (unfortunately) not a sticker.

Like the Cliq+, there is a Minolta Instapix app that connects with the camera via Bluetooth. Through the app, you can take, edit and save images to your phone, control camera functions, and share photos in other apps.

Also, if you’re a hardcore camera nerd like we are, yes this is the same Minolta that made some of the best cameras to come out of the 80s and 90s. Today, Minolta is a subsidiary of Rokinon but they’re still producing products including point and shoot cameras, dash cams, and now this instant camera.

Polaroid OneStep+

  • Price: $159.99
  • Colors: Black

Next up is the Polaroid OneStep+ from Polaroid Originals. This model has a few major upgrades from the original OneStep2 including the addition of Bluetooth technology, close-up mode, a more powerful flash, and longer battery life.

As mentioned above, this camera features Bluetooth which you can use to connect with the Polaroid Originals app. The app unlocks a range of additional creative features including a remote, self-timer, portrait, double exposure, light painting, noise trigger, and a manual mode for control freaks (no judgment).

Fujifilm Instax SQ20

  • Price: $159.95
  • Colors: Beige, Black

Last but not least we have the Fujifilm Instax SQ20. The SQ20 is a film/digital hybrid camera that combines the aesthetic of film photography with digital technology. It’s worth noting that this is the only camera in our comparison that has a zoom feature. The SQ20 is also the only model that records video.

When you switch to movie mode you can record up to 15 seconds of video and use additional features like frame grab, time shift collage, and sequence to further spice up your photos. When you’re done editing, all of your videos and pictures are saved on the SQ20’s internal microSD card for your future enjoyment.

See our SQ10 vs. SQ20 review here.

Which is the best instant camera for you? Let us know in the comments!

Cuddeback Cameras Buying Guide (2020)

Trail Cameras Cuddeback Buying Guide
Courtesy of Cuddeback

When you research trail cameras, a few names appear on almost every list—Browning, Hunting Made Easy, and Stealth Cam to name a few. However, Cuddeback is a key player that consistently wins customers with its price and reliability. In this post, we review Cuddeback’s products, how their systems work, and answer one of the most common questions we receive about these products: which Cuddeback camera should I get?

Cuddeback Camera Comparison

Cuddebacks are not known for having a lot of fancy add-ons, but they do the basics very well. They’re affordable, reliable, and have a consistent trigger speed of .25-.5 seconds. That said, there are a few key differences between the different grades of Cuddeback trail cameras.

CuddeLink Dual Flash 20MP Model G-5055 CuddeLink Black Flash Model J-1422 CuddeLink Long Range IR Model J-1415 Cuddeback X-Change Trail Camera (Blue) Cuddeback CuddeLink G Series Trail Camera CuddeLink Power House IR 20MP
Trigger Speed .25 seconds .25 seconds .25 seconds .25 seconds .25 seconds .25 seconds
Image Quality 20MP 20MP 20MP 20MP 20MP 20MP
Flash Range 100+ feet 50+ feet 100+ feet 100+ feet 100+ feet 100+ feet
Flash Type No-glow & low-glow IR with 28 940nm LEDs No glow IR with 940nm LEDs Infrared with 850nm LEDs Color, Infrared, or Black Color strobe with 570uF Power House IR (3x power of normal LEDs)
Battery Life 6 months 6 months 6 months 12 months 12 months 12 months
Interchangeable Flash
Waterproof
Shoots Video
Day & Night Modes
Time Lapse
EZ, Advanced & Survaliance Modes
CuddeLink On-Site Compatible
CuddeLink Cell Compatible
Price $199.99 $199.99 $199.99 $199.99 $199.99 $285.00

What Makes Cuddebacks different?

Battery Power & Durability

You can mount Cuddebacks to trees and leave them to record uninterrupted for a range of 6-12 months depending on your preferred model. However, if you’re in a position where you can’t (or don’t want to) regularly update the batteries, you can add a Cuddeback CuddePower Battery Booster or Cuddeback J Camera D Battery Adapter. This compact add-on gives four times the power provided by the 8 AA batteries in the camera itself. It’s also an asset if you’re using your Cuddeback in freezing and subfreezing temperatures which can drain batteries faster than use in a more temperate climate.

Cuddeback gear is designed to weather the great outdoors. As a result, all of the brand’s cameras are waterproof. However, some Cuddeback customers don’t deal with “normal” weather patterns. Instead, they’re contending with the harshest cold and most scorching heat on the planet. For those users, we recommend adding a Cuddeback camera case to your setup. It’s not only an extra layer of protection from excessive snow, rain, and heat but also some of your camera’s more aggressive subjects.

Mesh Networking

One of Cuddeback’s biggest selling points is that their cameras are connected with a wireless mesh network; they call it CuddeLink. In short, this system lets you check up to 15 Cuddeback cameras that are monitored from one hub; that hub can either be a “home” camera or your email inbox. As a result, you don’t have trek miles through your property and leave your scent behind when checking individual devices.

Transmission Distance

The average transmission distance between two cameras in a densely wooded area is ¼ to ½ mile. In open areas, CuddeLink has a camera-to-camera range of a little over 1 mile. However, if you invest in more than two devices, you can extend your signal much further—the cameras daisy-chain together and can cover a distance of over 4 miles.

A word to the wise, these are the average ranges and the numbers will vary a little based on the elevation of surrounding terrain and the presence of extreme weather conditions. If you want to be extra sure that your cameras will always be in communication, you can add an antenna like this one for the Dual Flash 1361. Keep this in mind when planning your setup.

Connectivity

CuddeLink caters to people that live near the land their monitoring as well as those who are keeping an eye on things from a different geographic location. They have two options based on your situation: On-Side and Cell.

Trail Cameras Cuddeback Buying Guide
Cuddeback Shutter Speed | Courtesy of Cuddeback

CuddeLink On-Site

CuddeLink On-Site is for hunters or landowners living on or near their property. Let’s say you have the maximum number of 15 cameras spread out over miles of land. Rather than spending your entire day going to each camera individually, the system automatically sends the images taken on all 15 devices to one designated Cuddeback “home” receiver. There, they are saved to a single SD card that can be taken out and unloaded onto your computer.

CuddeLink Cell

Option number two is CuddeLink Cell. Cell and On-Site work the same way: you have multiple connected cameras that send their images to one convenient place. However, you don’t have to go retrieve an SD card to view them; they are automatically sent to your email inbox.

This is objectively the more convenient option for Cuddeback users. Rather than shuffle out to a camera in the freezing cold to retrieve an SD card, you can just glance at your computer or smartphone. However, this convenience does not come for free: CuddeLink Cell has a monthly fee. It works off of a proprietary cellular system that allows Cuddeback to communicate through an LTE home unit and billing is based on data usage.

The plan information is listed below. Compared to typical data plans, it’s very affordable.

Trail Cameras Cuddeback Buying Guide
Courtesy of Cuddeback

Ease of Use

Perhaps most importantly, Cuddeback products are incredibly easy to use. After all, all of this useful tech doesn’t mean a thing if users can’t figure out how it works. The camera interface is simple and intuitive and there aren’t a lot of unnecessary bells and whistles. Plus, Cuddeback does a great job providing set-up videos like the one below.

Instagram Influencer Tips: How To Prepare for Travel Photography

It’s that special time of year! We are in the throws of summer which means your Instagram feed is absolutely inundated with friends’ trips to tropical locations you’ve never heard of. It is both endlessly entertaining and a bit depressing. The only solution? Get yourself a plane ticket, dust off your camera, and hit the road. Travel photography #goals await.

We spoke with travel and lifestyle guru Ilona Izabella and Sony Artisan Tony Gale about how to to take stellar travel shots on the beach and in the streets.

Do Your (Historical) Research


View this post on Instagram


A post shared by 𝓕𝓁𝓎𝒾𝓃𝑔 𝓓𝓊𝓉𝒸𝒽𝑔𝒾𝓇𝓁 (@ilonaizabella) on

History enthusiasts often choose their destination locations based on interesting historical locations. For the rest of us, there’s Wikipedia. Before you land, have a few places in mind that you want to photograph. Perhaps more importantly, understand the historical significance of those places. 

“I like to read about the history of a destination or about some of the sights to have some knowledge of the place I am visiting which I can use for my photography as well,” said Ilona Izabella. Izabella, an Amsterdam native, is a frequent visitor to cities steeped in history like Budapest, Prague, and Copenhagen. 

Knowing which historical spots to hit or what small features to look for helps Izabella “focus on the details of history that are still visible.” It can also help non-natives avoid cultural gaffes or worse.

Check Out Other Travel Photographers


View this post on Instagram


A post shared by 𝓕𝓁𝓎𝒾𝓃𝑔 𝓓𝓊𝓉𝒸𝒽𝑔𝒾𝓇𝓁 (@ilonaizabella) on

We recommend doing travel research online and (gasp) in tangible guide books. However, Izabella recommends that you avoid the pitfall of viewing too many “perfect pictures” on travel websites or photography magazines. 

“I look for “real” pictures taken by locals or other travelers,” she says. “Instagram is my biggest source of inspiration to get a first idea of the destination and to find hotspots that I want to go to.”

Practice Patience When Possible


View this post on Instagram


A post shared by 𝓕𝓁𝓎𝒾𝓃𝑔 𝓓𝓊𝓉𝒸𝒽𝑔𝒾𝓇𝓁 (@ilonaizabella) on

Traveling is stressful. If you have a tight itinerary, it’s easy to look past the beauty of the moment and get distracted by travel logistics. Funnily enough, the key to slowing down, focusing on your trip, and enjoying travel photography is both obvious and incredibly difficult to accomplish: you need to relax. 

Do some yoga, meditate, go for a run; do whatever it takes to calm down before you go shoot. Once you’ve reached a state of zen, hit the street (or beach).

“For my street photography I mostly use the people that are already there so the photos come out naturally,” says Izabella. “If I stumble upon a place that I want to photograph, but there are no people, I sometimes wait for someone to pass by or I ‘create’ the scene I want to photograph by asking a friend to walk there or photograph me when I walk there.”

Planning a quick “candid” moment is great if you can pull it off. However, you often just have to go with the flow. “When I photograph a street musician, I do not interrupt them to ask for a photo,” says Izabella. “I take my candid moment and leave them some money as a thank you, or sometimes buy their CD.”

Bring the Right Gear


View this post on Instagram


A post shared by Tony Gale (@tonygalephoto) on

The “right” gear is totally dependent on what you want to shoot when you travel. For street photography, 50mm or 35mm lenses are classic standbys—and a tripod makes a big difference if you can fit it in with your other travel gear. 

However, if you plan to shoot landscapes, Sony Artisan Tony Gale recommends a few accessories in particular. “I bring a Sony a7RIII, a Sony 12-24/4 G, a Sony 100-400/4.5-5.6 G Master, a Sony 2x tele extender and a Gitzo Traveler tripod,” he says. “I’ll also bring a lighting trigger, an X-Rite Color Checker Passport and possibly Polarizing and ND filters. Plus extra SD cards and batteries.”

Take A Gander At Google Maps


View this post on Instagram


A post shared by Tony Gale (@tonygalephoto) on

Before you walk out into the wilderness, Gale recommends consulting Google Maps to get a lay of the land. “If it’s a National Park, I will use the REI app for ideas as well,” says Gale. “I will also typically do a Google Image search, partially for ideas and partly so I don’t make the same photos everyone else does. There is also a website called Loaded Landscapes that has suggestions for places. Checking weather is important as well!” 

The more effort you put into preparing for your trip, the more wiggle room you’ll have when it comes to taking the best travel pictures. Remember to be patient and do your research, but don’t spend too much time flipping through photography magazines. If you do, use those photos as a launchpad rather than a guidebook. Put some thought into what gear makes sense for your shots, and (of course) check the weather!

4 Nature Photography Tips For Beginners

Nature Photography Tips

Nature photography is a great way for new photographers to simultaneously brush up on their skills and get impressive results. If you’re just starting out, here are four of the best nature photography tips for beginners.

Know Your Camera

If you’re brave enough to go camping in bear country, we believe you’re brave enough to abandon “Auto” mode. Auto is not your friend. Sure, you can use it to fire off a quick shot. However, there’s no guarantee it’s going to capture the scene exactly the way you want it to.

A good start is learning about the exposure triangle which consists of aperture, ISO, and shutter speed. It’s much less scary than it seems. The key is understanding that those three settings work together to adjust exposure and control the flow of light entering your camera. You can learn all about it in our Exposure Triangle Beginner Guide.

Most importantly, get out there and practice!

Focus Exposure Triangle

Master Long Exposures

We’ve all seen the photos of smooth, rushing water cascading through impossibly beautiful landscapes. To capture this effect (and many others) try experimenting with slow shutter speeds.

As a point of reference, an example of a fast shutter speed would be 1/1000 or 1/500 whereas a slow shutter speed would be something like ¼, ½, or 1. To take the shot, first, choose your exposure time. Then, set your camera up on a tripod to eliminate blur from shaking hands (you might even want to look into a remote shutter release). Finally, take the photo. It will probably take some trial and error to get the right angle and exposure time so don’t get frustrated if it isn’t the perfect shot right away.

The Rule Of Thirds

If you’ve ever taken an art class (or know someone who enjoys showing off at museums) you’ve probably heard of the “Rule of Thirds.” At its core, the Rule of Thirds dictates that you place the focal point of your shot off-center where the crosshairs of your viewfinder intersect.

The point of the rule is to draw the viewer into the photo rather than glance at the center and move on. In many cases, it makes for a more interesting photograph and an engaging narrative.

Choose The Right Lenses For Nature Photography

You don’t necessarily need a professional camera for incredible nature photography. In fact, if you have an interchangeable lens camera, you can take just about any shot if you invest in the right lens.

Landscape

For the newbies out there, focal length refers to the angle of view or how much of the scene in front of you is captured. In short:

  • Short focal length (12-50mm) = wide angle, captures the whole scene
  • Long focal length (55-200mm+) = narrow angle, captures less of the scene

So, if you’re shooting an expansive landscape, it calls for a wide angle lens or a wide-angle zoom lens. As mentioned above, the lower the millimeter number, the wider the view will be.

Close-up/Portrait

If you are shooting a portrait of a flower or doing macro photography, buy a lens with a long focal length and a low f-stop number. If you look at the exposure triangle above, you’ll notice the f-stop diagram on the left. As you can see from the explanation, the lower the f-stop number (f/1.4) the blurrier the background.

The combination of those two specs means that you’ll be able to take close-up photos with blurred backgrounds and great bokeh. Two of our recommendations are the Sigma 70mm F2.8 Art DG Macro for Sony E and the Nikon AF-S Micro NIKKOR 60mm f/2.8G ED Standard Lens.

That wraps up our 4 nature photography tips for beginners. Check back for updates and more info on how to photograph the great outdoors.

Sony Super-telephoto | FE 200-600mm & 600mm F4 G Master Prime

Sony 600mm F4 G FE and Sony 200-600mm F5.6-6.3 G OSS

Two new Sony super-telephoto lenses have landed: the FE 200-600mm F5.6-6.3 G OSS and the 600mm F4 G Master Prime Lens. Keep scrolling for preorder information, pricing, features, and sample images.

Sony FE 200-600mm | Key Features

When paired with Sony’s latest E-mount camera bodies, the Sony FE 200-600mm super-telephoto lens can accurately track and capture incredibly fast objects. That includes (but is not limited to) professional athletes, birds, UFOs, jungle creatures, frightened house cats, etc.

Quality & Stabilization

This lens’s versatile tele-zoom extends from 200mm to 600mm. If you need an extra boost, it’s also compatible with Sony’s E-mount 1.4x and 2.0x teleconverters; these additions extend the lens’s reach to 840mm at F9 or 1200mm at F13 respectively.

However, it would be difficult to utilize those super-telephoto powers without image stabilization. The FE 200-600mm has built-in optical stabilization with three mode settings, allowing for images that are sharp and in-focus at extended focal lengths.

In terms of internal layout, this lens has 5 extra-low dispersion glass elements and an aspherical element. These are arranged in a new optical design intended to minimize chromatic aberration.

Additionally, elements are coated with Sony’s original nano AR coating to suppress unwanted reflections, glare, and ghosting in images. It’s also worth noting that the FE 200-600mm’s 11-blade circular aperture mechanism ensures beautiful bokeh every time.

Amazing Autofocus

Photographers chasing the perfect action shot don’t have time to stop and adjust their focus; if you miss the perfect photo it’s gone forever. Sony wants you to get that perfect shot with the FE 200-600mm.

This lens is equipped with Sony’s direct drive SSM (DDSSM) focusing system. In case you’re unfamiliar, DDSSM propels the lens mechanism and makes fast, accurate autofocus possible. The autofocus is also incredibly quiet for a lens of this size. That muffled functionality is especially advantageous in wildlife photography when you don’t want to disrupt a skittish subject.

Interface Perks

You’ll notice that this Sony super-telephoto lens doesn’t get longer or shorter as you zoom in and out. Instead, it maintains a consistent distance between the front of your lens and whatever you’re shooting. Its fixed-length-structure and internal zoom mean that there are less moving parts for dust and moisture to sneak through. As a result, this lens is inherently more dust and moisture resistant and great for outdoor use.

As for features, its external focus ring has a linear response MF for granular, responsive manual focus control. Plus, there are three customizable focus-hold buttons and a focus range limiter for quick changes.

Pricing & Availability

The Sony FE 200-600mm F5.6-6.3 G OSS is currently available for preorder and will ship in August 2019 for $1,998.00.

Sony 600mm F4 G Master Prime | Key Features

The Sony 600mm F4 G Master Prime wins a couple of superlatives. First, it’s now the company’s longest reaching prime lens. Second, it is the world’s lightest lens of its class. It also packs in almost all of Sony’s most advanced optical and mechanical advancements. These three elements combined make it a. very, very cool and b. an incredible new toy for professional news, sports, and wildlife photographers.

XD Autofocus

Like the FE 200-600mm, the 600mm F4 G Master Prime works with Sony’s latest full-frame E-mount cameras to deliver exceptionally quick, quiet autofocus. More specifically, the FE 600mm features two extreme dynamic (XD) linear motors that drive the lens’ focal groups. These motors are supported by specialized motion algorithms to minimize lag and instability.

Image Quality

The 600mm F4 G Master Prime is a prime, large aperture, super-telephoto lens—you can also add Sony’s 1.4x and 2.0x E-mount tele-converters for extra magnification. Even with its incredible reach, Sony still managed to ensure that image quality, detail, contrast, and resolution are maintained from corner to corner.

This Sony super-telephoto prime offers previously unheard of portability and flexibility for a lens in its class. Of course, this is a relative comparison; this lens weighs 107.3 oz (3,040 g) and is 6 1/2 in x 17 3/4 in long. This new, “smaller” size was achieved by reducing the number of elements at the front of the barrel and using magnesium alloy throughout the lens to help minimize weight and bulk.

Improved Bokeh

This lens enhances bokeh with the help of its 11-blade circular aperture and Sony’s original Nano AR coating which suppresses unwanted reflections. Plus, Sony’s latest bokeh simulation technologies and XA element help control spherical aberration.

Interface & Durability

As mentioned above, Sony’s new FE 600mm F4 GM OSS is made of durable magnesium alloy and a strong, lightweight carbon fiber hood. As a result, it is dust and moisture resistant and perfect for nature photography.

It also features a number of hard controls accessible from the lens’s body including customizable focus-hold buttons in four different locations on the barrel. Plus, it has a full-time DMF switch for manual focus and a focus ring with linear response MF.

Pricing & Availability

The Sony FE 600mm F4 GM OSS is currently available for preorder and will ship in August 2019 for $12,998.00.

Interested in upgrading? Click here to preorder one of these Sony super-telephoto lenses.

Ultimate Ears Wonderboom 2 | Worth The Upgrade?

Ultimate Ears (previously branded as ‘UE’) just released the Wonderboom 2. This durable, portable speaker can only be described as a must-have for summer adventures. It’s the second generation of the Wonderboom line and it delivers big improvements in sound, battery life, and weatherproofing.

Wonderboom 2 Upgrades

Design

Ultimate Ears Wonderboom 2 Candy

The Wonderboom 2 comes in vibrant dual-tones whereas the original is only available in single colors. As for size, this speaker is a little bigger than a softball; it’s small enough to clip to your bag or slip into your backpack without issue.

Honestly, the Ultimate Ears Wonderboom 2 is adorable—it looks like a giant piece of candy. If a fruit Tootsie Roll and a DK barrel had a baby it would be this speaker. Let the record show that I love both candy and Donkey Kong so this is high praise.

Outdoor Boost

One of the coolest new features is the addition of “Outdoor Boost.” When you press the little tree button on the bottom of your device, it activates a different sound experience better suited to the boundless expanse of nature. The speaker’s built-in, pre-adjusted equalizer plays to its surroundings and delivers louder, crisper sound to accommodate for the acoustics.

Ultimate Ears Megaboom 2 outdoor boost

Battery Life

The Wonderboom 2 can play nonstop for 13 hours whereas its predecessor could only last for 10. That’s 30% more time DJing at the beach or blasting music at a backyard party. You can also pack a power bank for portable charging.

Ultimate Ears Megaboom 2 waterproof

Weatherproofing

It’s likely that you’ve come across a waterproof description that reads “IPX” followed by a number. However, if you don’t know the in-depth workings IPX standardization (and honestly why would you?) that number doesn’t mean much.

An “IP” rating is a numeric system set by the International Electrotechnical Commission. It tells you how “dust resistant” or “waterproof” an item is based on a series of physical tests. The format is: IP(dust #)(water #).

The new speaker has a rating of IP67. “6” is the highest dust-resistant rating a device can have. It means that this speaker is totally protected if you take it to the beach or it accidentally falls into some dirt when you’re camping. Like the original, thanks to its ‘7’ water resistance rating the Wonderboom 2 can be submerged in up to 1 meter of water for 30 minutes.

IP Rating Explained Chart

Connectivity

Thanks to its true wireless capabilities, the Wonderboom 2 connects with two source devices simultaneously; you can wirelessly stream music from either one. Alternatively, you can connect with two Wonderbooms from one source from up to 100 feet away.

Final Thoughts

The Ultimate Ears Wonderboom 2 has notable updates from the original and you can get it for the same price ($99.99). It’s louder, more rugged, waterproof, has excellent battery life, and more color options. All things considered, the Wonderboom 2  is definitely a worthwhile investment.