We love sizeable, interchangeable lens cameras and all of the flexibility they provide. However, they aren’t always the most convenient option. Point-and-shoots are often preferable as travel and street photography cameras. They’re smaller, lighter, less obvious, and don’t require any additional gear. In this post, we compare two of our favorite point-and-shoot cameras: the Ricoh GR III vs Fujifilm XF10.


Ricoh GR III vs Fujifilm XF10
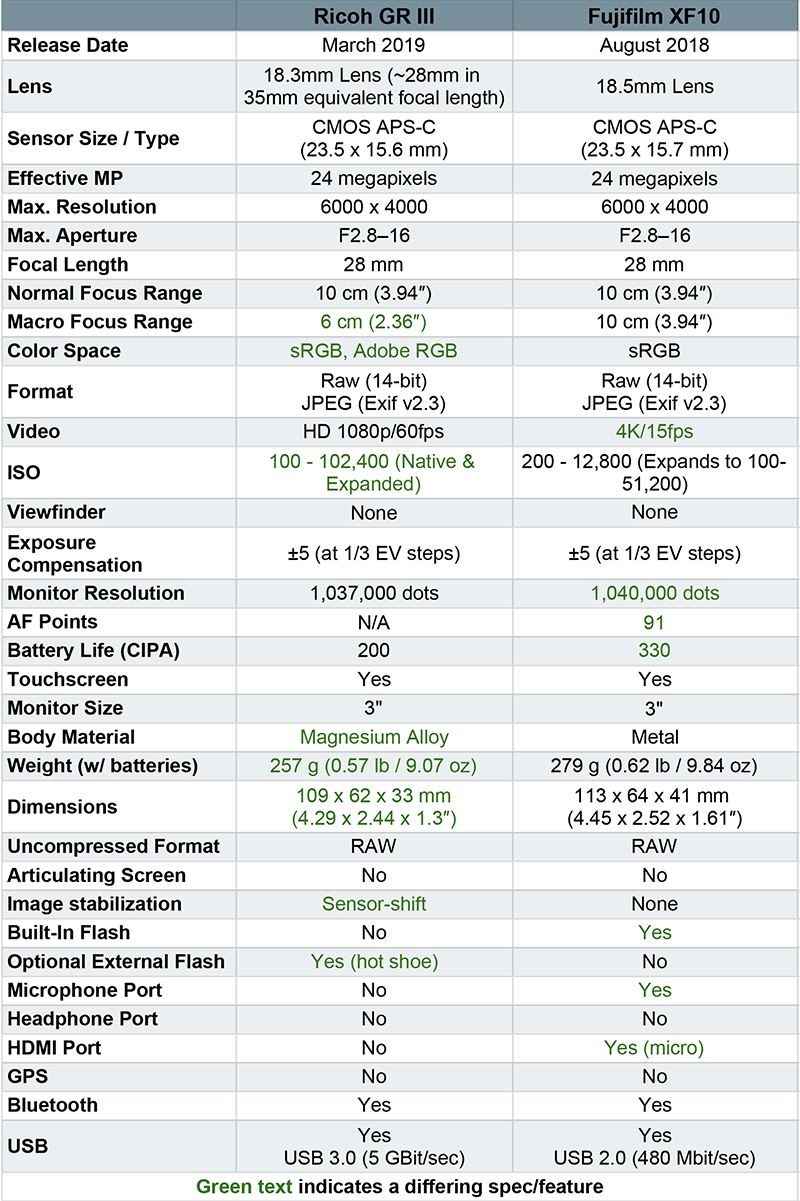
Image & Video Quality
These two cameras are remarkably similar when it comes to image quality. They have the same CMOS APS-C sensor, a maximum resolution of 6000 x 4000, and 24 megapixels. Plus, both shoot in RAW if you want that extra detail.
The XF10 does beat the GR III in video quality (4K/15fps vs 1080p/60fps). Neither of these cameras is necessarily built for video, but it’s still an important factor to consider if this is the only camera you’re taking with you on vacation.
All of that said, it’s worth noting that the GR III is equipped with sensor-shift image stabilization. If you’re using the XF10 you’re on your own—there’s no internal image stabilization included with that model.


Monitor & Viewfinder
There are several distinctions between these cameras that aren’t necessarily earth-shattering, but make a huge difference when it comes to individual user preference. The viewfinder situation is one of them.
Neither the Ricoh GR III nor the Fujifilm XF10 has a built-in viewfinder. However, you can add a viewfinder onto the GR III. So, how important is it for you to be able to look through a dedicated viewfinder to preview a shot? It totally depends on you and your workflow.
The monitors themselves are comparable. Both are 3” and have almost exactly the same resolution; the GR III has 1,037,000 dots and the XF10 has 1,040,000 dots.

Usability | Ports & Add-Ons
Next in our Ricoh GR III vs Fujifilm XF10 battle are available ports and add-on capabilities. As with the monitor and viewfinder, your choice comes down to how you plan on using your camera.
For example, the GR III has a hot shoe; invest in the Ricoh if you have a specific flash you want to use. However, consider the XF10 if you plan on recording video and need a microphone port for additional audio capabilities.

Size & Weight
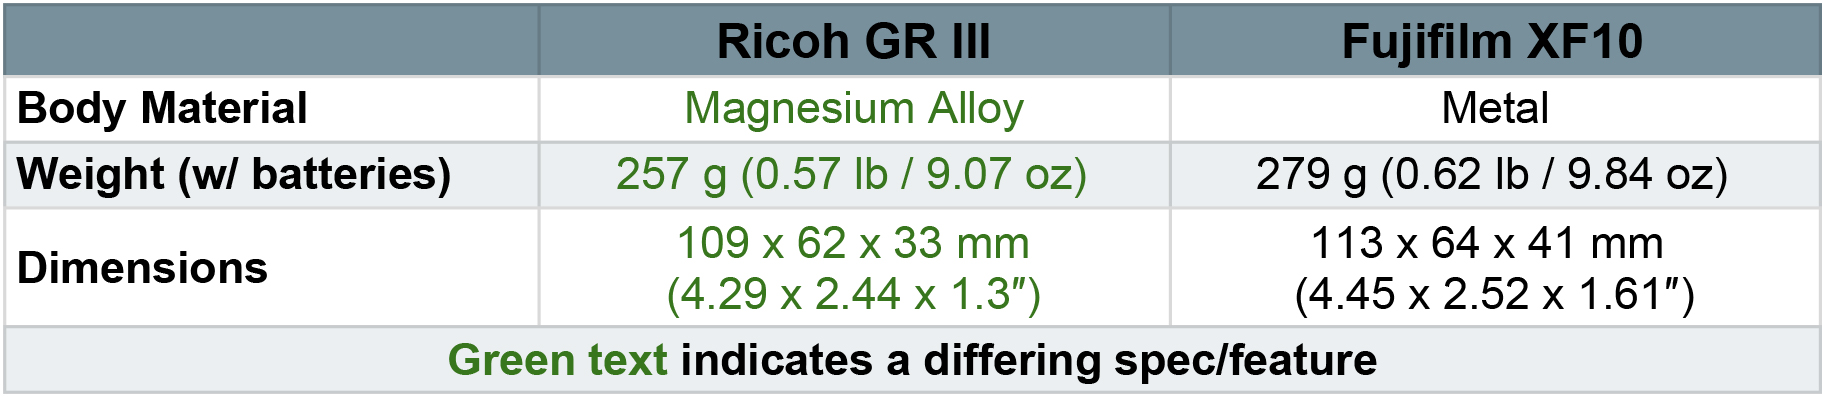
The size and weight of these cameras are comparable but the Ricoh GR III edges out the competition. Thanks to its magnesium alloy body and exclusion of a built-in flash, the GR III is slightly lighter and smaller than the XF10.
This factor shouldn’t scare you away if everything else about the Fujifilm fits your needs. That .10th of a pound difference won’t weigh you down too much.
Final Thoughts | Ricoh GR III vs Fujifilm XF10
Both the GR III and XF10 are incredibly straightforward models with minimal frills and maximum convenience. You can feel safe choosing either model as long as you consider the common use-cases ahead of you.