Just announced and on pre-order, the Sony RX100 VI is unlike any point and shoot before it. At $1200, it’s $200 more than its predecessor, and definitely more expensive than other point and shoots on the market. However, between a versatile zoom, diverse movie making options, and fast autofocus, it brings a lot more to the table.
Newly designed, the ZEISS Vario-Sonnar T* 24-200mm F2.8-4.5 lens stretches from wide angle to telephoto for some incredible versatility. (By contrast, the last RX100, released in 2016, only came with a 24-70mm equivalent lens.) Configured with eight aspherical lens elements including thirteen aspherical faces, the RX100 VI features excellent resolution, clarity, and contrast across the whole zoom range for high-quality images. Plus, the optical image stabilization prevents images from blurring at full telephoto.
Great for vloggers, the RX100 VI also offers a slew of movie-making functions. It features 4K with full pixel readout without low quality pixel binning, as well as the fast and accurate Hybrid AF necessary for 4K movies. Meanwhile, the HLG profile appears true to life without blocked shadows or blown highlights upon playback on an HDR compatible TV. If slow-motion is your game, you can even shoot it in close-up telephoto.
Fast moving objects are easy to focus on with the .03 second autofocus response. The RX100 VI features 315 phase detection points that cover 65% of the image area on the camera. You can enjoy continuous shooting at 24fps with AF/AE tracking at full resolution for up to 233 frames. Moreover, the electronic viewfinder’s accelerated display system makes it possible to view smooth video with less blackout and delay. For portraits, the Eye AF function provides superior tracking performance and better accuracy and stability, even if the subject isn’t looking at the camera.
Ultimately, this point and shoot is more than just an expensive smartphone upgrade. It’s a great match for photographers who want the convenience and the quickness of a small camera.
Thought you could get by without a tripod? Ha! Not so fast, shaky hands. A camera tripod is crucial in lots of genres of photography, and generally agreed upon as a standard piece of equipment. There are a few factors to consider when buying a camera tripod: size, weight capacity, head type, locks and feet, and material. Scroll down to learn more about which features make the most sense for you.
There are two sizes you need to consider when it comes to your camera tripod: collapsed size and extension size. Collapsed size lets you know how small you can make your tripod, which is especially relevant for transportation purposes. If your collapsed tripod won’t fit in your bag, then it can’t do you much good on the go. Some photographers suggest that you find a tripod with an extension size that matches your own height. That way, you never have to bend over to look through the viewfinder.
Load Capacity
Whether you’re rocking a point and shoot or a big DSLR, load capacity matters. Don’t confuse it with the weight of the tripod itself. Load capacity refers to how much weight the tripod can hold. If the weight of your camera is heavier than the load capacity of your tripod, you can damage both the tripod and camera. Check how much your camera weighs (along with any lenses, flashes, etc. that you plan to use) and choose a tripod with a corresponding load capacity.
Head Type
The camera tripod head secures your camera and lets you control its range of movement. There are four major types of heads: ball, pan/tilt, gimbal, and fluid. Ball heads can move 360 degrees. They offer flexible and smooth maneuvering and a simple design. By comparison, pan/tilt heads are the most common tripod heads and provide only horizontal and vertical movement. They’re typically suitable for beginners, and are usually found on less expensive tripods. Meanwhile, gimbal heads are specially made for balancing larger camera and lens combinations. Fluid heads are a type of pan/tilt with a hydraulic damping system to create a smoother range of motion for video.
Locks and Feet
Available in twist and lever, as well as a few custom options, leg locks prevent the legs from retracting when you load your camera onto the tripod. While flip locks are quick and easy to use, twist locks offer better weather sealing and are less likely to loosen over time. At the end of each leg, there is also a ‘foot.’ There are a few different types of feet, from spike, which suits outdoor shooting, to rubber, which is most common for its non-slip capacities.
Material
Tripods are made of a few different materials. The most common are wood, aluminum, and carbon fiber. For an ecological option, wood provides a durable, vibration resistant choice. However, wood camera tripods tend to be heavy and non-compact. Aluminum, on the other hand, provides a better strength-to-weight ratio. However, it also gets colder and hotter than the temperature tolerant wood. Expensive carbon fiber is usually only available in high end tripods. Not only is it temperature tolerant like wood, but carbon fiber also features solid vibration dampening qualities for reduced shake.
It might seem difficult to pick the best tripod to suit your purpose. If you’re a beginner photographer, a lightweight aluminum tripod with an appropriate load capacity should fit you fine. We recommend the Manfrotto Befree Travel Tripod. If you’re looking to upgrade, a more expensive carbon fiber, like the Manfrotto 290 Xtra Carbon Fiber Tripod, is a better choice. Be picky! Try a few different tripod types until you find your ideal combination.
Fujifilm announced their first cine lenses earlier this year at WPPI, with a release slated for mid-June. Well received during their first release for Sony E-mount systems, the Fujifilm MKX 50-135mm T2.9 Lens and Fujifilm MKX 18-55mm T2.9 Lens are both fully manual with compact light lens barrels. As part of the Fujifilm X Series lineup, they deliver high optical performance for professional video shooting. Plus, they boast color matching with other Fujinon lenses.Since Fujifilm features crop sensors, MKX 18-55mm covers a focal distance from 27mm to 84mm and MKX 50-135mm covers a focal distance from 76mm to 206mm. Combined, that’s a lot of coverage. They both feature T2.9 apertures across the whole zoom range, which allows for shallow depth of field shooting and lovely, popular bokeh effects. With consistent apertures, there’s also no need to readjust for lighting, which shortens shooting times. (And lets you focus your craft.)
Comprised of 22 glass elements in 17 groups with six super ED lens elements and two ED lens elements, the front group of lens elements and the zooming group of lens elements move independently of one another. (So you don’t have to re-focus after zooming!) Plus, unlike an electrical control system, there’s no lag time. The iris, focus, and zoom are all designed with three independent control rings. Meanwhile, the mechanical front inner-focusing system achieves smooth focusing with controlled lens breathing and a focus ring that rotates a full 200 degrees. Additionally, the Flange Focal Distance adjustment allows shooters to optimize performance by dialing in the lens perfectly with their camera.
Made for the developing videographer or cinematographer, the Fujifilm MKX 50-135mm T2.9 and Fujifilm MKX 18-55mm T2.9 cine lenses deliver lots of cine specific features. Plus, both lenses are the same weight and length, so you can avoid rebalancing the camera when shifting between them.
Rachel Abrams didn’t plan to become a newborn photographer. She just wanted to photograph her own children. “I knew that I wanted to have a family one day, and that I wanted to capture great quality images of them.” So, six years ago, her husband gifted her a DSLR camera for their first anniversary. “I didn’t think it would be a business at first,” she says. However, after an initial photoshoot with her newborn niece and young nephew, she started taking on more clients. “It just picked up.”
Totally self taught, Abrams turned to YouTube and Google for help. “Anything I struggled with, I just YouTubed or Googled it. That’s it,” she says. “You can learn all the facts about your camera, but photographers need to teach themselves through experience. I took a class to learn my camera, a quick course.” But otherwise, Canon Rebel T3i in hand, Abrams simply practiced until she found the looks she wanted.
She also experimented by taking pictures of her son. “Right when he was born, I didn’t really know what I was doing. Posing him felt awkward. I wasn’t experienced at all then, but I knew I wanted pictures of him. I got better as I went.”In the beginning, Abrams made house calls for her clients, but felt that the pictures weren’t consistent enough. She shoots with natural light, and some houses simply weren’t suited for it. “And I was bringing so much stuff with me when all they had to do was bring the baby.”
Eventually, she switched to using her son’s bedroom as a studio, and finally a studio room in her home. “The walls are white, with a window right in front, to allow the daylight to shine in and bounce off my walls onto my subject. My backdrop is set up and I have a closet full of props.”
Now she shoots with a Canon 6D, 50mm f/1.4 and 24-70mm f/2.8 lenses. “The 50mm was the first lens that I purchased,” she says. “I found that you get an actual visual of what you’re seeing. There’s no distortion.”Above all, however, she recommends patience for the newborn photographer. “You may feel the baby has taken control over your shoot. It takes a lot of patience and you have to stay calm for the baby. If they feel calm, then they’re happy.” And happy babies make for better pictures.
Though she pursued newborn photography to take pictures of her family, Abrams’ own children, ages five, three, and seven months old (twins), are her most difficult subjects. “It’s so hard to photograph your own children,” she says. “They only have so much patience with me and after 10 minutes I’m exhausted.” But she persists. “I don’t want to be the shoemaker who doesn’t have shoes for their children.”
We recently spoke with professional wildlife photographer, environmental photojournalist, and outdoor educator, Jared Lloyd, about how to get started with wildlife photography. From learning how to use light effectively, to taking the time to research and observe, here are a few wildlife photography tips to consider when out in the field.
Especially if you don’t use flash, it’s important to know how to work with natural light. Most wildlife photographers shoot at the beginning and end of the day, when most animals are active, and to catch some golden hour glow. Similarly, they try not to shoot at mid-day, when the sun is directly overhead, to avoid harsh shadows or overexposure.
While it’s a good idea to research what type of animals you’re going to work with, and when they like to move around, Lloyd stresses it’s important to be adaptive with light.
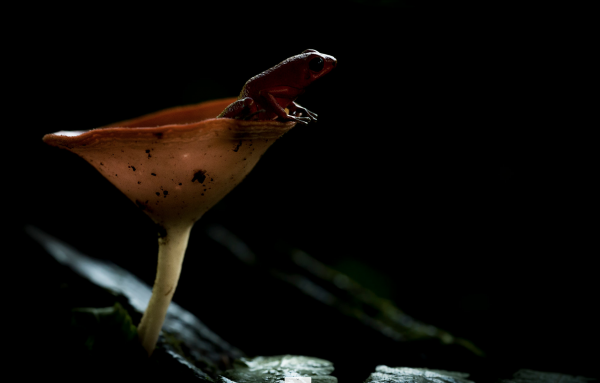
“As a wildlife photographer, it is up to me to learn how to see the possibilities of any given light,” he says. “Even in harsh tropical midday sun, beautiful photographs are waiting to be created. You can play shadows off of highlights for high contrast or Chiaroscuro style lighting in your compositions.”
Photo courtesy of Jared Lloyd
Although midday light is often harsh for critters on land, Lloyd says, “you can switch gears and go underwater, as midday light is the best time to shoot your subject close to the surface, given how that light penetrates through water.”
Take Time to Observe
Photo courtesy of Jared Lloyd
While it all depends on the animal, it’s a good idea to get a feel for your subject before you start snapping away.
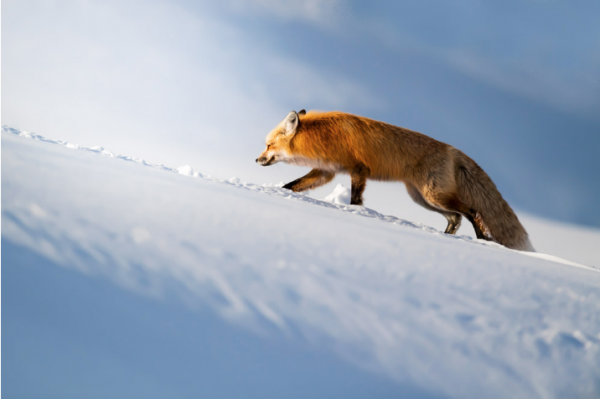
“Sometimes I might spend days watching a subject and preparing for a shoot,” says Lloyd. “Working a fox den can be like this. I will spend a couple days getting my mind wrapped around their comings and goings, when the kits come out of the den in the mornings and afternoons, trying to figure out the best angles and backgrounds, and time of day and light to shoot the situation in.”
“Then, I will go in in the middle of the day and set up a blind and brush it up with natural vegetation. Once completed, I high-tail it out of there as quickly as possible and don’t come back for three days in order to give the family of foxes time to acclimate to the new ‘thing’ in their environment, and my smell there.”
Animals acclimatized to humans, like those in national parks, may not require such advanced planning. However, in other cases, it can take an entire week of observation. It’s important to get close enough to your subject to anticipate their movements.
“The ability to anticipate behavior is everything in wildlife photography. This is why the better naturalist you are, the better photographer you will be,” says Lloyd.
Become a Naturalist
Photo courtesy of Jared Lloyd
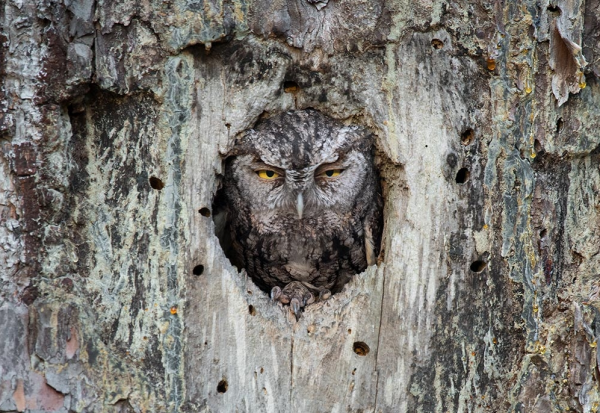
Speaking of: gather general information about your animal subjects for wildlife photography. Do the research. Lloyd has built a whole library of books about animals and natural history.
“Capturing the character of the animal starts with knowing the animal, understanding who they are in the world. You need to understand their ecology, biology, their friends and foes and food sources, and everything else that makes them who they are,” Lloyd says.
Basically, learning the history of a species can help you tell the story of an individual subject.
Stay True to the Story
It’s tempting to create a fantasy of your animal subject for the sake of a pretty picture. But whenever you can, Lloyd recommends staying true to its narrative.
“A couple of years back, I was working on a magazine assignment about Wood Ducks,” says Lloyd. “These guys are unique in the world of ducks here in North America in that they breed in the south, whereas all the other species go north for that. […] This species of duck is the denizen of cypress swamps, which is where they prefer to nest and breed and live out their lives. Cypress swamps are dark places.”
However, many photographers abandon this “mysterious world full of mood and emotion” to take pictures of the Wood Ducks in open water with bright light.
“This may make photography easier, and you can […] find Wood Ducks on the outer edges of their swampy haunts, but this is not the Wood Duck’s story.”
When you start wildlife photography, it’s a good idea to do your research upfront. Become a naturalist, and learn as much about the animal you’re going to photograph as possible.
Keep their story in mind as you structure your shoot. If you can, take some time to observe the animal in their space before you get started (bring your binoculars). It helps the animal get used to you, and you to it.
Capturing animals in their natural state can be incredibly exciting and rewarding. We hope the wildlife photography tips above provide a sense of what is required to nab the perfect shot. We also recommend following @jaredlloydphoto on Instagram for regular doses of nature in your feed.
To celebrate National Photography Month, we’re bringing you 60 Second Photography Tips for your favorite photography genres! This week, we give you the rundown on landscape photography best practices.
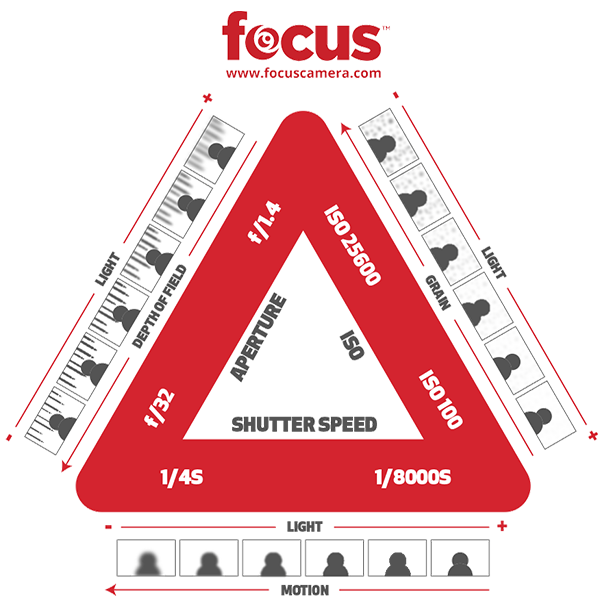
First, maximize your depth of field. To do this, you’ll want to shoot at f/8 or higher. The smaller the aperture, the greater the depth of field! Also, remember to bring a tripod to steady the camera during those longer shutter speeds. Otherwise, your beautiful, perfectly-planned landscape shot will look like a blurry mess.
If you’re interested in learning more about f-stops and the importance of shutter speeds, we recommend you check out our post on the magic of the exposure triangle.
2. Find Your Focal Point
The focal point of a photograph is the area to which the viewer’s eye is naturally drawn (or, perhaps more obviously, where it focuses). Focal points can be any shape, size or color. For your shot, look for a focal point in the distance that you want to highlight. Landscapes often look empty without one.
Both the hot air balloon and moon act as distant focal points in this landscape shot.
3. The Rule of Thirds
Consider the horizon and rule of thirds for framing. At its core, the Rule of Thirds dictates that you place the focal point of your shot off-center where the crosshairs of your viewfinder intersect. The point of the rule is to draw the viewer into the photo rather than glance at the center and move on. In many cases, it makes for a more interesting photograph and an engaging narrative. So, place the horizon on the top or bottom line to create aesthetically balanced images.
At 25, Nick Leonard is an old soul with a love for instant film. He started photographing traditional signs and classic places in Las Vegas in 2008 with a Polaroid 600 camera. It was the start of the Great Recession, and a lot of old businesses were hit hard. “I always took transit, and would bus around town. […] Now, it’s changed so much. Some for the better. Some for the not so better.”
Leonard first used his Polaroid to capture shots of the Apache Motel and the Queen of Hearts Hotel, both of which have since been demolished. “I thought the medium really resonated with classic places,” he says. “I always liked signs. It was really cool to document them. I was learning how endangered some of these places are, that they would eventually get demolished.” So, he made it a quest to preserve as much as he could with instant film.Now, Leonard has expanded his project across the United States. (“My goal before I pass is to have visited every state once.”) He goes on road trips, like a recent one he took with a friend to Oklahoma to prepare prints for the upcoming Oklahoma Modernism Weekend, hosted by Okie Mod Squad. They toured the area, including the Desert Hills Motel in Tulsa and the Indian Lodge in Wagoner, which is for sale. “We got to document that,” he says. They also shot neon signs in the area, which were gorgeous and glowing in the dark. A fan of all manner of instant film, Leonard captures his signature images using Instax and Impossible, as well as Polaroid film. “I have a lot of different shots of peel-apart Polaroid 108. Those expired in a really interesting way,” says Leonard. “I was shooting some that was 15 years old, but they were still producing. The colors would change and there was some emulsion.” He also loves to use peel-apart Fuji film, like the Fuji FP-100c, which allows him to create double exposure shots of neon signs at night.
In another trip, Leonard flew all the way out to Vineland, New Jersey to document a 1950s style Sears store that was closing. “Sears and K Mart are both hurting, so we are losing those stores,” he says. “There still happens to be so many that kept old signage from pre-1980s with 50s lettering. This one in Vineland I had known about for quite some time.”As Sears is quick to scrape away old signage, it was important that Leonard get to the store in time. He found out it was shutting down for good through a Facebook Live video from Dead and Dying Retail, a blog dedicated to closed and closing retail outlets and malls. This was on August 28, with a closing scheduled for September 3. “Long story short: I was able to get down there and document it, and that was incredible,” he says. “I spent from 8 o’clock to 12 documenting that Sears because it had so much to give in terms of signs.”
A former Costco cashier, Leonard now lives in Dallas, where he helps a friend with renovations while working on his art. He also routinely signs online petitions to save signs or to help raise money for their restoration. “I just want people to know that this stuff is out there,” he says. “That these are important. I try to show these places. I try to preserve it just so people remember what was here.”
Featured image and photograph (1), (2) copyright Nick Leonard. Photograph (3) copyright Tim Anderson.
There’s a lot to love about this small drone. The DJI Mavic Pro is a powerful photography tool at about the size of a brick. With folding arms, it transforms into a tight package that, along with the controller, make it easy to toss into a backpack. Complete with a 4K camera and 3-axis gimbal, the DJI Mavic Pro captures stabilized professional video with greater transmission range and speeds than the previous model. But that’s not even our favorite part.
While this might seem mundane, two sets of sensors are critical for stable and safe flight. And isn’t your drone a lot less fun if it’s crashing into the sea? Over the years, DJI has found that sensors are more prone to error than other parts of the drone. That’s why the Mavic Pro comes with dual IMUs and dual compasses to manage angle, speed, and acceleration as well as direction. If the system detects a problem with one set, it automatically switches to the other.
Tracking
That’s right: the DJI Mavic Pro follows you without cumbersome GPS bracelets or transmitters. ActiveTrack identifies different subjects, from skateboarders to surfers and bikers, to track and record from the air. You can select Trace, Profile, or Spotlight modes depending on your creative vision. Trace can circle or follow in front or behind the subject, while Profile whizzes alongside him or her. Spotlight lets you fly around the subject, but keeps the camera fixed. Meanwhile, Terrain Follow mode keeps the Mavic at a predefined height, so it can track you up an incline.
Battery Life
Again, battery life might not sound like a big selling point, but a long flight time translates to more footage – and who doesn’t want more? The DJI Mavic Pro battery allows it to maintain a hover for 24 minutes, and up to 27 at optimized energy consumption. Plus, the “flight control system is able to obtain accurate battery level,” which provides a clearer understanding of the battery status. So there’s no unprecedented jump down to ten percent battery life, unlike some electronics (looking at you, iPhone).
DJI Goggles
Oh man, what can’t be improved with VR? DJI Mavic accessories include the DJI Goggles, a virtual reality headset that uses head tracking to turn the camera on your drone for greater immersion. So you can see what your drone ‘sees’! It’s also super low latency thanks to the built-in OcuSync system that connects directly to the Mavic rather than through Wi-Fi to the controller, so there’s little lag time. (Plus, thanks to an HDMI port, you can also use the DJI Goggles to play PlayStation, Xbox and more.)
If you’re looking for a small drone, you can’t get a lot better than the DJI Mavic Pro. With multiple tracking options, dual sensors, extended battery life, and VR googles, it packs quite a punch in terms of features.
To celebrate National Photography Month, we’re bringing you 60 Second Photography Tips for your favorite photography genres! This week we discuss macro photography and 3 tips you can use for your smaller than life subjects.
Watches courtesy of www.marqadderly.com
Gear:
Canon EOS 5D Mark IV DSLR Camera
Canon EF 100mm f/2.8L Macro IS USM Autofocus Lens
Manfrotto Befree Advanced Aluminum Travel Tripod Twist Lock with Ball Head
Architecture photography (or ‘architectural photography,’ depending on who you ask) helps tell the story of a structure. To get a better idea of how to tell the story best, check out our five tips below!
It’s always a good idea to know what you’re walking into. Read up on the building or site, even if it’s minimal. Understanding the past helps you give credence to the parts of the structure that carry their own history. If you’re working with a newer structure, talk to the architect to uncover context for your shots.
You should also visit the site a few times before you start shooting. (This is research, too!) It will give you new and different perspectives to utilize during the shoot.
Make Multiple Trips
Even after you’ve completed your scouting, make multiple trips to photograph the structure in different types of light and weather. Capturing a skyscraper at night conveys a totally different feel than the same building during a sunny day. This way, you can offer your client a variety of shots that show different moods and stories.
Find Your Angle
To capture a building head on is all well and good, but shooting a structure at interesting angles helps to highlight its unique attributes. Plus, the best architectural photographers use this as an opportunity to emphasize an unnoticed form or detail that tells another layer of story. We recommend tilting or shifting your camera to experiment with new and different meanings in angles.
Use a Wide Angle Lens
We recommend using a wide angle lens – similar to landscape photography. Shooting at a larger aperture number provides the necessary sharpness and depth of field for architecture photography. After all, an out of focus building won’t communicate much of anything, regardless of how bright your image is. In terms of specific lenses, Sony, Canon, and Nikon all make great wide angles.
Don’t Lose Focus
It’s easy to get entrenched in details, but architecture photographers need to tell the whole story. The focus is the building or structure itself, not a beautiful stairwell.While architecture photography might not be as common as landscape or portraiture, it’s still the way that large swaths of people experience architecture. We recommend that you do your research, including but not limited to making multiple trips to scout and to shoot. Use a wide angle lens and experiment with different angles in general to highlight various attributes of the structure. While it’s important to capture the details, don’t lose sight of the forest through the trees! Focus on the building first, attributes second.

 Great for vloggers, the RX100 VI also offers a slew of movie-making functions. It features 4K with full pixel readout without low quality pixel binning, as well as the fast and accurate Hybrid AF necessary for 4K movies. Meanwhile, the HLG profile appears true to life without blocked shadows or blown highlights upon playback on an HDR compatible TV. If slow-motion is your game, you can even shoot it in close-up telephoto.


 Since Fujifilm features crop sensors, MKX 18-55mm covers a focal distance from 27mm to 84mm and MKX 50-135mm covers a focal distance from 76mm to 206mm. Combined, that’s a lot of coverage. They both feature T2.9 apertures across the whole zoom range, which allows for shallow depth of field shooting and lovely, popular bokeh effects. With consistent apertures, there’s also no need to readjust for lighting, which shortens shooting times. (And lets you focus your craft.)
 In the beginning, Abrams made house calls for her clients, but felt that the pictures weren’t consistent enough. She shoots with natural light, and some houses simply weren’t suited for it. “And I was bringing so much stuff with me when all they had to do was bring the baby.”
 Above all, however, she recommends patience for the newborn photographer. “You may feel the baby has taken control over your shoot. It takes a lot of patience and you have to stay calm for the baby. If they feel calm, then they’re happy.” And happy babies make for better pictures.


 (1 of 1)")
 Now, Leonard has expanded his project across the United States. (“My goal before I pass is to have visited every state once.”) He goes on road trips, like a recent one he took with a friend to Oklahoma to prepare prints for the upcoming Oklahoma Modernism Weekend, hosted by
  A fan of all manner of instant film, Leonard captures his signature images using
  As Sears is quick to scrape away old signage, it was important that Leonard get to the store in time. He found out it was shutting down for good through a Facebook Live video from


 While architecture photography might not be as common as landscape or portraiture, it’s still the way that large swaths of people experience architecture. We recommend that you do your research, including but not limited to making multiple trips to scout and to shoot. Use a wide angle lens and experiment with different angles in general to highlight various attributes of the structure. While it’s important to capture the details, don’t lose sight of the forest through the trees! Focus on the building first, attributes second.

