Home Blog Page 19

Canon EOS R Real World Review | Fashion photography with Gabriel Silva (Upgrading from the 80D to EOS R)

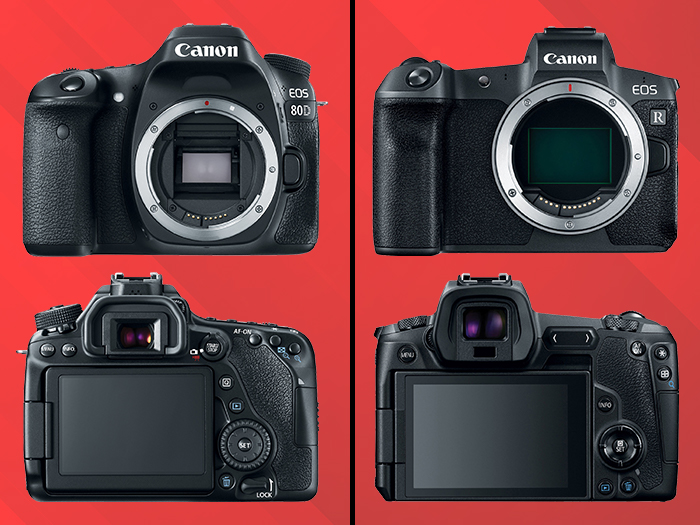
The Canon 80D vs Canon EOS R competition isn’t very fair. The EOS R is significantly newer and has better quality specs across the board. However, a lot of EF/EF-S mount and DSLR users are nervous to make the switch.

To make this decision a little easier for you, we gave the EOS R to an 80D user and asked for their feedback. Fashion photographer Gabriel Perez Silva (Vogue, PAPER, M.A.C) joined us in Focus’s studio to give us his thoughts on the EOS R, its usability, and switching systems.

Canon EOS 80DCanon EOS R
Announcement DateFebruary 2016February 2018
Body TypeMid-size SLR SLR-style mirrorless
Sensor24.2 MP APS-C30 MP Full Frame
MountCanon EF/EF-SCanon RF
File CapabilitiesJPEG (Exif v2.3) Raw (Canon 14-bit CRW)JPEG Raw (14-bit Canon CRW) C-Raw (Canon compressed Raw)
FPS (Stills)7 fps8 fps
ISO100-16000 (expands to 25600)100-40000 (expands to 50-102400)
Video1080/60p 4K/30p
TouchscreenYesYes
Fully Articulating ScreenYesYes
Screen3.0" LCD, 1040k dots3.2" LCD, 2100k dots
ViewfinderOpticalElectronic
StorageSD/SDHC/SDXC (UHS-I support)SD card (UHS-II supported)
Weight730 g660 g
Dimensions 139 x 105 x 79 mm136 x 98 x 84 mm
BluetoothNoYes
USBUSB 2.0 (480 MB/sec)USB 3.1 Gen 1 (5 GB/sec)

Canon EF/EF-S vs RF Lenses

The main selling point of the new RF mount is speed. Unlike the original EF/EF-S mount, the RF’s 12-pin connection facilities faster communication between the camera and lens. The improved connection is vital for higher autofocus speed and quickly transmitting larger amounts of data.

Canon debuted the RF mount in 2018 for its first full-frame mirrorless camera, the EOS R, followed shortly by the EOS RP. Sensing change-induced havoc, Canon released its own line of specialized adaptors that maintain all lens functionality. So, if you are an EF/EF-S user, you can effortlessly take advantage of the new mount.

Autofocus & Face Tracking

Canon has released several updates to the EOS R’s firmware since its initial release. First, they added both silent shutter and continuous shooting modes. Then, they took on autofocus.

Initially, people were… let’s say underwhelmed with the EOS R’s autofocus performance. As a result, Canon’s second firmware update significantly increased AF as well as AF tracking. This is vital for both photographers and videographers interested in taking advantage of the EOS R’s 4K/30p capabilities.

Canon 80D vs Canon EOS R

Build

These two cameras are inherently extremely different at their core; the Canon 80D is a DSLR and the EOS R is mirrorless. 

When you take a photo with a DSLR (or digital single lens reflex) camera, light passes through the lens, hits an angled mirror and shines through your viewfinder. This is a reflection of what your lens is pointed towards at that exact moment. Then, when you hit your shutter button, the mirror moves and reveals the sensor, thus recording the photo. 

On the other hand, mirrorless cameras (gasp!) don’t have a mirror. Instead, light passes through your lens and immediately hits the sensor. The preview image you see through the viewfinder (or on the back-panel display of your camera) is a real-time, digital representation of what your lens is pointed towards.

The EOS R is technically a DSLR-style mirrorless—it’s designed to have a similar feel to a classic DSLR and touts a hefty grip. However, it still has a natural size and weight advantage over the 80D. It’s inherently lighter, smaller, and more portable. Canon also did a great job cleaning up the back panel and streamlining the look and feel of the interface.

Touchscreen

Speaking of that revised interface, one of Gabriel Perez Silva’s favorite additions to the EOS R is its 3.15-inch, vari-angle, touchscreen LCD. Yes, its flexibility helps with tough shots. But the real draw here is easy access to settings, photo review, and autofocus point selection.

Fujifilm X-T4 vs X-T3 | Full Comparison | Specs, Features, Photos

Fujifilm X-T4 vs X-T3

Fujifilm’s much-anticipated X-T4 is officially available for pre-order. Its predecessor, the X-T3, gained popularity as a reliable, high-quality standby since its launch in September 2018. Today, we’re going to compare the Fujifilm X-T4 vs X-T3, highlight some important updates, and take a look at the UI changes.

Fujifilm X-T3Fujifilm X-T4
Announcement Date9/20182/2020
Sensor26.1MP X-Trans CMOS 426.1 MP X-Trans CMOS 4
MountFUJIFILM X mountFUJIFILM X mount
Weight539g607g
In-body StabilizationNo5-axis IBIS / up to 6.5 stops
Dimensions 132.5mm x 92.8mm x 58.8mm134.6mm x 92.8mm x 63.8mm
FPS (Stills)11 fps15 fps
Video4K/60P4K/60P
Screen3.0 inch / 1.04 millions dots3.0 inch / 1.62 millions dots
StorageSD memory card (-2GB) / SDHC memory card (-32GB) / SDXC memory card (-512GB) / UHS-I / UHS-II / Video Speed Class V90SD memory card (~2GB) / SDHC memory card (~32GB) / SDXC memory card (~512GB) / UHS-I / UHS-II / Video Speed Class V90
Vari-angle DisplayYesYes
TouchscreenYesYes
Face / Eye detection AFYesYes
BluetoothYesYes
Color OptionsBlack / SilverBlack / Silver

In-body Stabilization

One of the biggest gaps the X-T3 has is its lack of in-body stabilization. The X-T4 remedies this with 5-axis in-body image stabilization (or IBIS) which provides an additional 6.5 stops. That addition, combined with another 4-stops of digital image stabilization, gives users more freedom for handheld stills and video.

Fujifilm X-T4 vs X-T3

Video

We live in a video-driven world and Fujifilm’s X-T4 is further evidence that camera manufacturers are trying to keep up with the demands of content creators. In addition to in-body stabilization, the X-T4 also records both pro-level DCI 4K/60p and Full HD/240p super slow-motion video. Plus, you can now record f-log footage in 10-bit color directly to the card.

In regard to recording time, the X-T4 and X-T3 are comparable. They both allow you to film full HD (2048 ×1080 or 920×1080) at 60 fps in 30-minute increments.

Fujifilm X-T4 vs X-T3

Autofocus

The X-T4 is all about versatility—the ability to seamlessly switch from stills to digital, being able to shoot on-the-go with in-body stabilization. That trend continues with this camera’s expanded autofocus. Its AF-C sensitivity reaches down to -6EV making it easier than ever to record in low-light situations. While we don’t necessarily endorse you running around in the dark taking photos, it’s nice to know you have the option.

Battery

Planning on shooting video? Well, then you also better plan on having additional battery power at your disposal. The X-T4 shoots 500 frames per charge in “normal” mode and about 85 minutes of 4K/30p video. Alternatively, the X-T3 only shoots 390 photos on a single charge. There’s also a newly designed vertical battery grip that uses two extra batteries that raises the stills count to 2,000 frames.

This concludes our overview of the Fujifilm X-T4 vs X-T3. There’s much more info coming so keep an eye out for future reviews and video content.

Instax Mini 11 vs Mini 9 | Photo, Feature & Spec Comparison

Fujifilm has dominated camera announcement news over the past few months, first with the X-T200 and then the X100V. Today, the press continues in the instant camera category with the Instax Mini 11. In this post, we compare the new Instax Mini 11 vs Instax Mini 9 in terms of specs, features, and appearance.

Yes, the Mini LiPlay came out more recently than the Mini 9. However, we’re sticking with the Mini 9 vs 11 comparison because they’re both analog cameras. The LiPlay is great if you’re interested in a digital/film hybrid, but if you’re an instant camera purist, you’re in the right place.

Instax Mini 11 vs Mini 9
“Ice white” Instax Mini 11

Updated Features | Instax Mini

Automatic Exposure

The Mini 11 lives up to its reputation as an instant point-and-shoot with the help of automatic exposure. For photography newbies, this means the Mini 11 automatically chooses the perfect shutter speed depending on your lighting. The addition of this feature makes it easier than ever to avoid under and overexposed photos.

One-touch Selfie Mode

A big selling point of instant cameras is that, in their most basic form, you don’t need to add lenses and filters to get a decent shot. However, sometimes you do need the right accessory to get the specific angle or aesthetic you’re aiming for.

To keep your process streamlined, the Mini 11 has a built-in selfie mirror and macro mode. Instead of attaching an entire close-up lens attachment, just pull the lens barrel out until the “selfie mode” mark appears.

Instax Mini 11 vs Mini 9

Look & Feel

Colors

Next on our Instax Mini 11 vs Mini 9 comparison is color. Fujifilm is decidedly unafraid of highlighter-bright cameras. However, in this new wave of Minis, the company is embracing the muted pastel trend with sky blue, lilac purple, ice white, charcoal gray, and blush pink. The result is a generation of cameras that look just as good on your shelf as they do around your neck.

Size

We’re still waiting to get the exact dimensions of the new Mini 11. However, we do know it’s thinner than its predecessor. You can also see from the sample photos that the grip is narrower and has an additional ridge on the back to make up for the lost surface area. 

Instax Mini 11 vs Mini 9 purple clear rings
Special edition “clear purple” Instax Mini 9 vs the “lilac purple” Mini 11

Face

The Mini 9 has two “special edition” cameras with transparent ring lenses. That detail is now standard on the Mini 11, except for the gray model, which is a consistent matte color and texture. The above comparison of the special edition purple Mini 9 and new Mini 11 is a solid representation of how Fujifilm took the transparent ring lens concept and honed it into something both aesthetically pleasing and functional.

That concludes our Instax Mini 11 vs Mini 9 comparison (for now). Keep an eye out for future details, photos, and video reviews.

4 Best Beginner Cameras Under $1,000 – Canon, Sony, Fujifilm, Nikon

Choosing the right beginner camera takes an incredible amount of research. To help you out, we put together this list of (in our humble opinion) the best beginner cameras under $1,000 from the big four: Canon, Sony, Fuji, and Nikon.

We chose these cameras based on their specifications, price, and consistent popularity. We understand that some of these are contentious picks and we encourage you to tell us how wrong we are in the comments below.

Looking for a few less expensive options? We recommend you check out our list of the 5 best beginner cameras under $500.

Best Beginner Cameras Under $1,000 - Canon, Sony, Fujifilm, Nikon

Specs Canon T8iSony a6400Fujifilm X T-30Nikon D3500
Price$749.00$898.00$799.00$396.90
Announcement DateFebruary 2020January 2019 February 2019 September 2018
TypeDSLRMirrorlessMirrorlessDSLR
MountCanon EFE-MountFUJIFILM XF-Mount
Sensor24.1 MP CMOS24.2 MP CMOS26.1 MP CMOS24.2 MP CMOS
ProcessorDigic 8Bionz XX-Processor 4Expeed 4
ISO100 - 25,600100 - 32,000160 - 12,800100 - 25,600
AF Points4542542511
Weight18.17 oz14.22 oz13.5 oz12.9 oz
Dimensions5.16" x 4.04" x 3.00"4.72" x 2.64" x 2.36"4.66" x 3.26" x 1.84"4.88" x 3.82" x 2.76"
FPS (Stills)7fps11 fps30 fps5 fps
Video4K4K4KFull HD
Max. Resolution6000 x 40006000 x 40006240 x 4160 6000 x 400
Screen3.0" 1.04 million dots3.0" 921 thousand dots3.0" 1.04 million dots3.0" 921 thousand dots
Articulated LCDfully articulatingtiltingtiltingfixed
TouchscreenX

Canon T8i

  • Price: $749.00
  • Key Specs & Features
    • Sensor: 24.1 MP CMOS
    • Frames Per Second: 7 fps
    • Video: 4K
    • Screen: Fully Articulating LCD

The Canon T8i is the newest model in our beginner camera comparison. Sadly, that means we don’t have a lot of sample footage or images for this model. However, it also means it’s packed with a lot of useful, updated features including a vari-angle LCD, fast eye-detection autofocus, and a powerful processor (the Digic 8).

This is one of the DSLRs on our list so it’s a bit heavier than its mirrorless alternatives, but don’t let that scare you away. That extra weight is often considered an asset by photographers who prefer a little more heft to their cameras—DSLRs look and feel sturdier.

Sony a6400

  • Price: $898.00
  • Key Specs & Features
    • Sensor: 24.2 MP CMOS
    • Frames Per Second: 11 fps
    • Video: 4K
    • Screen: Tilting LCD

The Sony a6400 is one of the most popular Sony cameras on the market and for good reason. It has 425 phase-detection autofocus points, great subject tracking, and a .002 second AF speed. But perhaps our favorite Sony feature is its manual “peaking” function that color-highlights the sharpest area of an image. This is especially useful for new photographers who need a little extra guidance.

All of these features make this camera uniquely suited for both stills and video. If you’re interested in expanding the a6400’s video capabilities, it has connectivity for external microphones via the built-in microphone jack or the option for an XLR adapter kit.

Fujifilm X T-30

  • Price: $799.00
  • Key Specs & Features
    • Sensor: 26.1 MP CMOS
    • Frames Per Second: 30 fps
    • Video: 4K
    • Screen: Tilting LCD

The Fujifilm X T-30 is arguably the nicest looking of the beginner cameras under $1,000 (it also packs the biggest punch). The X T-30 boasts the classic lines of a film camera with the sleek body and high quality of a mirrorless.

Its powerful X-Processor 4 combined with a 26 MP sensor gives you high-quality photos at a remarkable 30 fps. The X T-30 also shoots 4K which you can watch in real-time with the camera’s tilting LCD.

Nikon D3500

  • Price: $396.90
  • Key Specs & Features
    • Sensor: 24.2 MP CMOS
    • Frames Per Second: 5 fps
    • Video: Full HD
    • Screen: Fixed LCD

Yes, the Nikon D3500 is significantly less expensive than the other items on our list. It’s not necessarily the fastest and it only shoots Full HD instead of 4K. However, new photographers still buy this camera in droves.

It has a tough body, a solid sensor for the cost, and takes reliably high-quality images. Sure, it doesn’t have a ton of extras but that’s part of the appeal. The D3500 does the basics very well without the user worrying about adjusting too many advanced settings.

That concludes our list of the 4 best beginner cameras under $1,000. Disagree with one of our pics? Make a good argument in the comments below and we just might change our minds.

Hands-On Review | Sigma 60-600mm f/4.5-6.3 DG OS HSM Sports Lens

In this post, we talk about the Sigma 60-600mm f/4.5-6.3 DG OS HSM Sports Lens, its extensive capabilities, and a bit about its construction. We took this beast of a lens out for the 2018 New York City Marathon to put it through its paces (sample photos below).

What do all the Sigma abbreviations mean?

We can’t all speak fluent Sigma. So, before we get into features, we put together a brief key to explain exactly what the three add-ons at the end of the lens title mean.

  • DG: compatible with full-frame DSLRs
  • HSM: has a motor designed to facilitate fast and silent focusing
  • OS: has optical image stabilization

Functionality | Sigma 60-600mm

The most incredible thing about this lens is undoubtedly the zoom. This is the world’s first 10× optical zoom telephoto lens with a tele end of 600mm. Immediately, this makes it a dream camera for sport and outdoor photographers alike. Gone are the days of carrying around three lenses when you can get their full range of functionality in one. However, that convenience comes with a sizeable price tag. That said, if you’re a professional, it’s well worth it.

In terms of usability, it’s also worth noting that the Sigma 60-600mm’s manual override (MO) can switch between two full-time manual modes. Similarly, it includes two optical stabilization modes that leverage a hypersonic motor for smooth, fast autofocusing.

Construction | Sigma 60-600mm

Element Resistance

If you invest in this lens, rest easy knowing that the body is dust and splash-proof with water and oil-repellent coating on the front lens. Again, this is especially important for photographers who make their living taking photos in the great outdoors.

Weight & Construction

This Sigma lens is on the heftier side and weighs in at 2,700 grams. The third-party lens company made it as light as possible with the help of three different materials: aluminum alloy near the lens mount, TSC or thermally stable composite throughout the barrel, and carbon fiber reinforced plastic throughout the lens seals and lens hood. 

You can purchase the Sigma 60-600mm f/4.5-6.3 DG OS HSM Sports Lens for Nikon F, Canon EF, and Sigma SA mounts.

Sigma 60-600mm f/4.5-6.3 Sample Images

sigma 60-600mmsigma 60-600mm sigma 60-600mm sigma 60-600mm sample image sigma 60-600mm sample image sigma 60-600mm sample image sigma 60-600mm sample imagesigma 60-600mm sample imagesigma 60-600mm sample image

Fujifilm X100V vs X100F | Spec and Photo Comparison

Fujifilm X100V vs X100F

The Fujifilm X100V has landed! It’s been about three years since its predecessor, the X100F was announced and quickly became a Fujifilm fan fave. However, there were a few long-standing issues with the F that even the most dedicated users detest including video and lens capabilities. Were they updated? Is the new model worth the upgrade? Find out below in our Fujifilm X100V vs X100F comparison post.

Fujifilm X100V vs X100F face 2

Fujifilm X100V vs X100F

Fujifilm X100V vs X100F camera comparison chart

Fujifilm X100V vs X100F Chart

Fujifilm X100V | Notable Updates

Autofocus

The X100F’s autofocus is decent but the new iteration has both touch autofocus and tracking autofocus. These are not only useful add-ons for hobbyists but also keep the Fujifilm X Series top-of-mind for professional photographers looking for a quality, compact bridge camera.

Without the telephoto lens attachment

Lens Updates

The Fujifilm X100V marks the debut of the X Series’ second generation lens. It’s still the prime 23mm (35mm equivalent) that we’ve come to know and love on the X100F. However, its edge-to-edge sharpness is dramatically improved—similarly, close-up photos at an f/2 are noticeably clearer and more detailed. This change goes hand-in-hand with the V’s improved sensor quality and its new X-Processor 4 quad-core imaging engine. Basically, the X100V takes significantly better photos even faster than its predecessor.

Fujifilm also created lens attachments if you’re interested in changing your angle of view on-the-go. However, unlike many lens-related accessories, these add-ons don’t look clunky on the X100V’s body. If anything, they complement its sleek, vintage look.

Body

Fujifilm made a few updates to the X100V body. First, it’s weather-resistant. Unlike the X100F, the V can be used as a travel and street photography camera without the constant fear of water damage from a light drizzle.

Second, the V’s monitor is (finally) an articulating touchscreen. This addition is probably why the new camera’s body is slightly heavier than the X100F. However, that minor difference is well worth the functionality provided by the new and improved 3-inch 1.62M dot screen.

We also have good news for those of you who favor a camera’s viewfinder over a back-panel LCD. The X100V has an updated 3.69M-dot OLED EVF compared to the X100F’s 2.38M-dot EVF. 

In short, you can now take clearer photos and see them in-camera in sharper detail.

Video

4K continues to creep into bridge cameras and point-and-shoots as the industry standard for video recording. Unlike its predecessor, the Fujifilm X100V shoots 4K at 30 frames per second. This is a far cry from the X100F’s HD limitations. From the sample footage we’ve seen from Fujifilm, this is a very capable video camera and we can’t wait to try it out.

So, should I upgrade?

Yes. We don’t give this strong of an answer often, but we feel confident that this upgrade is worth your time and money. Fujifilm made significant upgrades to everything X100F users had gripes with including lens quality, video recording, autofocus capabilities, and weatherproofing. This camera is a great option if you’re looking for a professional-grade, prime bridge camera.

This concludes our overview of the Fujifilm X100V vs X100F. Are you going to invest? Let us know in the comments below.

9 Romantic NYC Engagement Photography Spots

For most people, Valentine’s Day calls to mind big pink hearts, boxes of chocolate, and candle-lit restaurants. For professional photographers, it looks a lot more like payday. That’s right, people—it’s engagement season! To celebrate we put together a list of 9 romantic NYC engagement photography spots. Dust off those portrait lenses and let’s get started.

1. The Cloisters

Are you unsure if your partner loves you? Do you want them to demonstrate their loyalty and affection? Tell them you want to go up to the Cloisters and see what happens. If they’re willing to traverse all the way up to 190th street, you’ve got yourself a winner—lock that relationship down.

All joking aside, the Cloisters museum is a gorgeous testament to European medieval architecture and is itself a product of long-term dedication. 

The museum’s buildings are centered around four “cloisters” (a fancy way to say “covered walks”): the Cuxa, Saint-Guilhem, Bonnefont, and Trie. These structures were purchased by American sculptor and art dealer George Grey Barnard, dismantled in Europe between 1934 and 1939, and subsequently shipped to New York City. Later, John D. Rockefeller, Jr. bought and donated them to the MET.

In addition to being a photographer’s dream, the Cloisters’ focus on Romanesque and Gothic art makes it a prime destination for the aesthete in your life.

2. MET Rooftop

The MET Rooftop Garden The Cantor Roof Garden Bar
Image Courtesy of futuregreenstudio.com

Since we’re already discussing the MET, let’s move a little further south toward the museum’s 5th Avenue location. The Metropolitan Museum of Art is world-renowned for its extensive collection, curation, and architecture. In fact, in 2018 it was the third most visited museum in the world. However, it also boasts breathtaking views of both Central Park and the Upper East Side.

Enter the MET Roof Garden, the next stop on our list of NYC engagement photography spots. Periodically, the museum commissions artists to install a new masterpiece on the roof. For example, several years ago, Future Green Studio created a space with lots of gorgeous greenery. More recently, Alicja Kwade was commissioned for a massive piece called ParaPivot that evokes a mini solar system.

Art and a view—what could be sweeter?

3. Garden Court, The Frick Collection

A little further south—but still in the Upper East—we have The Frick Collection’s Garden Court. According to its website, The Frick is internationally recognized as a premier museum and research center known for its distinguished Old Master paintings and outstanding examples of European sculpture and decorative arts.

In addition to its gorgeous paintings and statues, The Frick also holds the picturesque Garden Court. This room looks like somewhere that Romeo and Juliet would meet to hold hands and hide from their respective families. It also boasts incredible lighting and striking architectural details ripe for snapping.

We recommend bringing a wide-angle lens to capture the entire whimsical space.

4. Bethesda Terrace

Let us now wander into the Central Park itself to Bethesda Terrace. There’s truly no time of year when this area of the park isn’t breathtakingly beautiful and worthy of documentation. Its layout includes both an upper and lower terrace connected by two “grand staircases” that lead to the mall and the Bethesda Fountain.

A large portion of the terrace’s beauty stems from its architectural inspiration: nature. Famously, one of its two architects, Calvert Vaux, said of the terrace’s design, “Nature first, second, and third – architecture after a while.”

This is a great romantic NYC photography spot for anyone interested in capturing the glory of the outdoors complemented by graceful archways fit for the cover of a romance novel.

5. Top of the Rock

There’s something undeniably pleasant about looking down at Manhattan from above. You can enjoy all of the gorgeous lights and breathtaking architecture without the constant stress of people rushing around you on the ground below. While New York has quite a few options for the perfect birds-eye-view, Rockefeller Center made it to the top of our list.

Don’t get us wrong, the Empire State Building and One World Trade are incredible. But, Top of the Rock is (usually) less hectic and gives you a bit more room to set up a tripod. It also offers a unique view of Central Park and a prime opportunity for celebrity sightings on your way into the building.

6. Central Park’s Conservatory Garden

Photo by Becky Phan

As evidenced by this list, Central Park is full of whimsical, fairy-tale-worthy spots. One of those hidden gems is way up on 5th and 105th: the Conservatory Garden.

Central Park is 843 acres large (making up roughly 6% of Manhattan). But, believe it or not, the Conservatory Garden is the only formal garden in the entire park. Thus, it’s quiet, calm, and completely free of bikers, runners, and other manic exercising types. This makes it ideal for engagement photos, romantic walks, and strolling around solo reading poetry in 1800s formalwear.

7. New York Public Library

Vaulted ceilings, grand marble staircases, and the world’s greatest love stories are all found in one place: the New York Public Library. Conveniently nestled next to Bryant Park, the Stephen A. Schwarzman Building is both the Main Branch and the flagship library location—it first opened its ornate doors in 1911 and has been inspiring artists ever since.

The building is packed with reading rooms, rotundas, murals, grand halls, and decorative doorways. While they have a cohesive design, each space has its own specific look and feel. We recommend this photography location for romance enthusiasts, photographers, and bibliophiles alike.

Again, bring a tripod to capture low-light shots and a camera with a very quiet shutter.

8. Brooklyn Bridge Park

Our list has finally crossed over into Brooklyn (woo!). Brooklyn Bridge Park is a massive, multi-purpose space with seemingly endless photo ops.

The entire park boasts sweeping views of Manhattan framed by local attractions including four piers, a beach, rotating art installations, a few elevated terraces, and Jane’s carousel (not to mention the neighboring neighborhood of DUMBO). 

We recommend Brooklyn Bridge Park if you’re looking for a romantic engagement photography spot with lots of room, varied shooting locations, and an incredible backdrop.

9. Brooklyn Botanic Garden

Last but certainly not least is the Brooklyn Botanic Garden. Unlike Central Park, you need to pay to shoot professional photography in this space. However, its indoor-outdoor, year-long attractions make it well worth the extra cash. Plus, it only gets about 725k annual visitors compared to Central Park’s 38 million—that extra elbow room makes all the difference when you’re lining up a shot.

Much like the adjacent Brooklyn Museum, the Brooklyn Botanic Garden is packed with a diverse array of breathtaking visuals and themes from the Tropical Pavilion to the Shakespeare Garden. As mentioned above, it’s also a great place to shoot regardless of the season. Just a few of our favorite attractions include the Japanese Garden, Water Garden, Cherry Esplanade (in the spring), and the balmy Warm Temperate Pavilion.

That concludes our list of 9 romantic NYC engagement photography spots. But, the best thing about New York is its endless possibilities. Do you have any additions to the list? Let us know in the comments below.

What Photography Gear to Bring to Coachella

Coachella Photography
A screenshot from the Coachella website documenting their v rude policy

Coachella is about so many things. Yes, technically it’s an annual music and arts festival that takes place in Indio, California. But it’s also about making new friends, enjoying one of the most beautiful venues in the US, and (of course) curating perfect festival looks that demand documentation. However, you can’t bring “professional” cameras with detachable lenses into the festival! A few people have managed to sneak in small mirrorless cameras, but most of those daredevils end up getting sent back to their cars or have their cameras taken away. In this post, we give you a few Coachella-approved camera options to take with you on your journey into the desert. Enjoy!

Polaroid OneStep2 i-Type Rechargeable Camera

You have quite a few instant camera options to choose from when packing for the desert. BUT, the Polaroid OneStep2 is a classic, no-frills instant camera that takes great photos. It features a high-quality 2 ft. to infinity lens, self-timer, and a powerful built-in flash for cute night shots. Plus, it has a 60-day battery life which is ideal for tent life. If its aesthetic is familiar, it’s because this camera is based on the 1977 OneStep Polaroid camera; this model offers all of those sweet throwback nostalgia vibes with a more intuitive interface.

Fujifilm Instax Square SQ20 Hybrid Instant Camera

Instax mini LiPlay Coachella
This is the Instax mini LiPlay. It’s the smaller alternative to the SQ20 and prints in mini film rather than square.

If you’re searching for the perfect combination of digital and instant, look no further. The Instax SQ20 is equipped with a digital image sensor and a color LCD monitor to preview photos before printing. The SQ20 even has a few new features that will up your content game including collage mode, frame grab, and time shift. To see a full breakdown of the SQ20, check our video review here.

If you prefer the instant mini aesthetic, we recommend you look into the Instax mini LiPlay. It offers more or less the same features as the SQ20 but prints on the brand’s smaller film (1.8 in × 2.4 in).

Panasonic LUMIX ZS80 Travel Zoom Lens Digital Camera

The ZS80—Panasonic’s newest point and shoot—is fanny-pack-friendly and made for travelers and vloggers. Use it to take 4k videos of your fave artists and perfect selfies with its tilting screen. If things get a little…uh…blurry while you’re shooting, the ZS80 has Post Focus mode and Stacking mode which both give you a lot of control over your images after they’re taken.

Sony Cyber-shot DSC-RXIR II

We love the Sony DSC-RXIR II. It has an impressive 42.4 MP sensor, records full HD movies, and shoots 5 frames-per-second with exceptional autofocus tracking. It is an ideal, reliable companion for all of your Coachella photography needs.

Admittedly, this camera is on the expensive side and you’re going to want further proof that it’s a great camera for real life as well as festival life. With that in mind, we recommend you check out this Flickr album of jaw-dropping sample photos.

Fujifilm Instax Share SP-3 Printer

The Fujifilm Instax Share SP-3 Printer is a great option if you don’t want to invest in a whole new camera or you’re (rightfully) nervous about taking a sensitive electronic device to a festival. 

The Share SP-3 is essentially a hyper-portable Bluetooth printer. Just download the Instax app, connect the printer with your smartphone, and print digital photos on instant film. Keep this little guy in your bag and print at the festival or keep your film out of the heat and print your favorite shots when you get home.

What must-haves are you taking with you to Coachella this year? Let us know in the comments below.

Over Coffee | Dani Diamond’s Guide To Making It In Fashion Photography

Nothing makes you reassess how you spend your free time quite like chatting with fashion photographer Dani Diamond.

Diamond is primarily known for his perfectly-lit portraits and high-end boutique fashion photography. But, between his packed shooting schedule and raising two kids, Diamond also makes his own leather photography accessories, binds books, and crafts large pieces of furniture by hand. Most recently, he built and installed a floor-to-ceiling shelf in his office to hold his curated collection of camera bags.

The worst part? He’s good at all of it. He either has an impeccable work ethic or found a way to add 3 extra hours to his day (our money is on the former).

Amidst this whirlwind of activities, Diamond was kind enough to sit down with us and discuss gear, photography tips, and his advice for new photographers.


View this post on Instagram


A post shared by Dani Diamond (@danidiamondphotography) on

How do I get started in photography?

As mentioned above, Diamond has quite a few skills outside of fashion photography.

However, he doesn’t have the (often odious) attitude of a person who can pick up any challenging task and instantly become an expert. Instead, he exudes the high energy, confidence, and pragmatism of someone who loves a good challenge.

It was this attitude that first drew him to photography. In fact, for many years he didn’t even like the concept of professional photography. Like so many of us, he developed a distaste for it after his parents forced him to sit for family portraits as a kid.

“My mom used to take us to JC Penny when we were growing up,” he shook his head, grimacing at the memory. “[The photographers] used to shove teddy bears in our face and promise lollipops but they never gave us anything.”

It wasn’t until years later when he toyed with Photoshop that he discovered his love for the technical side of photography.

“I was never, and I still don’t consider myself talented in photography. I’m really not,” he asserted. “I studied it and turned it into a skill that came with a lot of studying and experiences and experimenting and just knowing what works.”

“So to me, it’s just a huge scientific problem that I’ve solved. And it’s an equation that I just throw at my work every single day. And that’s how I walk around with consistent results, no matter what…The whole thing is just a huge math problem.”


View this post on Instagram


A post shared by Dani Diamond (@danidiamondphotography) on

Methodology

His advice to aspiring photographers reflects his pragmatic approach and origins: break down the most important elements into manageable pieces. In other words, create a formula. He gave portrait photography as an example. 

Diamond divided the portrait photography learning process into about five sections:

  • Colors- understanding which colors work well together and why
  • Poses
  • Location- understanding the depth between your subject and the background
  • Lighting
  • Communication and expression

“You could be a technically perfect photographer in every way, but if you’re not capturing killer expressions and connecting with the person in front of your camera, your pictures are useless. No one cares to see them,” he elaborated. 

“People are so worried about all the technical sides of photography, all the settings. ‘Hey, what camera do you use? What lens do you use? What settings was this picture?’ I’m like, ‘That’s not what’s important.’

“Yes, you have to have that stuff right. But what’s important is how I directed the person in front of me to get that killer expression that speaks to any random stranger who will ever see this picture in the future.”


View this post on Instagram


A post shared by Dani Diamond (@danidiamondphotography) on

Pre-shoot Prep

So, how do you prepare the models that you’re working with? Even the most beautiful subjects can feel uncomfortable in front of a camera or give off awkward, gawky energy.

“I think that it’s probably 50/50 of the photographer’s personality and also how they approach someone and build a connection with them from when they first meet…it makes a huge difference when someone is just real with you.”

Part of establishing that “realness” is building a rapport. 

“Don’t even take your camera out of your bag when you first meet someone. Just meet up with them and right away jump into the conversation and make it about them, not you…Find things that someone’s interested in. 

“So my first question is, what do you do with your free time? Do you have any hobbies? Do you like woodworking? Do you like gardening? Do you like reading books? Cooking? And the second you find something that they enjoy doing, maybe, I don’t know, yoga classes, whatever. Even if you’re not knowledgeable at all in the area, you’re still able to get someone to make conversation by just simply asking them questions…”

“And the second a person starts talking about themselves, they suddenly feel comfortable around you. And then [when] I pull out my camera and say, “Hey, you want to take a couple of pictures?’ They’re like, ‘Yeah! Let’s do it.” It’s like, ‘Yeah, we’re best friends now.’”


View this post on Instagram


A post shared by Dani Diamond (@danidiamondphotography) on

What’s in your camera bag?

Yes, we’ve established that connecting with your subject is a crucial aspect of fashion and portrait photography. That said, the importance of building the perfect camera bag for your needs should not be minimized.

Without further ado, here is a rundown of Dani’s favorite gear (with a little editorializing from his corresponding Instagram post):

Camera & Lenses

  • Nikon D850 – the best camera known to mankind for still images
  • 105mm f/1.4G – specialty for tight headshots
  • Sigma Art 50mm f/1.4 – my go-to for shooting fashion
  • Nikon 85mm f/1.4G – my go-to portrait lens
  • Nikon 35mm f/1.4G – specialty when I’m feeling creative and want an interesting perspective

Accessories

  • @holdfastgear the best camera strap on the market. Period. Everything is else a knock off. Watch my YouTube video on this.
  • @camranger sends my images Wirelessly to an iPad. I have a video on this as well. Case for it made by me check @danidiamondcarpentry
  • @BEDSTU protégé boots have been with me for 3 years now. They are as comfortable as boots can get and I get compliments on it daily.
  • @ueboom_ speaker amazing speaker I turn it on before my camera
  • @sandisk memory cards are the best
  • @sony xqd card does what it’s supposed to and cost me a kidney

This only scratches the surface of fashion photographer Dani Diamond’s tips, tricks, and tutorials! Check out his YouTube page and website for more info.

Fujifilm X-T200 vs X-T100 | Specs, Features, Photos

Fujifilm X-T200 vs X-T100

We’ve been big fans of the Fujifilm X-T100 since it was first announced in May 2018. It houses all of Fujifilm’s reliability, quality, and style in an entry-level body. So, when they announced the new Fujifilm X-T200, we were very excited to see if the new model lived up to its predecessor’s hype. In this post, we do an in-depth Fujifilm X-T200 vs X-T100 comparison including specs, features and physical characteristics.

You can pre-order your X-T200 here.

Fujifilm X-T200 vs Fujifilm X-T100

Upgrades & Additions

Look and Feel

Let’s take a moment to acknowledge the obvious differences between these two models. First, the Fujifilm X-T200 comes in champagne gold, dark silver, and silver (the last iteration has a black option instead of silver). This is not an earth-shattering change but it does add a little more variety to the lineup.

Second, we have size and weight. The X-T200 is both smaller and lighter than its predecessor. In fact, it’s almost 80g lighter than the X-T100. This is especially impressive when you factor in the new model’s larger, more versatile screen.

Finally, the X-T200 is equipped with a vari-angle 3.5” LCD screen with a 16:9 aspect ratio. It’s an intuitive touchscreen that can be opened and closed between 0° to 180° and rotated between -90° to +180°.

Fujifilm X-T200 lifestyle photos

Processing

When you first glance at its specs, the X-T200 doesn’t seem significantly more powerful than the X-T100. However, its high-speed APS-C 24.2 MP CMOS utilizes copper wiring to optimize the camera’s performance. As a result, it’s able to process data 3.5x faster than the X-T100. This is great news for those of us who hate waiting and love a higher frame rate.

Autofocus

Three factors come together to improve the X-T200’s autofocus and face/eye detection: quicker processing (as mentioned above), on-sensor phase detection, and an entirely new AF algorithm.

Often, due to the processing power found in many entry-level cameras, there’s a lag when you’re using autofocus on an LCD monitor. According to Fujifilm, this doesn’t hold true with the X-T200. Instead, focusing on both individuals and groups is nearly instantaneous. That speed works in conjunction with features like main subject recognition to effectively track, frame, and capture your human of choice.

Video

Fujifilm is really trying to give you everything you need to quickly edit footage within your camera without the help of a computer. We have to assume this is aimed at influencers who rapidly produce and post content on-the-go.

The X-T200’s updated gyro sensor improves both electronic stabilization and HDR video, reducing the effects of camera shake while you record. Speaking of that new HDR video feature, it makes recording footage in high-contrast situations much easier. These two additions in conjunction with the X-T200’s in-camera video editing allow for clips to be quickly trimmed, resized and shared.

Film Filters

For years Fujifilm was a leader in film photography—you actually can’t spell Fujifilm without the word “film.” Then, the dawn of digital photography came about and the company pivoted away from yesteryear and towards the future. Rightfully, most of their contemporaries did the same. Film was out, digital was in. We continued to progress as a society, years pass, etc.

Enter Instagram and its original set of filters.

For better or worse, the image-sharing platform sparked a remarkable challenge in the tech community: how do we make our digital photographs look like film without actually going through the trouble of shooting film?

Hundreds of apps now exist with names like “8mm Vintage Camera” and “Filmm” that promise effortless nostalgia.

It was only a matter of time before the professionals stepped in and said, hey, we can do this better.

Using their extensive experience in the industry, Fujifilm recreated 11 of their most iconic films and pre-loaded them onto the Fujifilm X-T200. According to their press info:

“Images made with these film simulations carry the look and feel of the actual films that inspired them, which are a great building block to sparking creativity in image-making. In addition, 20 advanced filters, which includes the new, ‘Clear Filter’, give even more creative possibilities to image-makers as they seek to express themselves artistically.”

This is not the first time Fujifilm included this feature in a digital camera. They first added “film simulations” to the (gorgeous) X-PRO3

That sums up our overview of the X-T200 vs X-T100. Are you going to upgrade? Let us know in the comments below.