Macro photography is the practice of taking extreme close-up images, usually of a subject that fills the entire frame. It’s often very nature-centric (bugs, flowers, water droplets, etc.) but can also be an asset in product photography. In this post, we go through some key macro photography tips and tell you which lenses and accessories you need to get started.
Macro Photography vs. Close-Up Photography
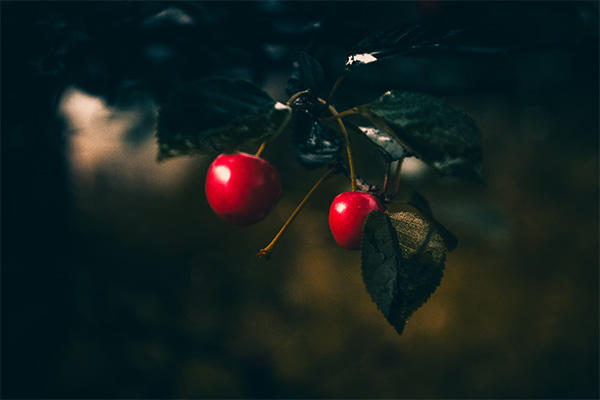
The key visual difference between close-up and macro photography is the amount of detail. For example, a close-up photo of a salmon will give you some specific color and texture characteristics. However, a macro photograph shows intricate details of individual scales.
Macro vs. Close-Up Photography
1 of 6
Close-up Image
Macro Image
Close-up Image
Macro Image
Close-up Image
Macro Image
Macro Photography Equipment
Microlenses and Macro Lenses
This naming scheme is often a point of confusion for new photographers. Simply put, “microlenses” and “macro lenses” are the same thing; companies sell the same lens under both names. If you buy a macro lens it’s the same thing as buying a micro lens. It is truly that simple.
Magnification
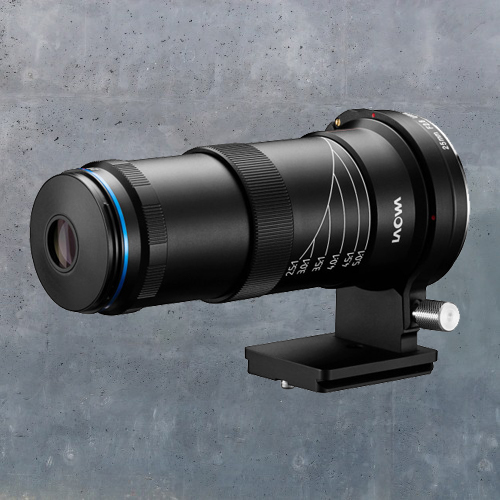
You want a macro lens that provides 1:1 magnification or higher. This ratio indicates that a one-inch object registers as one-inch on your camera’s sensor. An extreme example is this Venus Optics Laowa lens which has 5:1 magnification. By extension, that means this lens magnifies subjects to be five times larger than life-size.
5:1 Micro Photography
1 of 2
Shot With A Venus Optics Laowa lens | Courtesy of Roman Willi
Shot With A Venus Optics Laowa lens | Courtesy of J.S. McElvery
Working Distance / Focal Length
The “working distance” is the space between your lens and the object you’re shooting. The longer your lens’s focal length, the more potential for working distance you have. As with any other type of photography, the focal length you decide upon is entirely dependent on what you plan to shoot.
If your goal is to take breathtaking photos of live insects, you want a longer focal length; getting too close might scare off the bugs. To be safe, find a lens with a focal length in the 180mm-200mm range like the Irix Dragonfly 150mm f/2.8 Macro 1:1 Lens orSigma 180mm F2.8. Alternatively, if you shoot jewelry which (hopefully) will not run away from you, explore lenses in the 50mm-105mm range. For that, we would suggest something like the Sigma 70mm F2.8 Art DG Macro for Sony E or Nikon AF-S Micro NIKKOR 60mm f/2.8G ED Standard Lens.
Tripods
With macro lenses, small vibrations cause big blurs. That’s why it’s important to use a quick shutter speed—like 1/250 or faster—to minimize distortion. However, if you’re in a situation where you have sub-optimal light, you might need a longer exposure and a tripod to steady your camera. We recommend a reliable standard like the Koah PRO Aphelion Professional 6 ft Tripod.
A tripod is also incredibly helpful as you go through trial and error to determine the perfect settings for your shoot. Macro photography means leaving the comfortable realm of “auto” mode and changing to “manual.” Usually, autofocus is faster than manual focus. However, when shooting macro photography autofocus will cause your lens to keep swimming and refocusing.
Flash
If you’re using macro photography to shoot bugs, flowers, or other small objects, you need to set a wide aperture—f/1 through f/4—for adequate depth of field. Hopefully, a wide aperture and long exposure will provide enough light for your shot. However, that isn’t always the case. That’s when it’s time to break out the flash. While something like aflash ring or the Sony Alpha Macro Twin Flash Kit is preferred, beginners can use built-in pop-up flashes to start.
When you’re a new photographer it’s hard to justify investing in a lens that’s more expensive than your camera. The five Nikon D3500 lenses I chose for this video are not only affordable, but they’ll also let you use your Nikon D3500 in new, more advanced ways.
The D3500 is one of the most popular beginner DSLRs on the market. It’s affordable, lightweight, and has built-in guides that help you adjust the settings to get the shot you want. All of these features make it a great camera for people who are ready to graduate from a smartphone to something more serious. Let’s get started.
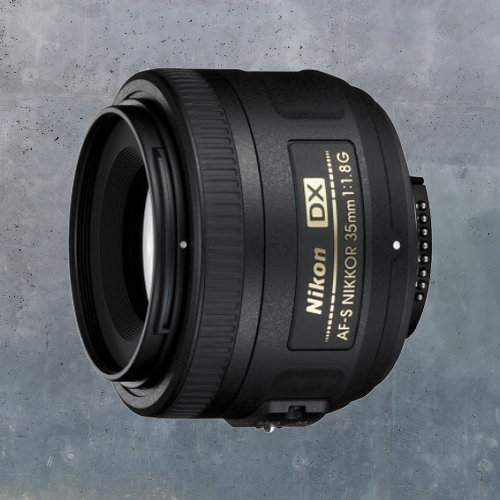
First, let’s talk about the Nikon 35mm f/1.8. With its wide aperture and incredible sharpness, this lens is an ideal everyday lens that features smooth, natural bokeh. It’s the least expensive lens on our list at $199.95.
This lens has a 52.5mm focal length which is a 35mm equivalent and a minimum focal distance of 11.8 inches. A few key features are Nikon’s Rear Focusing System so it’s always as compact as it looks and a M/A switch which allows you to instantly switch from autofocus to manual focus in a heartbeat.
2. Venus 25mm f/2.8 Lens
Second, we have the Venus 25mm f/2.8. I recommend this lens if you’re interested in close-up nature photography or you’re a germaphobe. It’s made for macro photography and has an extreme 5:1 magnification.
Unlike a lot of other macro lenses, this 25mm Venus gives you corner to corner sharpness in every shot. It’s also small and lightweight which makes it easy to carry with you on a nature hike. You can find this lens on our website for $399.00.
3. Sigma 18-35mm f/1.8 Lens
Moving on to our next lens the Sigma 18-35mm f/1.8. This is a little pricier at $799.00 but don’t let the sticker shock scare you away. We’re going to talk about why this is a great lens in a second, but Focus Camera also gives you a free SIGMA USB dock and memory card with the purchase.
The Sigma 18-35mm 1.8 translates to 27mm-52.5mm on a full frame camera. It also has extraordinary optics that professional photographers look for to give their images an extra pop. It’s called an art lens for a reason.
This Sigma lens has exceptional focus-related features. To ensure stability while focusing, this lens moves its inner lens groups without changing the lens’s physical length. It helps you take fast, very clear images. It also has an internal motor powered by ultrasonic waves that produce a quiet, high-speed auto-focus.
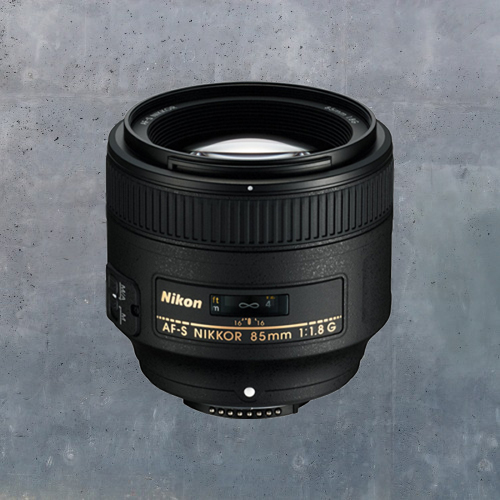
4. Nikon 85mm f/1.8 Lens
The fourth lens on the list is perfect for shooting portraits or concerts in low light. The Nikon 85mm f/1.8 has a maximum aperture ideal for low-light portraits, weddings, concerts, or recitals. It also has a silent wave motor autofocus system so you can capture the moment without any noise.
This lens has a minimum focal distance of 2’6” and is equivalent to a 127.5mm focal length on a full frame camera. It features an internal autofocus system and a M/A focus mode switch on the side of the lens barrel. All at the price of $476.95.
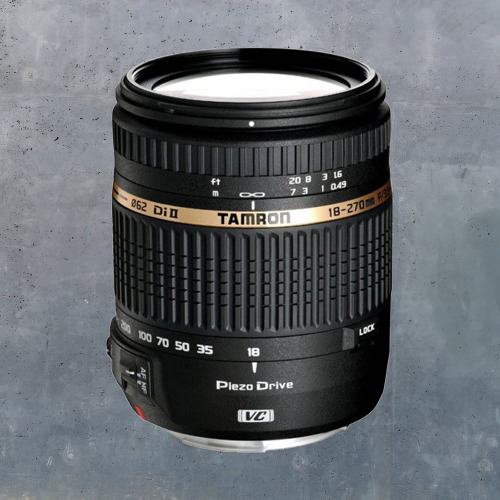
5. Tamron 18-270mm Lens
The last of our Nikon D3500 lenses is the Tamron 18-270mm. This $349.00 lens is a go-to for high powered zoom. It has 15x magnification and can switch from wide-angle to telephoto zoom macro.
If you don’t have a tripod using such an extreme zoom can get jittery so Tamron factored that issue in and added vibration compensation as well as a PDU autofocus motor which makes this lens lighter, slimmer, and easier to hold.
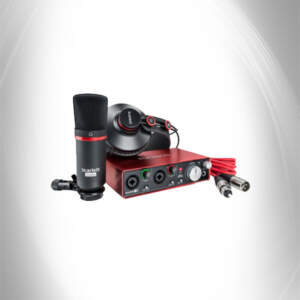
It’s no secret that podcasting is on the rise. As more and more shows gain traction, so does the market for podcast equipment. In theory, this shouldn’t be an issue; all of the interested would-be podcast hosts now have a massive number of specialized products from which to choose. However, one crucial question remains: what equipment do people actually need to get started? To make this as easy as possible for customers, the recording experts at Focusrite created a complete beginner podcast bundle.
In this post, we review what the core Focusrite podcast bundle contains, the key features and specs for those items, plus some additional hardware you can use to make recording a little bit easier.
Audio is only as good as the mic you record it with. Since themid-1980s, Focusrite has set itself apart as one of the best names in audio and recording; this bundle is the natural next step in making professional mics accessible to aspiring professionals. The CM25 Scarlett HP60 MkII headphones also come with a high-quality, low-noise microphone cable for high-fidelity audio transfer.
HP60 Studio Monitor Headphones
The included HP60 studio monitor headphones take the guesswork out of audio recording and editing. Many commercial headphones “flatten” audio to make it sound smoother than it truly is. On the other end of the spectrum, the HP60s are designed to provide true-to-life playback so you can catch every audio pop during the editing process.
Scarlett 2i2 Studio USB Audio Interface
The Scarlett 2i2 is a great standard audio interface for in-studio or on-the-go recording. While compact, it still gives you the same exceptional sound quality and digital conversion that you might find in one of Focusrite’s larger audio interfaces. In terms of features, it has two mic preamps, two instrument inputs, and one headphone output with gain control. It also has an impressive 192kHz conversion rate.
Every Focusrite Scarlett interface comes with a suite of audio editing software including Pro Tools | First and Ableton Live Lite for recording and mixing along with Novation Bass Station which adds bass or melody sounds to any music recordings; go ahead and try creating your own royalty-free music for your podcast. Focusrite also continues to add value by giving away audio production software every couple of months through their Plug-In Collective.
What is a USB audio interface?
A USB audio interface is a device that connects your XLR microphone with your computer. When you speak into your microphone, the audio travels through the audio interface, then delivered as a digital signal to your computer. This process contributes to a few key recording aspects including quality and conversion speed.
Do I need an audio interface for podcasting?
The short answer is maybe. If your entire podcast production consists of you and your microphone, an audio interface isn’t a necessity. However, if you have more than one host, multiple guests, or any musical elements, you should definitely invest in an audio interface.
A potential challenge of using this device is that it can limit the number of mic and instrument inputs used during a recording. Luckily, this is easily remedied by upgrading your gear to a more powerful USB audio interface or increasing the number of inputs with an audio interface adapter. The three most popular Focusrite USB audio interfaces for podcasters are theScarlett Solo USB Audio Interface (2nd Gen), Scarlett 2i2 USB Audio Interface (2nd Gen), and Scarlett 2nd Generation 18i8 USB Audio Interface.
Focusrite USB Audio Interfaces
1 of 3
Solo USB Audio Interface (2nd Gen)
2i2 USB Audio Interface (2nd Gen)
2nd Generation 18i8 USB Audio Interface with Pro Tools First
Bonus: Customize Your Setup
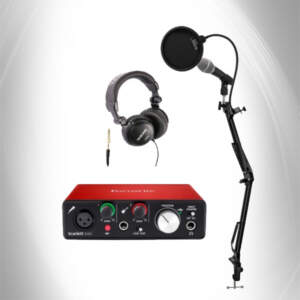
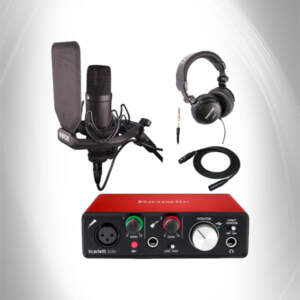
Below are a few alternate beginner podcast bundles for people who have specific needs due to space restrictions, recording needs, or simply personal preferences. Check out the additional accessory options and their bundles below to see what works best for you.
Beginner Bundle + Suspension Boom & Pop Filter
Sometimes, a studio looks more like a closet than a formal recording space; in some situations, it is a literal closet. Suspension booms are great if you have limited elbow room and are trying to clear up desk space or get a specific recording angle. The boom in this specific bundle supports 3.2 pounds and is made of sturdy steel that reduces vibration.
A pop filter is a screen placed in front of your microphone to prevent unwanted sounds created by air movement when you speak. It’s a natural, expected part of the recording process that happens with most microphones, regardless of brand or quality. This unique audio signature is actually valued in the ASMR community. For the rest of us, pop filters are required equipment.
If you’re worried about shaky, vibrating tables or equipment messing up your recording, look no further. This bundle’s internal shockmount Isolates the microphone on the X, Y and Z axes providing protection against vibration. This works in conjunction with the dual lyre system which puts more tension on the shock mount, further securing wobbly equipment.
Last week, the Focus Camera team traveled to Anaheim, California to cover the NAMM 2019 Show. NAMM (the National Association of Music Merchants) hosts an annual convention that brings together music and audio professionals for a week of exhibits and innovations.
We’ve been to several industry conventions over the last few months (CES and Imaging USA) and NAMM’s attendees are arguably the most entertaining. There were—among the buyers and reporters in attendance—a sea of incredibly talented musicians eager to try the latest releases from their favorite brands. We were lucky enough to see those artists showcasing new gear from some of our favorite companies including Yamaha, Vox, Korg, and JBL.
To the surprise and delight of many, the most talked about Yamaha release is a portable, electric keytar. The Sonogenic SHS-500 is aimed at a younger audience. However, we can definitely see some of Yamaha’s more mature customers taking an interest in this entertaining little keyboard as well.
Sonogenic SHS-500 Keytar
1 of 8
The SHS-500 features 30 different instrument sounds from drums and piano to a synthesizer. As you can tell from the photos, it’s meant to be portable; the keytar has 37 keys, weighs a paltry 3.5 pounds, and is easily carried by kids and adults alike.
All of that said, the keytar’s core selling feature is “Jam Mode.” No matter which keys you press and when the keytar will always play notes that match the song. For example, if your dog happens to put its paw on the keytar while it’s in Jam Mode, the pup plays along to the song in perfect harmony. This feature is great for kids who are still learning to play an instrument and adults who always wanted to be in an 80s hair band.
Vox
VX15 GT
First, we have a new 15W amp which is an update to Vox’s VXI model. In addition to an updated look, this entry-level model features high-quality sound by ABS bass-reflex design, 11 amps, and 8 effect models. It ships to consumers in April 2019.
VX50 GTV
Next, there’s the 50W which boasts a big sound in a small, lightweight package. Key features of the 50W include an ABS bass-reflex design with Nutube and USB audio interface. It is also slated to ship in April 2019.
AC15C1 Limited
Last but not least, Vox is putting out the AC15C1 Limited. The powerhouse of this trio, the AC15C1 features a Warehouse G12C 75W speaker and “Crinkle Tolex” exterior; it’s available in tan, cream bronco, white bronco, racing green, and maroon bronco. This limited edition amp symbolizes an important milestone, created to celebrate the model’s 60 years of success as a standard in the music industry. You can get your hands on it in April 2019.
NAMM Vox Releases 2019
1 of 3
VX15 GT | Courtesy of Vox
VX50 GTV | Courtesy of Vox
AC15C1 Limited | Courtesy of Vox
JBL
Professional One Series 104
The new JBL Professional One Series 104 are a pair of compact, powerful studio monitors; this is the latest installment to the legacy created by JBL’s 3 Series and 7 Series studio monitors. The One Series first premiered at CES 2019. However, it truly shined among NAMM’s audio-obsessed attendees.
The One Series 104’s high-end audio details and mid-range frequency response set these monitors apart from competitors. They also boast the highest range in class with 30 watts per speaker, and the lowest frequency response in class at 50Hertz. In terms of form, these speakers combine broad consumer appeal with professional, studio-worthy specs. Singers, songwriters, podcasters, and professional mixers alike will want these speakers in their studio.
Foldable Studio Headphones
JBL is also expanding its line of foldable studio headphones with three notable additions: the K175, K245, and K275. All three have metal elements for sturdiness and longevity of use as well as a new sonic pallet with flat frequency response. The pallet is designed to give the entire series the most even-keeled sound possible.
That said, there are also a few notable differences between the models. The K275 has a closed back while the K245 and K175 are open back. Additionally, the K175 has an on-ear design while the k245 and k275 are over-the-ear.
PartyBox 300 & PartyBox 1000
Finally, there are the JBL PartyBox 300 and PartyBox 1000. The intention with these two models is to introduce prosumers to JBL products with a blend of professional features and user-friendly form. The PartyBox 1000 is especially useful for DJs interested in stepping up their visuals; this model has a DJ midi pad on top of the speaker and rolling bottom for easy setup and takedown.
Korg
minilogue xd
The minilogue xd analog synth is intended to be a step between Korg’s original minilogue and the prologue. The main takeaway here is that this device is highly customizable and gives you a lot of control over your sound design in one, compact package. This item’s long list of technical features includes a digital multi-engine, a third programmable digital oscillator, wavetables, virtual phase modulation mode, and two analog VCOs.
Kross Neon Series
Korg is introducing limited edition, neon versions of its popular Kross keyboard series in yellow, blue, green, and red (temporarily unavailable). There are a few updates, but Kross Neon is almost exactly the same as its less flashy predecessor. Those changes include new sounds for modern music and EDM, additional electric piano sounds, and an increase in PCM.
Krome EX
The Krome EX is the latest and greatest upgrade from Korg’s original Krome. In terms of appearance, the update has a much sleeker finish. However, it boasts some important new features including more PCM and additional sounds and combinations for dance and EDM music. The layout is largely the same as the original (if it’s not broken, don’t fix it). However, it also has a new touchscreen interface making this the most affordable touchscreen sound workspace on the market. The Krome EX comes in 61 key, 73 key and 88 weighted key iterations.
Is your favorite brand or new tech missing from this roundup? If so, be sure to share your highlights in the comments below.
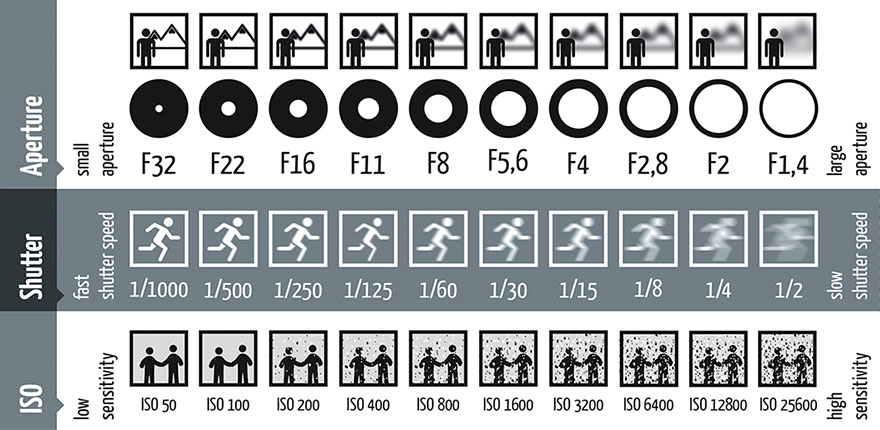
Before we jump in, it’s important to know what exposure is. Exposure refers to how much light reaches your camera’s sensor or film through the lens. It dictates how light or dark a photo is.
The more light you let in, the higher the exposure. If a photo is “overexposed” it’s too light. Alternatively, the less light you let in, the lower the exposure. If a photo is “underexposed” it’s too dark. The goal is to find a balance between those two extremes.
Your exposure is dictated by three different elements: aperture, ISO, and shutter speed. It’s often difficult for new photographers to get the brightness they want when only considering one of these elements at a time. Yes, you can use auto mode, aperture, or shutter priority but that doesn’t teach you how to master your camera.
Exposure Examples
1 of 3
Properly Exposed
Over Exposed | Courtesy of photo.stackexchange.com
Under Exposed
The good news is, this isn’t rocket science. The key is understanding that aperture, ISO, and shutter speed work together to adjust exposure; together they make up the “Exposure Triangle.” All three control the flow of light entering your camera.
The core idea behind the exposure triangle is this: if you raise or lower one of the elements, you must adjust at least one of the others; if you don’t make up the difference of how much light is or is not entering into your camera, your image may be over or underexposed.
For example, if you lower your ISO (which makes an image darker) you must then elongate your shutter speed to let in more light. This is one of a few possibilities all of which make more sense when you know what aperture, ISO, and shutter speed are. So, let’s talk about it.
Aperture
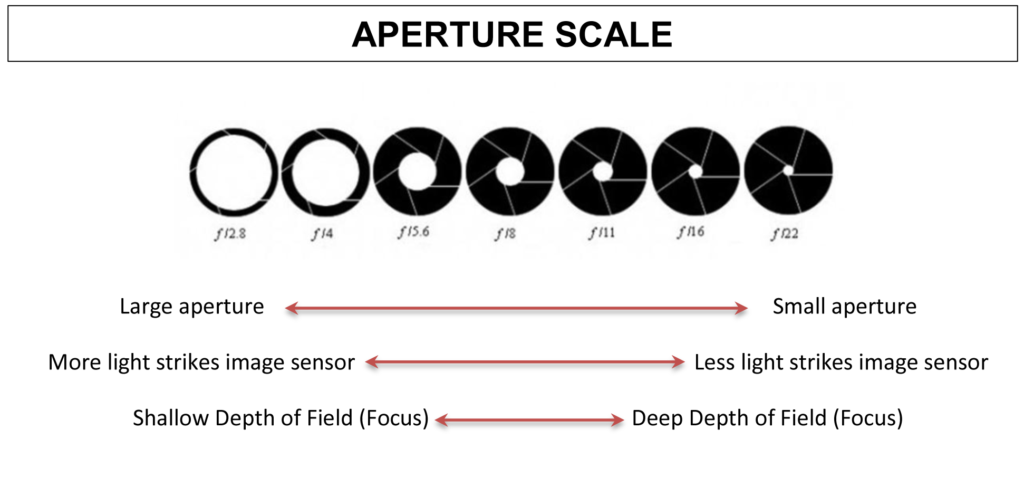
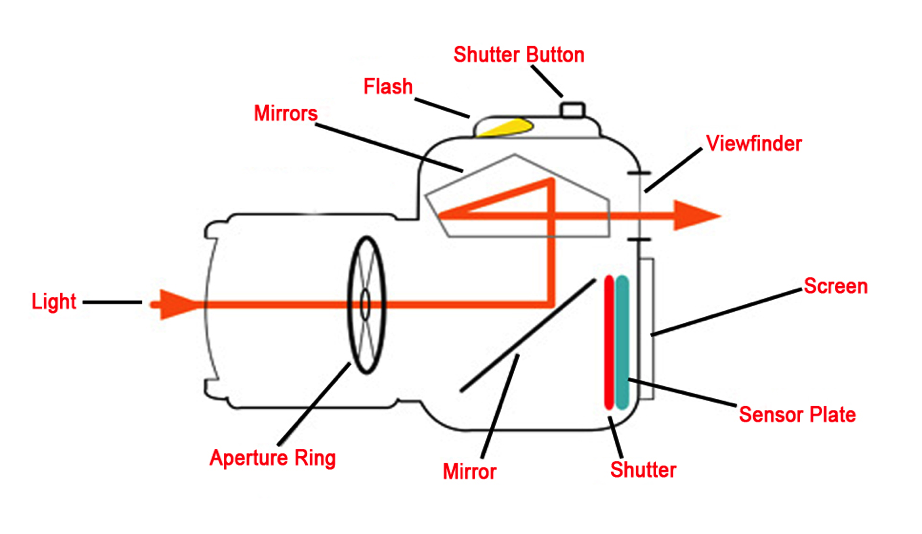
When you hear someone refer to an “aperture” they’re talking about the physical hole in your lens that controls how much light enters your camera when you take a photo. This is the setting to adjust if you want to take portraits with a blurred background or bokah-centric photos—it controls your depth of field (more on that in a second).
Courtesy of www.mitchmartinez.com
The amount of light that your aperture lets in is measured in “f-stops.” If you’re searching for this setting on your camera, it will look like one of these: f/1.4, f/2, f/5.6, f/11, f/16, f/22, etc. The wider the aperture (low f-stop number), the more light gets into the lens. However, a smaller aperture (high f-stop number) lets in less light.
Depth of Field
The amount of light your aperture lets in changes your depth of field; depth of field is the distance that your camera is able to focus. This is not necessarily intuitive so be patient with yourself here:
Shallow depth of field: the larger the hole in the aperture, the smaller your depth of field. In other words, the more light you let into your camera, the less it can focus on. This is commonly used in portrait photography to focus on one subject and blur out everything else around them. To achieve that effect, set your f-stop to f/2.8 and lower (like f/2, f/1.8 or f/1.4). Here are a few options.
Shallow Depth of Field
1 of 3
Deep depth of field: the smaller the hole in the aperture, the larger your depth of field. In other words, the less light you let into your camera, the further it can focus. Let’s say you’re trying to photograph a majestic mountain range. But every time you try to take a picture of the mountains, only the trees right in front of you are in focus. If you are this confused nature-goer, your depth of field is too short; you must elongate your depth of field. In that situation, make your f-stop number as large as possible. Set it to a high number like f/16 or f/22. The higher the number, the larger the range.
Wide Depth of Field
1 of 3
Choosing A Lens
This is an important moment to mention that the range of your f-stop is limited by your lens. It’s hard in this day and age to stumble upon a “bad” lens, but you should know what type of photography you want to use your equipment for before you invest. If you want to shoot portraits or close-up nature photography look for a lens with a very low aperture capability like f/1.4. If you want to include every single detail in the background of your pictures, focus on the other end of the spectrum; make sure you get a lens with a very high f-stop range of f/16 or f/22.
What to look for when checking a lens’s aperture range.
Again, there is no right or wrong here. It all depends on what you’re using your lens to capture. In fact, the next time you’re at a wedding take note of the photographer—we’re willing to bet they have two cameras on them at all times so they don’t have to switch lenses: one camera/lens for precious portrait moments (f/2.8) and another to take pictures of everyone on the dance floor (f/16).
ISO
The second side of the exposure triangle is ISO. ISO* (pronounced eye-sew) stands for International Standards Organization or International Organization of Standardization (different names, same company). This independent organization creates standards for various consumer goods around the world. All of this to say: the ISO acronym doesn’t stand for anything important or hold any secret photography knowledge. Instead, it is the name of a company. Now, let’s talk functionality.
When you click a shutter button to take a photo, the aperture opens and light enters your camera; the ISO setting determines how sensitive your camera’s image sensor is to that light.
ISO & Image Sensors
But why is that important? What’s an image sensor? For digital photography neophytes, a camera’s image sensor is the hardware at the back of your camera body that converts the image you see in your viewfinder to a digital file. Without an image sensor, there would be no way to record images onto your memory card.
Courtesy of www.dacs.org
So, with that in mind, the ISO setting measures how much light the image sensor receives.
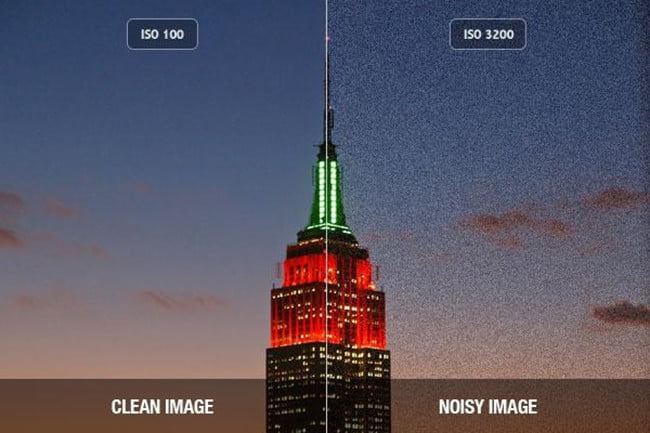
On average, an ISO display will show a range of numbers from about 100 to 1600. However, it can go as low as 50 and as high as 51200. If your ISO is set low to 100, your sensor is less sensitive to light and your images will be darker. Alternatively, If your ISO is set high to 1600, the more sensitive it is to light making your images lighter. If you want a good place to start, the “normal” setting is ISO 100.
In short: low ISO number = darker image / high ISO number = brighter image.
Courtesy of Digital Trends
A word of caution: do not raise your ISO levels too high. When you raise your ISO levels too much you can see an increase in “noise” which adds an unpleasant grainy effect to an otherwise nice photo. However, high ISO is still useful when your aperture cannot physically open any wider to accommodate more light, or when your shutter cannot stay open any longer without sacrificing sharpness. Which brings us to…
Shutter Speed
The third and final line of the exposure triangle is shutter speed. Shutter speed is measured in seconds and fractions of a second. For example (from fastest to slowest): 1/1000, 1/30, 1, 4, etc.. This unit of measurement refers to how long a lens shutter stays open, and therefore how long the sensor is exposed to light. There are two extremes, fast and slow shutter speeds.
The easiest way to remember it is:
To freeze a moment, choose a faster shutter speed.
To blur a moment chose a slower shutter speed.
Fast Shutter Speeds
The faster the shutter, the less time the sensor has to collect light. As a result, quick shutter speeds create sharp images that are less likely to blur. In terms of functionality, fast shutter speeds work best in well-lit areas and are great for portraits, sports photography, and any other action shot scenario. It’s also more conducive to hand-held photography.
A few examples of quick shutter settings are 1/2000, 1/1000, 1/500 and 1/250.
Fast Shutter Speed Examples
1 of 3
Slow Shutter Speeds
As we know, the longer an image sensor is exposed to light, the brighter the resulting image will be. However, slow shutter speeds aren’t only useful for low-light shooting. They’re also great for creating more artistic shots; if you’ve ever seen a photo of rushing water that looks like fog over glass or moving cars that look like beams of light, it was done with an extended shutter speed. That said, you need a tripod to capture any shot slower than 1/60—if you try to take them by hand, it will result in blurry photos and frustration.
A few examples of quick shutter settings are 1/15, 1/8, 1/4, 1/2, 1, 4, 8.
Slow Shutter Speed Examples
1 of 4
Adjustments
There’s a lot of math behind balancing the three sides of the exposure triangle. We will not be doing that math here today—we’ve found it often does more to confuse exposure triangle newbies than help them. Suffice to say, if you change one side of the exposure triangle, then you need to adjust the others. Opening the aperture without lowering ISO or shortening exposure time will create an overexposed image. Similarly, raising your ISO without closing the aperture or shortening exposure produces similar ill effects.
Our recommendation? Practice.
Mastering the exposure triangle takes time, but keep at it. If one combination isn’t producing desired results, play around. When constraints rise up with one-third of the triangle, you still have two more sides to work with.
Courtesy of www.blog.hamburger-fotospots.de
*Back in ye olde days of exclusively film cameras, ISO wasn’t adaptive. You chose your ISO sensitivity per roll of film. With digital, however, it’s a lot more flexible.
After weeks of preparation, Imaging USA 2019 has come to a close. During our time at the Focus Camera booth, we met a number of inspiring photographers, buyers, and hobbyists interested in growing both their businesses and skills.
The overarching theme of this year’s event was bridging the gap between photographers and consumers. The secret? Authenticity. If you listen to your instincts and act as your authentic self, clients will follow. The speakers driving home this message included Karyn Temple (the acting Register of Copyrights for the United States) and Scott Stratten (marketing expert and author of the “UN” series). A wide range of classes were also available from lighting and portrait lessons to food photography and tips from “the pet portrait dude.”
Imaging USA’s Past & Present
The story of Imaging USA goes far beyond their most recent Atlanta-based event. Today, the conference is a 5-day photography forum that revolves around a host of speakers, networking events, demos, and—most importantly—gear. However, the organization dates back to 1880 and is the longest-running photo conference in the United States. Its original purpose was to act as a trade show for the Professional Photographers of America; it still holds that title to this day.
As mentioned above, the muscle behind the event is the Professional Photographers of America, more commonly known as the PPA. For those who don’t frequent trade shows, the PPA is a nonprofit that acts as an advocate for independent photographers and small photography business. The organization asserts that they regularly send delegates to Washington, D.C. to speak directly with U.S. lawmakers and stakeholders regarding copyright protection for creators across the country. They also insure members’ gear, offer data loss protection, and provide a 3-day pass to Imaging USA. By all appears they are the Robin Hood of the photography industry.
Thank you again to everyone who dropped by the Focus Camera booth this year. We appreciate you coming by and look forward to seeing you again next year!
A few weeks ago, we asked you to submit a photo showing what family means to you. Dozens of amazingsubmissions later, we have a winner! Congratulations to Bethany who won the family photo contest and a $1,000 shopping spree at Focus Camera. She shot the winning photo with a Nikon d610 and we’re excited to see what she creates with her upgraded gear.
If you’re interested in entering Focus’s Camera’s next contest, keep an eye on our blog and Instagram for details and updates.
To celebrate Bethany’s win we compiled the top ten weirdest/most awkward family photos we could find. Click through if you dare.
1 of 10
Credit: Jamilia Jean Photography
#10 Joylessness To The World |
When kids are sad, everyone is sad. Shoutout to family and baby photographers tasked with turning these frowns upside down. You are far braver than we are.
Credit: AwkwardFamilyPhotos.com
#9 Oh…Christmas Tree? | We have so many questions. Who’s idea was this? Is this a family tradition? Are there more pictures of whatever is happening here? Can we see them? But most importantly, what is the star standing on?
Credit: Beverly Jenkins, ThoughtCo
#8 Babyzilla | Another heartwarming moment ruined by a cranky child. Get ready, kiddo. This picture will be shown to everyone you date for the rest of your life.
Credit: AwkwardFamilyPhotos.com
#7 Brotherly Love | We’ve all been the strangler and the one being strangled. Isn’t family the best?
Credit: Beverly Jenkins, ThoughtCo
#6 Adorable Copyright Infringement | A+ for effort. Bonus points because that is the happiest child we’ve ever seen.
Credit: HuffPost
#5 Spotted | That awkward moment when you have National Geographic’s creative director choose the props for your family photo.
Credit: BuzzFeed.com
#4 He Sees You When You’re Sleeping | No matter how we look at it, Santa’s eyes are always following us. Why do we need to be quiet, sir? You’re freaking us out.
Credit: AwkwardFamilyPhotos.com
#3 Monkeying Around | The most remarkable thing about this photo is not the presence of six small simians. The most incredible factor is that they’re all dressed. There’s no way this was easy—one of them is wearing a lace trimmed dress. We would like to see some behind the scenes photos, please.
Credit: TheDailyBeast.com
#2 Birds Of A Feather | It can be difficult to find a partner who shares your hobbies. This is especially true when you’re passionate about weapons, exotic birds and tinted eyewear. These two really found each other.
Credit: Jenny Sparks, Loveland Reporter-Herald
#1 Beach Babes | The movement in this picture gives it a similar dramatic vibe to Baroque paintings of the 17th century. But instead of portraying lords and ladies at court, it’s a couple failing miserably to take a casual beach photo. Action photography at its finest.
In 2018, photographer Tyler Mitchell shot the cover art for Vogue’s much celebrated September issue. This is remarkable for a few reasons. First, Mitchell was only twenty-three when he was given this honor. He was fresh out of college working with pop royalty Beyoncé Knowles-Carter, achieving a goal that some photographers wait a lifetime for. Second, he was the first black photographer to ever shoot the cover of Vogue.
It took Vogue 126 years to ask a black person to shoot their cover art. To give everyone a little perspective, Vogue was established in 1892. That same year, Ellis Island began receiving immigrants and a man named Jesse Reno patented the first working elevator. All of this to say: it’s great that we finally got here, but wow that took a while.
So, in the spirit of continuing to exalt talented artists who deserve the spotlight, we did a roundup of talented black photographers to watch. This was an absurdly hard list to curate because of the surplus of talent. Feel free to continue this endless list in the comments below.
Ronan Mckenzie is a UK based photographer, publisher, and curator. She has several major projects under her belt including a Vogue and Nike collaboration. However, her longest running series is “Girls”; the aptly named work consists of photos of models, close friends, acquaintances and—in the earliest stages—her mother.
“I pay so much attention to my casting for this because it’s so important to me to shoot people how they are, I only really shoot people that jump out at me for some reason,” Mckenzie explains in an interview. “I can’t really describe what that reason is, sometimes it could be a physical feature like beautiful eyes or an interesting shape face, or sometimes it could just be the vibe of that person or an energy that comes through.”
The multihyphenate shoots primarily with a medium format camera to bring out the textures and details in her numerous close-up portraits. Outside of her photography career, Mckenzie works to combat homelessness in London and hopes to use her talents to bring more attention to the pressing, ever-present issue.
Ronan Mckenzie
1 of 6
Courtesy of Glasshouse Journal / Ronan Mckenzie
Courtesy of Glasshouse Journal / Ronan Mckenzie
Courtesy of Glasshouse Journal / Ronan Mckenzie
Courtesy of Glasshouse Journal / Ronan Mckenzie
Courtesy of Glasshouse Journal / Ronan Mckenzie
Courtesy of Glasshouse Journal / Ronan Mckenzie
Kareem Black
Kareem Black is an NYC-based lifestyle and commercial photographer hellbent on living life to the fullest. He has seen it all, from strife in Sri Lanka to the excess of the New York City social scene. Through it all, he makes his living as an awe-struck witness.
“I’ve been so fortunate to live my life the way I do,” Black said. “But all this has been able to happen because I take pictures. Every time I think about it. I’m like WHOA this is… crazy. People are going to pay me a bunch of money to take pictures and live in a crazy hotel. Sometimes, I hope that people don’t discover that I’m just a normal guy. Because then this dream might end.”
For a normal guy, Black makes a pretty good name for himself shooting for some of the most well-known names in the world. His resume includes a range of players from MTV and Viacom to the FDA and Verizon among many more. If you’re interested in shooting like Black, we recommend investing in one of his preferred cameras (the Sony a7R III) and opening yourself up to the idea that life isn’t meant to be planned.
Kareem Black
1 of 5
Courtesy of Kareem Black
Courtesy of Kareem Black
Courtesy of Kareem Black
Courtesy of Kareem Black
Courtesy of Kareem Black
Shawn Theodore
Shawn Theodore is a Philadelphia-based photographer and archivist of “Afromythology.” He produces work that intertwines magical realism, “hypothesized mythology,” and the harsh realities of what it means to be black; the result is a unique style of visual storytelling. His work is a poignant reflection of black repression, majesty, and how those conflicting elements exist alongside one another.
One of his most well-known bodies of work, “Future Antebellum,” is a glimpse into the world he not only creates but also strives to preserve. “Preservation is a dynamic tool to activate memories not just to ‘store’ them, so to speak,” Theodore said in a 2018 interview. “I like to place objects in ways that the viewer would have to render themselves free from an understanding of chronological order, I work to make people see reality in new ways.”
Most recently, Theodore received both the ARRAY and VSCO Voices grants. He also garnered commercial attention with a Smithsonian Magazine cover and Apple commercial feature. He also has upcoming shows you can learn more about via his Instagram.
Shawn Theodore
1 of 7
Courtesy of Musée Magazine
Courtesy of Musée Magazine
Courtesy of Musée Magazine
Courtesy of Musée Magazine
Courtesy of Musée Magazine
Courtesy of Musée Magazine
Courtesy of Musée Magazine
Ade Okelarin
Meet Ade Okelarin. Okelarin was born in London, England raised as a child in Lagos, Nigeria, then spent his teen years back in London. The photographer’s current living situation reflects his upbringing; he splits his time and work between those two cultural epicenters.
Unlike Kareem Black, Okelarin is much more plan oriented when approaching a shoot: “It’s preconceived and thought out, well the personal project work at least,” the photographer said of his workflow. “Even when it’s not, I try to have a plan or a concept. I don’t think I could walk into a shoot without having an idea even if it is loose and easy flowing. I usually start with an idea and slowly expand it and build a story and in turn frames of images.”
His favorite project, “Layers,” explores womanhood, aging, and identity. The collection also saw commercial success; it was featured on Huffington Post and did a run at the South Bank in London. Most recently, his collection “Adorned” was exhibited at The Gallery of African Art in London and made up his first solo show at Rele Gallery in Nigeria.
Ade Okelarin
1 of 8
Courtesy of BeFront Magazine
Courtesy of LensCulture
Courtesy of LensCulture
Courtesy of LensCulture
Courtesy of LensCulture
Courtesy of LensCulture
Courtesy of BeFront Magazine
Courtesy of Ade Okelarin
Hilina Abebe
Hilina Abebe is a documentary photographer living in Addis Ababa, Ethiopia. Abebe is, for lack of a better phrase, the real deal. She is a self-taught professional who dedicates herself to exploring the social issues that affect her community. She has a knack for catching people in honest moments, including her father who is the inspiration for her career as a photographer. In a time when getting the most likes on a photo is a driving factor for creativity, Abebe is only concerned with the art.
“We should do the work not thinking about what book, which exhibition or what post it is going to end up for,” Abebe asserts in a Medium post. “We should not be concerned about which award or prize we are going to submit it to, nor how many followers and likes we will get from it. We should do the work because it is important to us and to others. We must do it questioning the things around us or because we want the work to say something.”
While she started on a point-and-shoot, her DSLR photography is what gets attention from the press. She won the Eddie Adams Workshop Nikon Award in 2016 and was nominated for the 2017 Joop Swart Masterclass and PDN’s 30 in 2018.
Hilina Abebe
1 of 8
Courtesy of Hilina Abebe
Courtesy of Hilina Abebe
Courtesy of Hilina Abebe
Courtesy of Hilina Abebe
Courtesy of Hilina Abebe
Courtesy of Hilina Abebe
Courtesy of Hilina Abebe
Courtesy of Hilina Abebe
That concludes our list of five black photographers to watch. This was a tough roundup to curate—there are thousands of talented photographers out there who also deserve the spotlight. Comment below with the names of contemporary black photographers you think deserve to be highlighted.
Today, we’re going to talk about hardcore fanbases: Blue Yeti devotees and the ASMR community. For those of you who don’t spend all of their free time on the Internet, ASMR is short for “audio sensory meridian response.” In short, ASMR is defined as a static-like, tingling sensation that begins on the scalp and moves down the back of the neck and upper spine. For those who enjoy it, it causes a low-grade euphoria and relaxation. In some cases, it can even help with insomnia and depression.
Meanwhile, Blue Yeti microphones are the darling of the recording community (and with good reason). It’s a hassle-free USB mic that produces pristine, studio-quality recordings for a relatively reasonable price. For all of these reasons, it is also the preferred microphone of the ASMR community. So, when the Blue Yeti Nano came out, we decided to give it the proper ASMR unboxing it deserves.
Blue Yeti Nano Specs
This Blue Yeti Nano is a smaller, more cost-effective version of the classic Blue Yeti microphone; it has the sound quality we love from the original in a smaller footprint. In short, this is a premium USB microphone designed for broadcast quality productions. You can use it for YouTube videos, game streaming, Skype, voiceovers, and podcasting.
This sleek little mic boasts a sample rate of 48kHz, 2 Blue-proprietary 14mm condenser capsules, a 24-bit rate, and offers both cardioid and omnidirectional. Its key features include a no-latency headphone output, volume control, and microphone mute. Plus, it works with the intuitive Blue Sherpa companion app to give you full control of your recordings through every step.
As we mentioned above, the Blue Yeti Nano has two recording modes. Cardioid mode only records sounds from sources directly in front of the microphone. This is perfect for solo game streaming, Skype calls, podcasting, and ASMR videos. You can also record in omnidirectional mode which picks up sound from everyone around you. Use it for a multi-person conference call or podcast interview.
In terms of aesthetics, this Blue microphone has a premium finish that looks good on camera and is available in Cubano Gold, Red Onyx, and Shadow Gray. Plus, for those of you who are in a rush to become famous podcasters, the Nano is ready to plug and play the moment it’s taken out of the box. Just unpack and stream instantly to a Mac or a PC.
All things considered, the Blue Yeti Nano is a solid alternative to the classic Blue Yeti; you should definitely consider it the next time you’re updating your recording studio or home recording setup. Let us know your thoughts on this microphone (or ASMR) in the comments below.
Sony recently announced the newest addition to its E-mount mirrorless camera lineup: the Sony Alpha a6400. We were initially confused by this release. Why, we asked, do we need another entry to mid-level Sony Alpha? Also, the a6500 came out way back in December 2016—aren’t we regressing with this new release?
Then, we saw the specs.
The a6400 is intended to be an upgrade to the Alpha a6300 (released in February 2016). Among the Alpha a6400’s many impressive updates, the three that stand out to us the most are the addition of 4K video, an external microphone jack, and a 180-degree fully tiltable LCD touch screen. These features in conjunction with the a6400’s AF speed and sensor make this camera a vloggers dream. Now, let’s take a closer look at specs.
Spec Overview
Before we jump in, here’s an overview of the must-know specifications for the Sony a6400:
24.2MP APS-C Exmor sensor
BIONZ X image processor
Continuous shooting of up to 11 fps
Ultra HD 4K video recording
Tiltable 3.0-inch (921k dots) LCD display
XGA OLED Tru-finder Electronic Viewfinder
Instant sharing via smartphone with Wi-Fi and NFC
425-point AF
Upgraded Autofocus & Shutter Speed
According to Sony, this E-mount mirrorless camera boasts the world’s fastest autofocus acquisition at 0.02 seconds. It achieves this number by combining its tracking AF system with a BIONZ X image processing engine. The result is 425 phase-detection AF points and 425 contrast-detection AF points that instantaneously lock in on your subject. In laymen’s terms: holy crap this is a fast and effective autofocus.
The a6400 also introduces “Real-time Eye AF,” the latest version of Sony’s Eye AF technology. This feature uses artificial intelligence to detect and process eye data in real time, resulting in improved accuracy, speed and tracking performance. The goal here is to let photographers worry less about focusing on their subjects’ eyes and more on the overall composition of a shot. Be advised, this feature works with both stills and video.
For everyone out there with Instagram famous pets, Eye AF support for animals will be added in summer 2019 via a system software update.
As for shooting speeds, the Alpha a6400 can shoot at up to 11 fps with full AF/AE tracking. Similarly, it shoots up to 8 fps with full AF/AE tracking while utilizing silent shooting. It can shoot at both of these speeds for up to 116 frames JPEG Standard / 46 frames RAW compressed.
Better Image Quality
Sony’s new a6400 is equipped with a 24.2 MP APS-C sized image sensor that is paired with an upgraded BIONZ X processor to deliver incredible advancements in both image quality and color reproduction. It also boasts standard ranges up to ISO 32000 for both stills and movies; this is expandable up to ISO 102400 for still images. This camera also inherits many of the image processing algorithms from Sony’s newest full-frame cameras; it suppresses noise while preserving resolution and improving texture depiction.
Sony Alpha a6400 Sample Images
1 of 8
Video Recording Quality
Like its predecessor (the a6300), the Sony a6400 has 4K video recording. However, the newer model’s focus during shoots is quicker and more stable thanks to its upgraded “Fast Hybrid AF technology.” This is one of those beautiful moments when marketing jargon actually translates to real-life features; this hybrid autofocus keeps subjects in constant, smooth focus no matter the scene, even if an object crosses in front of the camera.
Plus, this is the first time a Sony APS-C mirrorless camera includes an HLG (Hybrid Log-Gamma) picture profile; this addition supports an Instant HDR workflow, allowing HDR (HLG) compatible TV’s to playback beautiful, true-to-life 4K HDR imagery.
Filming a time-lapse is easy using the camera’s built-in interval recording. It adjusts anywhere between 1 and 60 seconds, with a total number of shots from 1 to 9999. AE tracking sensitivity adjusts to “High”, “Mid” or “Low” during interval shooting, allowing for reduced changes in exposure over the shooting interval.
Finally, we reach video sound quality. Sony added a built-in headphone jack that can be used for additional external recording equipment which is a huge asset; it has an XLR adapter (not included with the camera) to facilitate the use of pro-level microphones. Post-production sound edits do not have to be a total nightmare. Thank you, Sony.
The Sony Alpha a6400
1 of 7
The Selfie Screen
Sony is fully leaning into the age of selfies with the a6400. The camera has a 180-degree, tiltable, 3.0-type LCD flip screen with 921k-dots of resolution. With this addition, you can now take selfie-style shots for both stills and video. This adaptation allows vloggers to check and monitor composition throughout the entire creative process. It’s also a touch LCD with options for Touch Pad, Touch Focus, Touch Shutter and new Touch Tracking which quickly activates “Real-time Tracking” through the touch screen.
We’re incredibly excited to give this camera a try. If you are too, click here to preorder the camera. As always, if you have any questions or thoughts about the new release, feel free to leave them in the comments below.