Home Blog Page 17

Zoom PodTrak P4 Review | A Near-Perfect Podcast Recorder

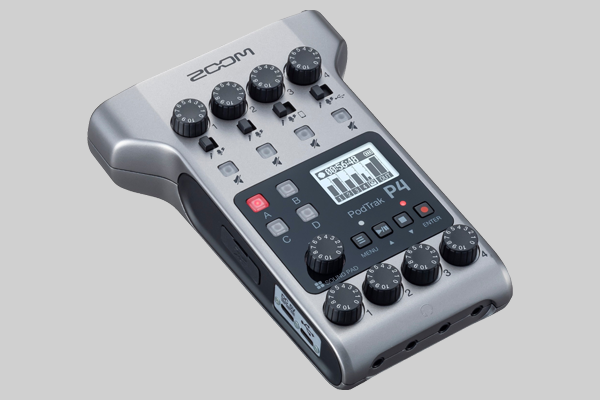
Zoom recently announced the PodTrak P4, a new audio recorder designed specifically for podcasts. It’s an exciting release by Zoom, who already offer an impressive range of audio recorders including the Zoom H5, H6 and H8. However, the PodTrak P4’s podcast-focused design clearly differentiates it from Zoom’s other recorders.

Releasing a recorder that caters to podcast creators is a smart move by Zoom. Podcasts have steadily increased in popularity over the last few years. A study conducted in January reported that nearly 40% of the US population had listened to a podcast in the last month, up from less than 20% just 5 years ago.

As a result of the COVID-19 coronavirus pandemic, there are also more podcasts being produced. While the pandemic shut down film and television production in the US, it provided the perfect setting for many people, quarantining at home with nothing to do, to create their own podcast. 

We took a dive into the specs to find out exactly what changes Zoom have made for their first podcast-focused audio recorder. Here’s our Zoom PodTrak P4 review. 

PodTrak P4 Review – Key Features

The PodTrak P4 is best defined by its features, and how well they lend themselves to the unique requirements and challenges of recording a podcast.

The PodTrak P4
Zoom’s PodTrak P4

Build

Zoom is known for making great portable recorders, and the PodTrak P4 is no exception. It’s small, light, and has a clean layout. The LCD screen is small, but allows for easy navigation through the recorder’s menu.  

While some audio recorders can look and feel intimidating, the P4 is not one of them. It’s a great blend of functionality and practicality. Both beginner and pro podcasters will feel comfortable using the PodTrak P4.

Microphone Inputs

The PodTrak P4 has 4 XLR microphone inputs. Each input has its own gain control knob and a mute button, both which can be used even while recording. With up to 70 dB of gain per input, you should have no problem using the P4 with high-quality dynamic microphones that require plenty of gain, like the Shure SM7B

If you’d rather use a condenser microphone like the Rode NT1A, a switch below each gain control knob allows you to easily enable phantom power (48 volts) for the input. A limiter and low-cut filter can also be applied to each input to help you record clean, high-quality audio. 

Additionally, the P4 is a multi-track recorder. Each input is recorded to its own track, making it easier for you to mix and master your recordings. 

Headphones 

The P4 has 4 headphone outputs, but a really nice touch is that each output has its own volume control. Separate controls aren’t crucial, but if your podcast ever has more than one host, it’s going to be appreciated. This is a feature not included on higher-end audio recorders such as the Zoom F8, and helps make the P4 stand out as a recorder built for podcasts.

Remote Recording (Mix-Minus)

One of the best features of the PodTrak P4 is that it enables you to record 2 remote phone calls simultaneously. Input 3 connects to the TRRS input on the left side of the P4, allowing you to record audio from a phone call (using a TRRS cable or Zoom’s BTA-2 Bluetooth adapter). Input 4 connects to the USB port on the right side, allowing you to record audio from a computer.

Of course, you should also use a mix-minus when recording remote audio. Mix-minus is an audio recording function most commonly used by radio stations and podcast creators when one of the inputs is being recorded through a phone call. A mix-minus allows the caller to hear all the inputs being recorded (the mix), minus their own input, so they don’t hear themselves speaking. 

While it is possible to enable mix-minus in their other recorders, Zoom has dramatically simplified it for the PodTrak P4. For example, the easiest way to set up a mix-minus on the Zoom H6 requires you to use splitting cables and manually pan the audio. On the P4, mix-minus is automatically enabled for audio recorded via the TRRS input, and is as easy as selecting on or off in the Settings menu to activate it for the USB port.

The video below highlights how easy it is to use the PodTrak P4 for recording remote interviews. 

Sound Pads

The PodTrak P4 has 4 sound pads which can be used to play audio clips or sound effects. The P4 comes preloaded with 11 sound effects, but you can also assign your own clips to each button. 

Power 

The PodTrak P4 can be powered using 2 AA batteries or USB cable. Just like any recorder, it’s recommended you power the P4 via cable when recording, if possible. Saying that, the battery life is impressive. Zoom reports the PodTrak P4 can be used for up to 4 hours when using alkaline AA batteries, and up to 9 hours with lithium batteries. 

The P4 has two USB-C ports; a DC 5V port for charging the recorder, and a port that can be used as an audio interface. Remarkably, you can also use the audio interface port to charge the recorder even while using it to record audio. 

Price

The PodTrak P4 is a great option for anyone interested in starting their first podcast, and the price reflects that. Available for pre-order now for just $199, don’t mistake its affordability as a sign of weakness. The PodTrak P4 is a high quality recorder, and has everything you need to produce a professional-grade podcast. 

Of course, if you are a podcasting beginner, you’ll need more than the recorder to get started. The PodTrak P4 bundle for $319.98 includes a Zoom ZDM-1 microphone (with wind screen), ZHP-1 headphones, and a ZTPS-4 tabletop tripod. You’ll also need a memory card; an SDXC card with fast read and write speeds is your best option. 

PodTrak P4 Review – Competitors

The PodTrak P4’s top competitors include other Zoom recorders such as the H6, H8, and the recently announced PodTrak P8. Thankfully, Zoom makes it easy for you to decide which recorder is right for you.

The major advantage of the H6 and H8 recorders is that they’re built for more than just podcasts. If you’re looking to record music in addition to a podcast, you’re going to want a recorder with XLR/TRS combo jacks, like the H6 or H8, so that you can easily connect instruments to the recorder. Similarly, while the P4’s 16-bit/44.1kHz sample rate is perfectly suitable for a podcast, you might want a higher quality when recording music. Both the H6 and H8 can record up to 24-bit/96kHz.

However, if you’re only interested in recording podcasts, the PodTrak P4 is the obvious choice. Features such as its remote recording capabilities and the volume controls for each headphone output are great for podcast recording, and aren’t available on the H6 or H8. The Zoom H8 is arguably more functionally abundant, but it’s also a little cluttered and less portable. The PodTrak P4 has a clean layout, weighs about 40% less, and is half the price.

Meanwhile, the PodTrak P8 is effectively the P4’s older sibling. It has a bigger interface with more features, including more inputs and sound pads.  However, it’s also far less portable, and over twice as expensive. The P8 is a great option for experienced podcasters who are producing a multi-person show. The P4’s practical blend of affordability, functionality, and portability make it the better choice for beginners.

PodTrak P4 Review – Summary 

The PodTrak P4 is another great recorder by Zoom. While Zoom is already a market leader for podcast recording, the PodTrak P4 will undoubtedly cement their position. Offering high-end features that simplify recording, a clean, portable design, and an affordable price tag, the PodTrak P4 is everything you want in a podcast audio recorder.

Sony a7S II vs Sony a7S III | Full Comparison

Sony a7S II vs Sony a7S III

When comparing the Sony a7S II vs Sony a7S III, one thing is clear: the a7S III is worthy of all the hype. 

The Sony a7S II is a great camera, and has been consistently popular since its release in late 2015. So naturally when a successor was announced this year – the Sony a7S III – it generated a lot of excitement. But exactly how much of an upgrade is the Sony a7S III?

We compared the two cameras to find out. 

Overall, Sony has improved the performance capabilities to produce a more powerful camera. Like its predecessor, the a7S III is a great full-frame hybrid, capable of shooting 4K video and performing well in low light. However, multiple upgrades across the board have resulted in a superior camera. 

Sony A7S II vs Sony A7S III

What’s New or Improved in the Sony a7S III

There are several notable differences between the Sony a7S II vs Sony a7S III. While both cameras are accurately marketed as hybrids, the improvements that have been made certainly seem to cater to video content creators.

Sensor

The a7S III’s new Exmor R sensor has a readout speed twice as fast as the a7S II, as well as a significantly improved rolling shutter. The rolling shutter on the a7S II could be particularly frustrating, so this is a wise improvement by Sony.

While the resolution is effectively the same at 12.1MP, the new back-illuminated sensor has increased the size of each pixel, enabling a stellar low-light performance. This resolution may still be too low for some still photographers, but it lends itself well to 4K video recording. Higher resolution cameras often have to use pixel binning (combining pixels to reduce resolution) to shoot 4K. Impressively, the A7S III can internally record 4K 120p 10-bit 4:2:2 video with full pixel readout.

Additionally, the A7S III is the first camera in the Alpha series to offer 16-bit RAW output via HDMI output to an Atomos Ninja V external recorder. The camera also has a standard-size (Type A) HDMI port rather than a micro HDMI port like the a7S II. 

Design

The A7S III is a slightly bigger camera, but the design changes that have been made are definitely worth it. Firstly, the A7S III has a flip-out, rotatable LCD screen. This is a great update for content creators that like to see the display when they’re both in-front, and behind the camera. The LCD is also a touch screen, allowing for easier image zooming and menu navigation. 

Another new feature is the new heat dissipation system that enables the camera to record for longer without overheating. The a7S III can remarkably handle continuously recording 4K 60p 10-bit 4:2:2 video for up to an hour. 

Other design improvements include a bigger, better-positioned record button on top of the camera, a more ergonomic grip, and a more powerful electronic viewfinder. 

Autofocus

The Sony a7S III uses a hybrid autofocus system, with 759-point phase-detection and 425-point contrast-detection working in conjunction to provide a faster, more accurate autofocus. As a result, the new autofocus works exceptionally well, even in low-light or while recording 4K 120p video. 

The a7S III is also the first camera in the S series to include real-time tracking, an intelligent autofocus feature that allows you to lock the focus on a moving subject. The new LCD screen allows you to simply touch the screen to indicate your subject, and the feature will automatically track them and keep them in focus. As an added nice touch, this feature can be used even when you’re shooting manually.

Battery

The a7S III uses a NP-FZ100 battery, the same battery as the Sony a7R IV, which has increased the life from the A7S II’s 310/370 (viewfinder/LCD) shots per charge to 510/600 shots per charge. 

Memory

The Sony a7S III has two memory slots for SD (UHS-I/II compliant) or CFexpress Type A cards

While the a7S II has a single memory slot for UHS-1 SD cards, the a7S III has two slots, both of which support UHS-I and UHS-II SD cards, as well as CFexpress Type A cards

CFexpress cards read and write much faster than SD cards, and are strongly recommended if you’re planning to shoot 4K video. SD cards won’t actually be able to handle 4K 120p video recording. However if you are planning to shoot on a CFexpress type A card, you’ll also likely need to invest in a card reader

Specs: Sony a7S II Vs Sony a7S III

Sony a7S IISony a7S III
SensorFull Frame 12.2MP Exmor CMOS SensorFull Frame 12.1MP Exmor R CMOS Sensor
Image ProcessorBIONZ XBIONZ XR
Video Recording4:2:2 Full HD or 4K QFHD with XAVC S Format4K 120p 4:2:2 10-bit
ISOStill images: ISO 100-102400 (expandable to ISO 50-409600), AUTO (ISO 100-12800, selectable lower limit and upper limit), Movies: ISO 100-102400 equivalent (expandable to ISO 100-409600 equivalent), AUTO (ISO 100-12800 equivalent, selectable lower limit and upper limit)Still images: ISO 80–102400 (ISO numbers up from ISO 40 to ISO 409600 can be set as expanded ISO range.), Movies: ISO 80–102400 equivalent (ISO numbers up to ISO 409600 can be set as expanded ISO range.)
Autofocus169-Point Contrast-DetectionHybrid AF With 425-Point Contrast-Detection and 759-Point Phase-Detection
5-Axis Image StabilizationYesYes
HDMI PortMicro HDMI (Type D)Standard HDMI (Type A)
Memory Slots12
Memory TypeMulti slot for Memory Stick Duo™/ SD memory cardMulti slot for SD (UHS-I/II compliant) memory card / CFexpress Type A card
Viewfinder2.4M-Dot, 0.5-Inch XGA OLED Electronic Viewfinder9.44M-Dot, 0.64-Inch Quad-XGA OLED Electronic Viewfinder
LCD3-Inch Tilt Screen3-Inch Flip-Out, Vari-Angle Touch Screen
Battery LifeApprox. 310 shots (viewfinder) / 370 shots (LCD screen) (CIPA standard)Approx. 510 shots (Viewfinder) / 600 shots (LCD monitor) (CIPA standard)
Dimensions (W x H x D)4.69 x 2.74 x 1.50 inches5 1/8 x 3 7/8 x 3 1/4 inches
Weight (Body Only)Approx. 1 lb 4.6 oz (584 g)Approx. 1 lb 5.7 oz (614 g)

Why Pick or Stick With the Sony a7S II

If you already own a Sony a7S II, it may not make sense to upgrade yet. Sony hasn’t reinvented the wheel, the a7S III is definitely a more powerful camera; if you’re shooting a lot of video it’s worth upgrading. However, there are some reasons why you may pick or stick with the a7S II. 

Resolution

The sensor resolution on the a7S III is still the same at roughly 12MP. If you’re planning to upgrade to a higher resolution camera next, you may want to consider the Sony a7 III or a7r IV instead.  

Price

With the release of the a7S III, Sony has officially discontinued the a7S II. As a result, the clearance price is remarkably low at just $1,998.00. While the a7S III may be an upgrade, the a7S II is still a very powerful camera with many of the same capabilities. It’s a great choice for a photographer or content creator on a tight budget. That is, if you can still get your hands on one.

Verdict

The Sony a7S III is a superior camera to the Sony a7S II, especially when it comes to video. While both cameras offer a superb low-light performance and impressive 4K video recording, a more powerful sensor and multiple other upgrades have made the Sony a7s III a very attractive release.

Sony a7C Review | Sony’s Smallest Full-Frame Camera Yet

Size does matter, at least according to Sony. Overnight they announced their new full-frame mirrorless camera, proclaiming it the lightest and smallest full-frame camera system in the world. It’s a bold claim, but it’s believable when you see the new camera. Here’s our Sony a7C review. 

The Sony a7C just about fits in the palm of your hand, even when fitted with the new FE 28-60mm f/4-5.6 zoom lens, announced last night too. A new, equally small external flash was also announced, the HVL-F28RM.

To give you a sense of the camera’s size, the body is similarly shaped to the Sony models that use an APS-C sensor, such as the a6100 and the a6400. However, instead of an APS-C sensor, the a7C has a full-frame, back-illuminated Exmor R sensor, the same as Sony’s powerful a7 III

If you’re intrigued by Sony’s latest release but not sure if it’s the camera for you, we’ve taken a dive into the specs to determine the a7C’s best features and its flaws. 

First, watch the announcement video below for a quick summary of the a7C’s top features:

Sony α7C Review

Design

While it can sometimes be hard to discern a single key feature of a new release, that is not the case with the Sony a7C. Sony has been very clear about why you should invest in their new camera: it’s small.

Small may not sound like much, but considering the a7C’s performance capabilities, its appeal is clear. The a7C body weighs approximately 18 oz (509g) when loaded with a battery and memory card. Compare that to the Sony a7 III, which weighs 23.04 oz (650g). That’s nearly 30% bigger for a camera with the same sensor.  The Panasonic LUMIX S5, another similar camera, weighs even more at 25.28 oz (714g)

If you’re about to point out that a small body can be redundant depending on the lens you’re using, Sony has also released a new, small lens to go with the a7C. While kit lenses can be notoriously unreliable, the FE 28-60mm F/4-5.6 zoom lens offers corner-to-corner high resolution and great close-up capabilities. In other words, like the a7C, it’s been built with vloggers in mind.  

While the a7c is remarkably small, it may not actually be the smallest full-frame camera system in the world. The Sigma fp full-frame camera still holds that crown. When paired with a 45mmm f2.8 DG DN lens, it weighs in at 22.47 oz (637g). Slightly less than the 23.85 oz (676g) the a7c weighs when fitted with its zoom lens. Granted, the a7C kit is arguably better for vloggers, offering zoom flexibility and a better depth of field.

Sony a7C weight comparison
The weight of the Sony a7C compared to the Sony a7 III, Panasonic LUMIX S5, and the Sigma fp.

Another great feature for vloggers is the a7C’s flip-out, rotatable LCD screen. It’s also a touch-screen, allowing you to autofocus for stills or video with a touch of your finger. 

The shell of the a7C is made from magnesium alloy with dust and moisture resistant sealing. Small, strong, and powerful, this camera was built for use in the field.

Performance

The a7C is capable of delivering beautiful imagery. The camera has a powerful 24.2MP full-frame sensor, 15-stop dynamic range, and an ISO range of 100-51200 (up to 102400 expanded). Impressive bokeh can also be captured when shooting with a wide aperture lens.

The a7C additionally has 5-axis image stabilization and Sony’s AI-driven eye autofocus system. These features can elevate your video quality dramatically, especially if you’re shooting a moving subject without a tripod. For vloggers that like to walk and talk directly to the camera, these features will make the difference between a video that’s watchable and one that’s not.

Speaking of video, the a7C can record 4K video without pixel binning, full HD video at 120fps, and supports HDR and S-log/S-Gamut profiles.   

Memory

One downside of the a7C’s compact frame is the single memory card slot. While this may be a dealbreaker for some, it’s a sacrifice that won’t deter most content creators given the portability of the camera.

Price 

The Sony a7C is available for pre-order now in both black and silver for $1,798.00 (body only). You can also purchase the camera with the FE 28-60mm f/4-5.6 zoom lens for $2,098.00. The lens is available separately for $498.

Considering its size and gamut of features, the Sony a7C is a well-priced addition to Sony’s Alpha range. 

Sony a7C Review – Summary

The Sony a7C is a strong release. Blending some of the best features of Sony’s other cameras into a more compact body has resulted in a camera that is as portable as it is powerful. The a7C is sure to be popular with vloggers and content creators alike who need a camera they can carry with them anywhere. After all, it’s the world’s smallest full-frame camera.

Sony WH-1000XM3 Vs Sony WH-1000XM4 | Full Comparison & Verdict

Sony WH-1000XM3 Vs Sony WH-1000XM4 Full Comparison and Verdict

Sony’s new wireless noise cancelling headphones, the Sony WH-1000XM4, has big shoes to fill.  Released last month as an upgraded version of Sony’s impressive 2018 WH-1000XM3 headphones, the XM4 has only a few variations, but they could make all the difference to the discerning consumer.

Chiefly, the key difference between the two headphones is the quality of noise cancelation. Sony made a concerted effort to release headphones with more intuitive and immersive noise cancelation, and they’ve succeeded.

Improved hands-free calling and other new features also help round out the XM4 as an exciting upgrade.

Meanwhile, battery life performance remains unchanged at 30 hours (noise canceling on, continuous music playback), as does charge time, approximately 3 hours for a full charge. 

Considering the XM4 is already selling at the same price as the XM3, the choice is logical for customers looking to purchase new headphones. However, if you already own a pair of the XM3, is it worth the upgrade?

We did a full comparison to help you decide.

Sony WH-1000XM3 Vs Sony WH-1000XM4

Specs Comparison

WH-1000XM3WH-1000XM4
HD Noise-Canceling Processor QN1YesYes
Bluetooth Audio SoCNoYes
Dual Noise SensorNoYes
Sensitivities104.5 dB / mW (1 kHz) (when connecting via the headphone cable with the unit turned on) & 101 dB / mW (1 kHz) (when connecting via the headphone cable with the unit turned off)105 dB / mW (1 kHz) when connecting via the headphone cable with the unit turned on) & 101 dB / mW (1 kHz) when connecting via the headphone cable with the unit turned off
Frequency Response4 Hz - 40,000 Hz (Active Operation) & 20 Hz–20,000 Hz (44.1 kHz Sampling)/20 Hz–40,000 Hz (LDAC 96 kHz Sampling, 990 kbps) (Bluetooth Communication)4 Hz - 40,000 Hz (Active Operation) & 20 Hz–20,000 Hz (44.1 kHz Sampling)/20 Hz–40,000 Hz (LDAC 96 kHz Sampling, 990 kbps) (Bluetooth Communication)
Frequency Range2.4 GHz band (2.4000–2.4835 GHz)2.4 GHz band (2.4000–2.4835 GHz)
Bluetooth Version4.25
Touch ControlYesYes
Ambient Sound ModeYesYes
Quick AttentionYesYes
Personal NC OptimizerYesYes
Wearing DetectionNoYes
Battery Charge MethodUSBUSB
Battery Charge Time (Approx.)3 Hours (Full Charge)3 Hours (Full Charge)
Battery Life (Continuous Music Playback Time)Max. 30 hours (NC ON), Max. 38 hours (NC OFF)Max. 30 hours (NC ON), Max. 38 hours (NC OFF)
Battery Life (Waiting Time)Max. 30 hours (NC ON), Max. 200 hours (NC OFF)Max. 30 hours (NC ON), Max. 200 hours (NC OFF)
Weight (Approx.)8.99 oz8.95 oz

What’s New or Improved in the Sony WH-1000XM4

Comparing the specs of each model there appear to be few differences, but the devil is in the details. 

The XM4’s new Bluetooth SoC (System-on-Chip) has enabled superior noise cancelation capabilities. Working in conjunction with an updated algorithm and new noise sensors (a microphone on each earcup), it can eliminate more sounds on mid and high-range frequencies, providing a more immersive listening experience. 

The XM4 also has 5 built-in microphones for improved phone call quality, a big flaw of the XM3. The new microphones more effectively pick-up and isolate your voice, allowing for clearer phone conversations. If you’ve ever had a phone call while using the XM3 headphones, you’ll know why this is an exciting update.

The Adaptive Sound Control feature has also been improved, detecting where you’re listening to music and adjusting the noise cancellation accordingly. For example, this feature works great when you’re using public transit as the headphones will automatically filter out irritating background noise but still allow you to hear overhead announcements. 

The XM4 headphones are not only stronger, they’re smarter. A new feature called Speak-to-Chat automatically pauses your music when it hears you speak to someone, while new proximity and acceleration sensors do the same when they detect you’ve removed the headphones from your ears.  

Why Pick the WH-1000XM3

A second-hand set will be cheaper, but otherwise it appears Sony was able to improve on the core features of the XM3 without sacrificing any of the smaller features that made them such a popular set of headphones.  The XM4 headphones have everything the XM3 has and more.

While it’s disappointing the battery life hasn’t improved, it’s not surprising, given that the XM3 already offered an impressive life of 30 hours of continuous play.

Verdict 

For new customers deciding between the Sony WH-1000XM3 vs Sony WH-1000XM4, the XM4 is the clear choice. While it was initially offered at a higher cost, you can now purchase a XM4 set for the same price as the Sony WH-1000XM3.

If you’ve purchased a set of XM3 headphones in the past 2 years, it may be a tough decision. Depending on how recently you purchased them, your budget, and how much you value improved noise cancellation and phone call capabilities, you may feel compelled to upgrade soon. If you do, it’s unlikely you’ll be sorry; the Sony WH-1000XM4 is a great set of headphones.

Long Exposure Photography Guide

Brooklyn Bridge At Night by Tom Gainor

Long exposure is a popular photography technique that uses a slow shutter speed to capture the movement of a subject in a single frame.  A long exposure can ultimately result in beautiful, surreal imagery that visualizes the passing of time. 

Of course, if you do it incorrectly, you might just end up with a blurry photograph.

To make sure that doesn’t happen, we’ve created a comprehensive guide to walk you through the process of capturing your own long exposure photos.  

What is a Long Exposure?

To understand what a long exposure is, you first have to understand the basics of photography. 

A photograph is also called an exposure because it is created when a camera’s image sensor (or film, in a traditional camera) is exposed to light. The camera lens, designed to work like a human eye, filters the light wavelengths so that when they are exposed to the sensor it generates a digital image that replicates what we see.

A long exposure simply refers to the image that is created when the sensor is exposed to light for a longer period of time than for a typical photograph. 

The length of time the sensor is exposed is determined by the shutter speed. On a camera, the button you push to take a photograph is called the shutter button. When you push the button it opens the shutter, a barrier that protects the sensor from constantly being exposed to light. 

Shutter speed refers to the amount of time the camera shutter is open, and is measured in seconds and fractions of a second. For example, a shutter speed of 1/500 means the shutter is open for one five-hundredth of a second. A shutter speed of 1/60 means the sensor is exposed to light for one sixtieth of a second. 

If you are photographing a moving subject, a longer shutter speed – i.e. a long exposure – creates a visually interesting image because it allows you to capture more of the object’s movement within a single exposure. 

What You’ll Need

Photo by Clint Patterson

Camera

No single camera brand or model is better than all others for long exposure photography, but you will need a camera that performs well in low-light, has bulb mode, and allows you to adjust shutter speed and ISO. A DSLR or mirrorless camera would be best. 

Here are some of our favorite cameras that will certainly help you capture great long exposure photos: 

Tripod

A tripod is critical for long exposure photography as it will ensure the camera remains perfectly still while you’re taking the photo. Even the slightest movement of the camera will disrupt the effect, so handheld is strongly not recommended.  

Here are some tripods we recommend:

Lens

The lens you end up using will depend on both your camera and what you’re shooting. If you’re shooting landscape, a wide-angle lens will be best. 

Here are some great wide-angle lenses you could use on the cameras we recommended above:

Neutral Density Filter

This filter isn’t always needed, but will be crucial if you’re shooting somewhere with a lot of light. A neutral density filter reduces the amount of light entering your lens.  Low-light is critical to long exposure photography, and if other circumstances prevent you from shooting in a low-light environment, this filter can help evenly reduce the light exposure. For this reason, a ND filter can also allow you to use a longer shutter speed. 

Here are some recommended neutral density filters you can use for the lenses mentioned above:

Shutter Release

If you’re planning an exposure longer than thirty seconds, most cameras will require you to use bulb mode and hold down the shutter button for as long as you want the exposure to last (more about this below). Holding down the shutter button will be uncomfortable and could cause you to accidentally move the camera. 

To avoid this, it’s recommended you use a remote shutter release – an external remote control you can use to open and close the shutter. Some shutter release remotes can even be programmed to automatically close the shutter after your desired duration. The shutter release can be connected to your camera via cable or wirelessly using bluetooth or infrared. 

Preparation

Photo by Austin Neill

Shooting Location

Long exposure is most often used in landscape photography. As mentioned above, you should be shooting in a low-light environment. Unless you’re using a neutral density filter, shooting on a bright, sunny day will make it extremely hard to achieve the desired effect as the sensor will be exposed to too much light.

If you’re shooting the sky, clouds and stars make for great subjects, as their movement will be captured in the photo (use a shutter speed of at least 20 seconds to capture star light trails).  Avoid the sun – if it’s in frame, it will add a disproportionate amount of light and could ruin the photo. 

Framing and Composition

Once you’ve found your shooting location, set up your tripod and camera, and frame your shot.

At least one subject in your frame should be moving, but the best long exposure photos typically include both a fixed and moving subject, as the contrast between them accentuates the effect you’re trying to create. Bright moving objects will leave a trail of light, while dark objects may disappear. 

Taking care with your framing and composition will only make your photo more powerful. Following the rule of thirds is a simple yet effective way to ensure your subjects are well captured within the frame of your shot.

Focus

You can set focus manually, or use auto focus. If you’re using auto focus, hold down the shutter button to set focus, then, before releasing the shutter, switch your camera back to manual to lock the focus in place. 

If your camera has the back button focus feature, it will make it easier to set and lock focus, as it separates the focusing functionality from the shutter button. Almost all DSLR and mirrorless cameras include this functionality, but most require you to change your settings to enable it. Check your camera’s manual for instructions on how you can start using back button focus.

Aperture

Aperture controls how much light enters the camera lens, and is measured using the F-stop, or F-number, the ratio of focal length to the lens’ entrance pupil. A smaller aperture will allow less light to enter the lens, and is ideal for a long exposure shoot. 

The specific F-stop you should use will vary depending on when and what you’re shooting, as well as your lens. Every lens has a ‘sweet spot’ – the aperture at which the lens will capture the sharpest imagery – which is  typically about 3 stops less than the lens’ maximum aperture. For long exposure photography, you want to use a small F-stop that will still capture a sharp image. 

ISO

The ISO setting on your camera determines how sensitive your camera’s sensor is to light. A low ISO means your camera will be less sensitive to light, resulting in darker imagery.  A high ISO means more light, but it can also add noise to your image – the grainy texture you can see in some photos. That’s why you should generally keep your ISO as low as possible. 

One of the great things about long exposure photography is that your sensor is being exposed to more light than a standard photograph, so you should be able to use a fairly low ISO. Start as low as 100 and increase carefully as you need. 

Shutter Speed

The shutter speed used for most photography is typically 1/60 or faster. For long exposure photography, you want to expose your sensor for much longer – multiple seconds, instead of fractions of a second. Anything over 1 second could be considered a long exposure, but the longer the shutter speed, the more likely your image will be visually striking. 

Bulb Mode & Shutter Release

If you’d like an exposure longer than thirty seconds, switch your camera to bulb mode. Most cameras will restrict your shutter speed to 30 seconds by default. Bulb mode enables you to use whatever shutter speed you desire – as long as the shutter button is held down. Use a remote shutter release to avoid holding down the shutter button. 

Check Exposure Using Histogram

Photo by Maxim Medvedev

Once you’ve determined your shutter speed and aperture, and you’re happy with the focus and framing of your shot, take a test photograph and check the histogram. The histogram is a graph that shows the amount of light distribution across your image, and is the best way to assess exposure. Most DSLRs and mirrorless cameras will allow you to see the histogram for each photo.

There is no exact reading on a histogram that is best, but it will make it clear when the image is too dark or too bright. A spike on the left side of the graph will indicate the image has too many dark pixels (under exposed), while a spike on the right side suggests too many bright pixels (over exposed).  Adjust the aperture, shutter speed, and ISO as needed to increase or reduce the amount of exposure. 

Add Neutral Density Filter

If you’re using a ND filter, wait until after the test photo (and you’re happy with the exposure) to put the filter on the lens. This is because, depending on the strength of the filter, it may make it impossible to see through the viewfinder or LCD screen.

Once you’ve added your filter you should adjust the shutter speed accordingly based on how many stops were added by the filter. To determine your new shutter speed, use the following equation:

Original Shutter Speed x 2ND = Filter Shutter Speed
(ND = the filter’s stop value)

For example, if the shutter speed you used without the filter was 1 second, and the filter you’re using has 6 stops, your equation would be:

1 x 26 = 1 x 64 = 64

The shutter speed you should use with the filter should be 64 seconds. 

If you don’t feel like doing math, there are also a range of mobile apps available, such as Long Exposure Calculator, that can help you determine the best shutter speed to use when utilizing a ND filter. 

Take the Photo

You should now be ready to take a photo! Depending on what you’re photographing, there are a number of techniques you can use to capture truly beautiful images. 

Techniques

Motion Blur

Photo by Nicole Y-C

Motion blur is the photographic term for what movement looks like when it’s captured in an image. Every long exposure photograph contains some kind of motion blur because, well, that’s kind of the point. It might be as simple as a photo of someone running, or cars driving along a busy highway. 

Silky Water

Photo by George Alexandru Novac

Long exposure photographs of water can generate really fascinating imagery. Using a neutral density filter will allow you to photograph water during the day using an extremely slow shutter speed. Depending on the motion of the water, the resulting imagery will give the water a silky, flowing appearance. 

Light Painting

Photo by Jack B

Light painting is all about capturing the motion blur of a brightly lit object contrasted with a dark background. Once you’ve got the basics of long exposure down pat, light painting is also pretty easy to pull off. You just need a dark space and a brightly lit movable object, such as a sparkler or glow stick. For more information about getting started with this technique, click here

Send Us Your Best Photos

You should now have everything you need to try long exposure photography. So what’s next? Try it out! If you take a photo you’re particularly proud of, don’t be afraid to share it with us by sending us an email or reaching out on Instagram, we would love to see it. If there’s anything important you think we missed in our guide, leave us a comment below!

LUMIX S5 – Everything You Need to Know about Panasonic’s New Mirrorless Camera

It’s here. Panasonic’s new full-frame mirrorless camera, the LUMIX S5, is now available for pre-order.

After generating plenty of anticipation since rumors of its existence first appeared several months ago, we thought we’d put together a rundown of everything we already know about the new release. 

You can also join our virtual LUMIX S5 launch event on Wednesday September 3rd 2020 at 5pm EDT, where Panasonic will give us an in-depth first look at the camera.

The S5 is the latest addition to the popular LUMIX S-Series, Panasonic’s range of mirrorless cameras. However, it appears the S5 will be a more compact, affordable camera than its siblings.

Shop more from the LUMIX S-Series:

Check out the product launch video below:

According to Panasonic, the S5 has been designed for content creators who need a field-ready video camera that won’t bust their budget. The specs seem to confirm that, especially when compared with the LUMIX S1, Panasonic’s first mirrorless camera, and the Nikon Z6, a competitor camera that’s popular with videographers and vloggers.   

Specifications

LUMIX S1Nikon Z6LUMIX S5
Sensor24.2MP full-frame CMOS sensor24.5MP full-frame BSI FX-format CMOS sensor24.2MP full-frame CMOS sensor
ProcessorVenus Engine image processorEXPEED 6 image processorVenus Engine image processor
4K VideoYes, at 60fps (8-bit, sensor cropped to APS-C)Yes, at 30fps full-frameYes, at 60fps (4:2:0, 10-bit, sensor cropped to APS-C)
Image Stabilization5-axis dual image stabilization3-axis image stabilization (5-axis with NIKKOR Z lens)5-axis dual image stabilization
Lens MountL-MountNIKKOR Z Series (and F Series with FTZ mount adapter)L-Mount
Memory2 Slots (1 XQD and 1 SD)1 Slot (XQD only)2 Slots (Both SD)
Viewfinder5,760k-dot OLED eye viewfinder3.6 M-dot quad VGA viewfinder2.36M-dot OLED live viewfinder
DimensionsApprox. 148.9 W x 110.0 H x 96.7 mm D / 5.86 W x 4.33 H x 3.81 inch D (excluding protrusions)Approx. 134 W x 100.5 H x 67.5 mm D / 5.3 W x 4 H x 2.7 inch DApprox. 132.6 W x 97.1 H x 81.9 mm D / 5.22 W x 3.82 H x 3.22 inch D (excluding protrusions)
WeightApprox. 899g / 1.98 lb (Body only)Approx. 585 g/20.7 oz (Body only)Approx. 630g / 1.39 lb (Body only)
Price$2497.99$1796.95$1997.99

Compared to the LUMIX S1

Panasonic has done a great job of improving on the S1, releasing a camera that has notable enhancements and a smaller price tag. The S1 was well received when it was released, but it did attract criticism for having a clunky body and a higher price tag than its direct competitors. The S5 is considerably cheaper than the S1, while its body is more compact and over 200g lighter. 

The S5 also offers an improved autofocus system, dual native ISO, and a better viewfinder (2.36M-dot vs 5,760k-dot), making the camera a clear upgrade on the S1.

LUMIX-S1-LUMIX-S5

Compared to the Nikon Z6

The Nikon Z6 is one of the most popular video cameras on the market today thanks to its advanced video capabilities and affordable price. The S5 is heavier than the Z6, and slightly more expensive, but appears to offer several superior features that may make it the new preferred choice for videographers and content creators looking to upgrade from a DSLR or first-gen mirrorless camera. 

Firstly, the S5 offers more advanced video capabilities, with the ability to shoot 4K video at 60fps, compared to the Z6’s 30fps. The S5 can also shoot 4K video at 60p 4:2:0 10-bit (or 30p 4:2:2 10-bit) internally, while the Z6 and most other mirrorless cameras require an HDMI output to an external recorder to achieve that quality. 

Secondly, one of the Z6’s biggest flaws is it’s single memory card slot, for an XQD card. The S5 has two SD card slots, which will definitely appeal more to anyone who’s already shooting on SD and likes to dual record. Not having to purchase an XQD card also almost makes up the price difference between the two cameras. 

Summary

At first glance, the Lumix S5 promises to be a powerful new contender in the mirrorless camera market. With a clear focus on enhanced video capabilities, without an inflated price tag, the S5 is a great addition to the LUMIX S-Series, building on the S1 without undercutting the appeal of the S1R and S1H. Designed with video content creators in mind, the S5 looks like it will perform well in the field and hold its own against competitors like the Nikon Z6. 

Available for pre-order now, body only or in a kit with a LUMIX S 20-60mm f/3.5-5.6 lens, the LUMIX S5 seems destined to be a popular holiday purchase this year.

Novation Launchkey Mini MK2 vs Mini MK3 – Worth The Upgrade?

The Novation Launchkey Mini MK2 has been a popular purchase since its release, primarily due to its practical blend of functionality and mobility. Offering many of the same features as the full-size MK2, but at less than half the size, the Mini has earned its reputation as an excellent portable keyboard controller.

Novation has since released an updated version – the Launchkey Mini MK3 – and the question on everyone’s lips is: is it worth upgrading?

In short, yes. The Mini MK3 has done everything a new release should do; elevate the best features of the original, and address or eliminate its downsides. With an affordable price tag of $109.99, there are more reasons to upgrade than not.

Upgrading is ultimately a personal choice, however, so we have compared the Launchkey Mini MK2 with the Mini MK3 below so you can make an informed decision about whether or not you should upgrade. 

Look & Feel

The Launchkey Mini MK3 has all the same design benefits of its predecessor – portability, sleek design, clean layout – but with some notable improvements.

The Mini MK3 is slimmer than the Mini MK2, and the layout is equally neat, despite new buttons and features. The control knobs are smaller yet still dynamic, the buttons are appropriately spaced, and the drum pads are slightly more sensitive, allowing for more precision and speed. The minikeys have also been improved and feel easier to play.

If you’re already a fan of the design and layout of the Mini MK2, it’s hard to imagine you won’t appreciate the changes that have been made for the Mini MK3; it immediately looks and feels like an upgrade.

Novation Launchkey Mini MK2 Vs Mk3Functionality

While the Mini MK2 and Mini MK3 are almost the same size, the MK3 manages to offer additional functionality without compromising usability. In other words, the Mini MK3 has more to offer, but isn’t any harder to use. 

New buttons enable arpeggiator and fixed chord modes, two features alone that might compel you to upgrade, allowing you to more easily create new melodies and sounds using just the controller.

New play and record buttons also provide more control, while touch strips have been added to allow for easy adjustment of modulation and pitch – a nice touch considering the size of the board.

Additionally, the Mini MK3 has a sustain pedal input port, a USB port (instead of the Mini MK2’s micro-USB), and a 3.5mm TRS MIDI output port.  

Disappointingly, the Mini MK3 doesn’t come with MIDI DIN break-out cables, even though an adapter is required to connect to some devices. This is likely because, until recently, there wasn’t a universal standard for wiring a TRS MIDI connection, which meant that an adapter for one brand’s TRS jack may not work for another. The MIDI Manufacturers Association has since released specification guidelines to address this issue, but if you plan to connect to a device with a MIDI 5-pin port, you’ll need to purchase an adapter cable (type A male 3.5mm TRS to female 5-pin DIN MIDI).

Software & Plug-Ins

Like the Mini MK2, the Mini MK3 is designed to work with Ableton Live, but will work with all DAWs including Protools, Reaper, and Studio One. 

Ableton Live 10 Lite is included with the Mini MK3, but if you’re already using Ableton Live with the Mini MK2, you’ll just need to make sure you’re running version 10 of the software (or higher).

March 2021 – v1.1 Firmware Update

On March 30, 2021, Novation announced a new firmware update for the Launchkey MK3 and the Launchkey Mini MK3. The v1.1. firmware update is available for download here.

The v1.1 update enables both controllers to use Strum Mode. This new feature allows you to play chords on the keyboard using the modulation strip/wheel. Simply hold down the shift button and press the key with the circle, then turn the arpeggiator on by pressing the Arp button. Now when you play a chord, you won’t hear it until you move the mod strip/wheel. 

The update includes additional new features only for the Mini MK3. These include the ability to adjust the brightness of the drum pads and toggle their velocity on/off. You’ll also be able to toggle the clock output from the MIDI port on/off.  Finally, a new double-tap shift function latches the shift button to the Arp and Fixed Chord buttons, making it easier to use the controller one-handed. 

Summary

Launchkey Mini MK2Launchkey Mini MK3
25 MinikeysYesYes
16 Backlit Velocity Sensitive Drum PadsYesYes
Touch Strip for Pitch-Bench with Centre-ZeroNoYes
Touch Strip for ModulationNoYes
ArpeggiatorNoYes
Fixed Chord ModeNoYes
Play ButtonNoYes
Record ButtonNoYes
Kensington MiniSaver slotYesYes
USBMicro USB onlyYes
3.5mm MIDI TRS OutputNoYes (MIDI DIN break-out cables not included)
Sustain Pedal InputNoYes
Ableton Live Lite IncludedYesYes
Dimensions325mm width x 175mm depth x 43mm height330mm length x 172mm depth x 31mm (40mm including knob-caps) height


Overall, the Novation Launchkey Mini MK3 provides you with more creative control than the Mini MK2, reducing your reliance on the DAW and allowing you to more easily create music using just the controller. Despite adding so much functionality, the Mini MK3 is also slimmer, sleeker, and easier to use, with improved drum pads and minikeys. Considering the low-price tag, deciding whether or not to upgrade to the new Launchkey Mini should be an easy choice.

Tips to Become a Full-Time Wedding Photographer

If you are just starting out in the world of wedding photography, you may be wondering how to become a wedding photographer full-time. The wedding industry can be very competitive, and putting effort into your wedding photography business will help you excel above and beyond your local competitors. To become a wedding photographer full-time, you must be able to run a steady and profitable business. Let’s talk about what it takes to become a full-time wedding photographer.

Maintain a Wedding Photography Portfolio Website

Maintain a portfolio website to show off your photography. This is important to keep updated so your clients will always know what your work looks like. Perhaps you have learned some new editing techniques in the last few months — make sure that it is reflected on your website. Your clients will want to know exactly what they are getting when they book you as their wedding photographer. Common sites photographers use to build their portfolio include Squarespace, Showit, and Wix.

As a professional wedding photographer, you should have a consistent style that your clients can rely on, so they know what they are getting for their wedding day. That is why it is so important to keep your portfolio website updated. In addition, the more weddings you photograph, the more experience you’ll gain –– which often results in better photos. Keeping your site up-to-date allows potential clients to see the best and newest work.

It’s also a good idea to research local SEO. Make sure that your photography website is optimized to be found by potential clients on search engines. The basics of this include listing which areas your business serves, and what your style of wedding photography is. For example, if you’re a fine art wedding photographer in New York, you should make sure to sprinkle those keywords around your website.

Keep an Up-To-Date Blog

Keep your blog on your website up to date with the most recent sessions that you’ve done. Whether it is a wedding, an engagement session, a bridal shower, or engagement party, you want to post about it on your blog. Making sure to reference any local vendors and venues that you are working with, keeping this content on the blog will help you share your professional wedding photography and be found easily on search engines.

For example, if a couple is Googling a specific venue, you’ll want to have a blog post that is relevant to that venue on your website. That way, couples will be more likely to come across your photos. When they see the way that you’ve photographed the venue in the past, they may want to book you then and there because you’ve already had experience at their dream venue.

Focus on Your Marketing as a Full-Time Wedding Photographer


One of the biggest parts of running a business as a wedding photographer is marketing your services. You can have the most beautiful portfolio in the world that is all technically awesome, but being able to get clients is the most valuable part of a successful wedding photography business. As a wedding photography business owner, marketing is crucial to your business. When you market, you’re not just waiting for clients to find you – instead, you’ll be putting yourself directly in front of them.

There are several ways to market your wedding photography services, especially with social media, digital advertising, and having a web presence. When you put your energy into marketing your business, it will get you shooting more weddings and keep on building up your word-of-mouth referrals.

As a wedding photographer, you cannot solely rely on word-of-mouth. It’s great to get referrals from past clients, and friends and family members, but you must have other ways to generate business when your referrals run out. Take a look at how other photographers in your area are marketing themselves. Are they prevalent on Yelp? Do they have a ton of Instagram followers? What can you do differently to make your business stand out to potential clients?

Use Social Media to Your Advantage

As a wedding photographer, you can luckily use social media to your advantage. Since photography is inherently visual, there are lots of visual-based social media platforms for you to promote your business on. Instagram is one of the biggest ones for wedding photographers, as it is where many engaged couples are announcing their new engagement, scouting out venues and vendors, and visually getting inspired for their wedding.

Pinterest is another great platform for wedding photographers, as plenty of users are on Pinterest solely to plan life events like parties and weddings. If you can provide them localized content that inspires them relevant to their big day, it will lead them directly to your website. Creating blog content for your business is especially important when considering how to post on Pinterest. You can post pins about venues you’ve photographed and locations you’ve had engagement shoots to draw in more local business.

TikTok is a rising platform for wedding photographers, as many are showing their behind-the-scenes process on this video platform. The great thing about a TikTok video is that you can cross-post it to Instagram and Facebook as well. Facebook is another big platform for wedding photographers, not only with fan pages but also within Facebook groups. Photographers promote themselves to local brides in wedding planning groups and generate clients through these networks.

Create Irresistible Offers


One thing that you can do to get more wedding photography clients so that you can become a full-time wedding photographer is to create irresistible offers. What is something that your business can provide that others may not be able to? Are you including a complimentary engagement session with your packages? Do you have a second shooter automatically added to your photography packages?

Think about ways that your business can stand out amongst the other local photographers in your area. Doing competitive research on other photographers will help you to understand the market better. In saturated markets like big cities, this is especially important so you can differentiate yourself from the competition.

Figure out what makes your business truly unique to start carving out your place in the market. If you can create a niche, you narrow your competition. For example, some photographers only photograph adventure elopements in the mountains and woods. These photographers make sure to only post those types of elopements on their website and social media, which allows them to corner that specific part of the market.

Connect With Other Vendors in Your Area

Connect with other vendors in your area and start to build a network of mutually preferred vendors. It’s a great way to get to know others in your industry, and also to get referral clients. The most important vendors for a photographer to get to know our wedding planners, wedding venues, and officiants. These are the people who often get booked first in a wedding planning process.

If you can become the #1 referral for other vendors, you’ll likely get tons of direct referral business. Venues will often specifically have preferred vendor lists, which are quite lucrative for photographers. Having referrals come in frequently from sources like these will help you to maintain your full-time wedding photography business.

Offer Headshots and Updated Photos for Vendors

One way that full-time wedding photographers get their foot in the door with fenders for networking purposes is to offer headshots and updated photos. This allows your work to be seen by their audience every time they go to their website or social platforms, and it also provides the vendors with something of value.

The more you can give to others, the more opportunities you will have to receive. It’s important to give back to your local wedding community and build genuine connections with others. If you are going to go full-time, this is essential as you build a community and your reputation.

Calculate Your Prices for Long-Term Success

When it comes to the technical side of being a full-time wedding photographer, you must consider the financial aspect of making the move to full-time. Calculating your prices for long-term success requires planning and thoughtfulness. Don’t just price your wedding packages at whatever the couple’s budget is, or at some random number you’ve decided to come up with.

Think about how many weddings you want to photograph per year, what the taxes are that you’ll need to be paying, what your business overhead is, and how much you want to be making on a personal level. If you are not a fan of finances, you can also work directly with a financial planner or a CPA. Together you can work out what it is you need to become a full-time wedding photographer.

Structure Your Wedding Photography Business Properly

You may also need to work with a CPA to structure your business properly. The structure of your business will depend on a variety of factors. It’s often best to speak with a professional on what is right for your business. Many photographers choose to create an LLC or remain as a sole proprietorship, but there are other options to consider based on what the needs of your business are. It’s important to work with a professional to understand what will benefit your professional wedding photography business the most.

Check on Which Insurances Your Photography Business Needs

It’s important to have insurance for your business as a full-time professional wedding photographer. You must figure out which insurance is your business needs. Many photographers are required to have General Liability Insurance from the venues that they work with. Most venues will require a photographer to have this insurance before they are allowed to shoot the wedding day. It’s important to make sure that your business is insured for any potential risks.

Look into other available options for photography insurance to keep your business running smoothly. Insurance protects yourself and your business in case of any issues. Having insurance for your equipment is essential for photographers, as wedding photography equipment can be costly.

Create Alternative Sources of Income as a Full-Time Photographer

One important lesson for any wedding photographer is to create alternative sources of income. Not only can you make additional income through albums and print sales, but also through photography in general. As we saw with the coronavirus pandemic of 2020, there may be issues that prevent wedding photographers from shooting actual weddings.

Making sure to gain experience in other types of photography will allow you to have a diverse income as a full-time photographer without relying simply on weddings. The elopement photography business is also great to gather experience in. You can build an elopement portfolio by doing styled shoots and elopements for friends or family members. You can also diversify into family photography, portrait photography, food photography, and so on.

Finding alternative paths to take as a full-time professional wedding photographer to supplement income in case you don’t have enough bookings or unforeseen circumstances is important so you can keep your business afloat. You can also look into other options like selling fine art prints, photo editing work for other photographers, or selling presets and digital products.

Maintain a Steady Job Until You’re Ready to Be a Full-Time Wedding Photographer

Until you are ready to be a full-time wedding photographer, make sure that you maintain a steady job to pay the bills. You mustn’t take the leap into being a full-time professional photographer until you are financially secure enough to do so. It may mean having a certain number of weddings booked or having a certain amount of income saved up first.

Figure out what it would take to leave your job before you actually do it. You can still be a wedding photographer with a full-time job. That way, you can maintain security until you’re ready to become a full-time wedding photographer.

Become a Full-Time Wedding Photographer

You can make the transition to become a wedding photographer as your full-time job by thinking about these different areas. It’s important to remember that running a business is hard work and takes some juggling. You are often your own marketer, accountant, networker, and so much more on top of being a wedding photography professional.

When learning how to be a wedding photographer full-time, take it one step at a time. Becoming a full-time professional does not happen overnight. With hard work and patience, you can take your wedding photography business to the next level. For more photography business tips, check out the Focus Camera Wavelength Blog.

Sigma Announces the 85mm F1.4 DG DN | Art Lens, an Optical Wonder in a Compact Frame

sigma 85mm f1.4 featured

Less than two months after dropping the bombshell that was the 100-400mm F5-6.3 DG DN | Contemporary telephoto lens, Sigma has announced yet another beauty. This time, it’s the Sigma 85mm F1.4 DG DN | Art lens, a full-frame mirrorless camera lens with high-caliber optics and a lightweight body.

Available in late August, the 85mm F1.4 DG DN | Art comes in L-Mount and Sony E-Mount and includes five Special Low Dispersion Elements and one aspherical element, resulting in outstanding edge-to-edge image sharpness. It delivers large aperture and professional optical capabilities in a compact package. Scroll down for the details on this next-level lens.

The Nitty Gritty About the Sigma 85mm F1.4 DG DN | Art

YouTube player

Sigma’s new portrait lens comes in a lightweight (22 ounces) frame yet maximizes edge-to-edge sharpness. It achieves this thanks to a stepping motor with a smaller focusing lens that are optimized for both phase detection AF and contrast detection AF. It offers excellent aberration correction even at maximum aperture, and it features an 11-blade rounded diaphragm that achieves smooth bokeh. This lens is an improvement over the 85mm F1.4 DG HSM | Art lens, achieving both improved image quality and a smaller, dust and splashproof body.

Here are the full specifications:

  • Focal Length: 85mm
  • Maximum Aperture: f/1.4
  • Minimum Aperture: f/16
  • Format: For full-frame mirrorless cameras
  • Lens Construction: 15 groups, 11 elements (5 SLDs and 1 aspherical lens)
  • Angle of View: 28.6°
  • Number of Diaphragm Blades: 11 (rounded diaphragm)
  • Minimum Focusing Distance: 33.5”
  • Maximum Magnification Ratio: 1:8:4
  • Filter Size: φ77mm
  • Maximum Dimensions (Diameter x Length): φ3.3 × 3.7”
  • Weight: 22.2oz

*The figures above are for the L-mount*

sigma 85mm f1.4 shot
Taken with the Sigma 85mm f1.4 DG DN | Art.

Contributing to the outstanding performance of this Japan-made lens, in addition to the five SLD elements and one aspherical lens, are cutting-edge high refractive index glass, high resolving power, and its reliable ability to minimize ghosting. New to the Art line is the “iris ring long switch,” which prevents unintended movement of the iris ring while shooting. Finally, the 85mm F1.4 DG DN | Art features a robust build quality thanks to materials including aluminum and TSC (thermally stable composite).

The lens comes supplied with the LH828-02 lens hood and a protective case. Watch this space for updates, and get excited!

Sony Xperia 1 II Review: The Perfect Smartphone for Photographers

Hey Focus Fam! Veronica here let’s talk about the new Sony Xperia 1 Mark 2.

It’s only been a year since Sony released the original Xperia 1, but they have made a whole bunch of improvements.

Sony has really stepped up its smartphone game with the Xperia 1 Mark 2. This latest addition to the Xperia line is a photographer’s dream, plus if you’re a gamer, avid movie-watcher, or love listening to music, the Xperia 1 Mark 2 is a great option for you.

So let’s get to it….

The Highlights

Some of the highlights of the Xperia 1 Mark 2 include: 

  • 4k HDR display with 3840 x 1644 resolution
  • Triple lens camera setup with focal lengths of 16, 24, and 70mm in addition to the
  • 8-megapixel selfie camera
  • This is the first smartphone with 20 fps AF/AE tracking burst
  • 60 fps Real-time Eye AF
  • Snapdragon 865 processor
  • DSEE Ultimate and 360 Reality Audio technologies
  • ip65/68 water resistant
  • 256 GB storage and 8 GB RAM
  • Android 9 Pie operating system

That’s the basic rundown, but let’s get into more detail on some of these features.

Sony Camera Technology in a Smartphone

First, let’s talk about the camera. Simply speaking it’s pretty cool, Sony used a lot of the a9 technology in this phone. Think of it as a baby a9 inside your smartphone.

Like the original Xperia 1 released back in 2019, the Mark 2 has a triple 12-megapixel rear camera setup. The Mark 2 gets a path-breaking camera system to make it a photographer or videographer’s delight. While the 16 and 24mm lenses will serve you well for wide landscapes, the 70mm lens takes the game up a notch to give you amazing portraits.

The Mark 2 also improves on the Xperia 1’s image quality thanks to a 50% larger sensor and the new, high-quality anti-reflective Zeiss T coating on the lenses. And it’s the first smartphone on the market to offer an incredible 20 fps continuous burst shooting with autofocus and auto-exposure. Plus, the Mark 2 offers real-time Eye Autofocus for both humans and animals.

Also, thanks to the Photo Pro and Cinema Pro apps, you can have control over your images and videos at a level previously only possible with a professional camera. You can control your ISO, shutter speed, aperture, and much more. But if you’re looking for a simpler interface, you can switch to the separate basic camera app.

Cinematic 21:9 4K Movie Display

For the movie lovers and gamers out there, there is also a lot to admire. First-off, Sony is still the only manufacturer to produce a cinematic 21:9 4K HDR OLED display. This is a 6.5-inch edge to edge screen with no notches in the way of the action, and it’s supported by two front speakers with Dolby Atmos sound and immersive 360 Reality Audio. The Mark 2 also introduces motion blur reduction technology that gets rid of lagging, as well as touch sensitivity for more responsiveness. Just as Sony took advantage of its Alpha photography experts in designing the camera, Sony leaned on its BRAVIA technology team in creating the video and gaming aspects of the phone, and it really shows.

Next Level Gaming

This phone also takes advantage of another one of Sony’s most famous products. For those who love their PlayStation, the Mark 2 can directly connect to the DualShock 4 controller. Gamers can also look forward to the Game Enhancer feature. This allows you to keep all your games in one place and even block out those annoying notifications during a heated gaming session. You can also use it for finding online gaming tips and recording your gameplay.

How Mark II Beats I

The Mark 2 outdoes the original Xperia 1 across a number of features. Some improvements include an upgraded Snapdragon processor, more storage space and memory, an upgraded battery, and Finally! wireless charging. Those who value function over form will appreciate the reintroduction of a standard headphone jack, as well as SIM tray that’s easy to open with your fingernail. It also has a side-mounted fingerprint sensor that may take some getting used to. One feature unique to Xperia that the Mark 2 retains is Side Sense, a sensor at the side of the screen that, when you double-tap it, pulls up a quick menu of your favorite apps that makes it easier to access them with one hand.

Final Thoughts

Users shopping for size should know that it’s bigger than the Samsung Galaxy S20 and about the same size as the iPhone 11 Pro Max; just a little longer and thinner – which makes it a somewhat easier handle. The Mark 2’s $1198 price tag makes it a bit pricey, but the benefits you get for your money are pretty hard to argue with.

Right now Focus Camera is offering a great deal if you preorder the Xperia 1 Mark 2, you’ll receive a FREE pair of Sony XM3 True Wireless Headphones valued at $230. This offer ends July 12 so be sure to pre-order now using the link in the description below.

That’s all for now. Don’t forget to subscribe to the Focus Camera channel for reviews and tutorials on the latest gear. See you next time!