Home Blog Page 6

Xperia 5 IV Review | Compact Smartphone for Photography & Video

Xperia 5 IV review + photo samples

Sony has raised the bar again, releasing the new Xperia 5 IV, an impressive upgrade to the Xperia 5 III. This latest smartphone will have similar specs and features to the Xperia 1 IV released earlier this year. The Xperia Sony phones have recently been created to produce outstanding content creation capabilities and entertainment features to increase user-friendly properties.

The best part is that the new Xperia 5 IV provides immersive elements and content creation experience at a more affordable price and in a more compact phone (compared to the Xperia 1 series). However, this is no average smartphone; enhanced performance elements to audio, visual, and image and video capture make it great for:

  • Live streaming on your phone.
  • Brighter and better smartphone display.
  • Smartphone gaming and streaming games. 
  • Recording videos.
  • Smartphone photography. 
  • Smartphone audio recording.

Our team had a great time reviewing the Sony Xperia 5 IV camera and video features and using Sony’s newest Xperia phone for a fun “content creator challenge”. Watch here.

The previous model, like the Xperia 1 IV, put content creation and speed at the forefront of its campaign. Sony’s newest Xperia model now reinforces this idea, making these features available to anyone looking to get in the mix. If the above smartphone capabilities seem appealing, then the Xperia 5 IV might be worth purchasing.

Like phones before, this new Sony Xperia is nothing to sleep on. Its features now make it accessible for anyone to explore their creative side. Using phones (as opposed to computers and cameras) to view, share, and create content is very common nowadays, and Sony is leading the charge with the Xperia 5 and 1 series.

This post reviews the Xperia 5 IV features we found most remarkable. Let’s find out if it keeps up with the smartphone hype and demands of today and what new features it’s paving the way for.

Xperia 5 IV Build, Specs, & Price 

Xperia 5 IV / Xperia Sony phone
Photo courtesy of Sony

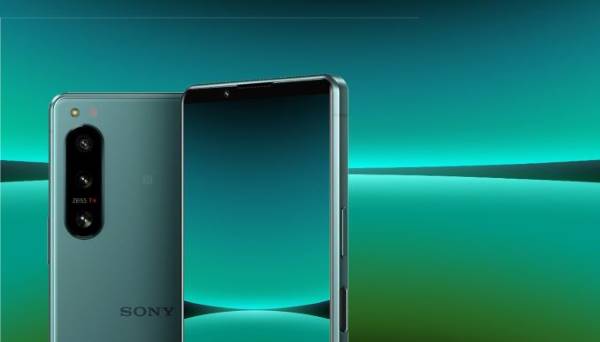
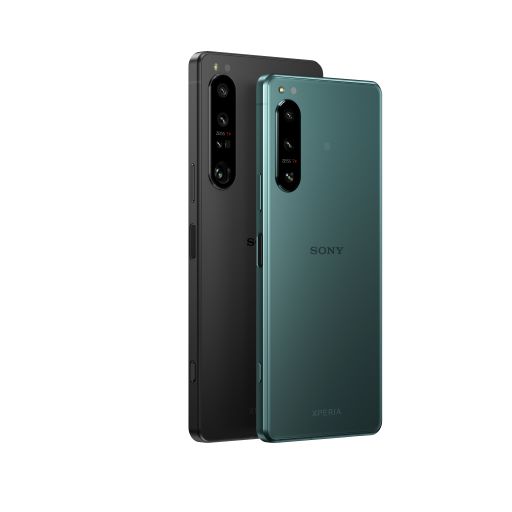
The Xperia 5 IV keeps the sleek, thin, and vertical style of its predecessor, the Xperia 5 III. Its dimensions are: 156 × 67 × 8.2 mm, weighing .584 lbs, lightweight and compact. The slender and narrow frame helps to maintain a larger display screen size for a rich watching and gaming experience.

The phone has an IP65/IP68 rating for a water/dust resistance of up to 1.5m and 30 minutes. Regarding buttons, you have the volume switch, power button, Google Assist, and a shutter release button. The side shutter button solidifies its title as an excellent smartphone for photography.

The Xperia 1 IV is slightly larger and a bit more expensive for those who want to be more official with their content creation practices. However, the Xperia 5 IV will cost a bit less, starting at $999.99 (for a limited time, you can get WF-1000XM4 noise-canceling wireless earbuds included in a bundle deal.)

Storage Capacity & Battery 

Xperia 5 IV vs Xperia 1 IV
Xperia 5 IV is a lot more compact compared to the Xperia 1 IV

The new phone has 128GB of internal storage (expandable with a SIM card) and 8GB of RAM. It uses Qualcomm Technology’s state-of-the-art Snapdragon 8 Gen 1 Mobile Platform processor for faster speeds, supporting a 5G network connection.  

The screen is well secured with the Corning Gorilla Glass Victus, an upgrade from Gorilla Glass 6 from the previous Xperia 5 model.  Its battery capacity has also been increased to 5,000 mAh, built for long phone sessions without worrying about charging.

Display Screen & Viewing Experience 

The Xperia phones have some of the best smartphone display screens for exceptional brightness, quality images, and little lag. Users can enjoy their favorite shows or movies on a 6.1″ FHD 120Hz HDR OLED display with 1080 x 2520 pixel resolution. Like the Xperia 1 series, the screen will be about 50% brighter than the previous model. So, if you love watching videos on your phone, you’ll have a blast with the Xperia 5 IV.

In addition to these features, the phone’s display screen is so crisp that it can double as an external camera monitor using a simple HDMI adaptor (for the Sony A series). The 21:9 ratio creates a fantastic viewing experience, especially on social media platforms mainly catering to vertical videos like TikTok and Instagram.

Xperia 5 IV / smartphoen for photography and video
Photo courtesy of Sony

Moreover, flip your phone sideways, and now you have a quality and compact TV in the palm of your hands, ready for hours of watching time. The Xperia’s audio features complement the phone’s visuals well enough to create a riveting and entertaining experience for its users. 

Sony prides its phones on its front-facing stereo audio technology, allowing for superior sound quality and increased low frequencies. The speakers’ positioning ensures sound doesn’t get trapped within your hands (while holding the phone) but is distributed more efficiently. Not only this, but its 360 audio properties give off a fuller and louder vibration and bass for better sensory input.          

Phone Photography

Just like the Xperia Sony phones prior, the Xperia 5 IV is an exceptional smartphone for photography and video capture. Anyone looking to shoot extensive smartphone photography can now relish that this phone now provides similar camera features as the Xperia 1 IV. In other words, this phone easily ranks as one of the best smartphone cameras available. We even pitted the Xperia 1 IV against the Sony A1 camera, and we’re very impressed. 

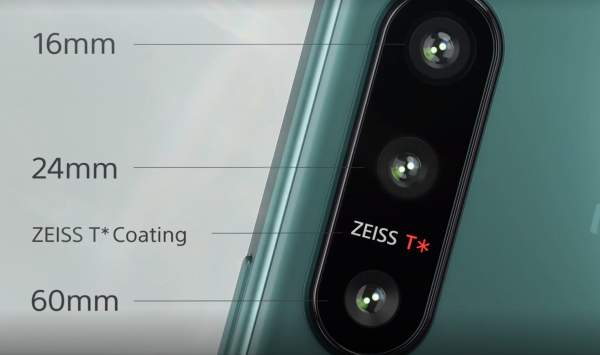
In terms of smartphone photography, the Xperia has some fantastic portrait features capturing great detail and color. Each rear lens and the front camera have 12MP sensors and a 120FPS high-speed read-out image sensor. With a total of 3 rear cameras, the focal lengths are: 16mm, 20mm, and 60mm –wide, ultra-wide, and telephoto lenses for mobile photography versatility. 

The Xperia’s larger sensor helps capture more detail in each shot, and its ability to shoot in low light is some of the best we’ve seen on the market. Our team created stunning images while exploring each lens and its full capabilities.

Xperia Sony Phone / best camera on smartphone
Photo courtesy of Sony

Xperia 5 IV Specs

  • 16mm: 12MP F2.2 120 fps AF 3D iTOF
  • 24mm: 12 MP F1.7 120 fps OIS/AF
  • 60mm: 12MP F2.4 120fps OIS/AF
  • Real-time Eye AF for All lenses / Real-time tracking for All lenses 20fps AF/AE burst for All lenses with HDR
  • Lens type – ZEISS optical, anti-reflective T* coating
  • 4K 120fps slow-motion and High Frame rate for All lenses
  • Object tracking for video / Eye AF for video
  • Wider dynamic range mode / Live streaming

Video 

The best part is that photography isn’t even the real bread and butter of the Xperia 5 IV. Sony input some of the best smartphone video features for those looking to capture creative and incredible phone cinematography. Each lens uses real-time eye and object focus for accurate and clean imaging throughout your smartphone video recordings. 

The phone essentially uses an amalgamation of five algorithms to keep the focus on your smartphone videos as seamless as ever. This includes color patterns, distance, eye, and object autofocus to create some of the best smartphone video recordings at your disposal.

Xperia phone 5 IV series
Photo courtesy of Sony

Users can also enjoy true native 4K 120FPS for smooth-looking slow-motion videos. This includes a wider dynamic range and shake-free videos using steady optical shots and flawless eye features. As for camera phone settings, you’ll have the opportunity to adjust everything from shutter speed and memory recall to auto options and ISO with the press of a button. The Xperia’s built-in shutter button option solidifies it as an ideal smartphone for photography. 

The Smartphone for Gaming 

This phone is so much more than just for calling. As an official partner of the PUBG Mobile Esports scene, Xperia is one of the best gaming smartphones in the industry. Let’s start with the 6.1″ OLED 4K HDR screen to help gamers see more of everything. 

Features such as L-y raiser keep the game graphics brighter and more colorful, making everything easier to spot in game-time situations. You can use quick touch response for a lag-free experience, record insane game clips with ease, and use voice chat for clear communication while playing with your team. 

Xperia 5 IV viewing screen

The Smartphone for Live Stream 

Are you looking for a good phone for live streaming? The Xperia 5 IV lets you stream from your phone without using any additional equipment. Live streaming with your phone is another growing phenomenon, and Sony’s Xperia doesn’t miss a beat on this. They’ve made sure streaming directly from your phone is quick and painless, encouraging more streamers to showcase their talents.  

When streaming (or gaming) for long hours, you may experience an overheating phone. However, Sony helps avoid this when you plug your Xperia into the charger, bypassing the battery and preventing the phone from overheating.  

Audio & Listening Experience

As mentioned earlier, Sony utilizes front-facing Full Stage stereo speakers to produce some of the loudest and best phone audio. These speakers help to increase the depth of sound and vibration for a better listening experience. This is done with 360 Reality Audio properties to distinguish and enhance even the tiniest of vibrations. 

Unlike most smartphones today, the Xperia still embraces the 3.5mm headphone jack for those who still wish to use a plug-in headphone option. Many gamers may use this for less sound latency during competitive gaming and streaming. The 360 audio combined with hi-res sound will have you hearing things you might miss on a standard smartphone. 

Xperia 5 IV slim and compact

Audio Recording

When discussing the best phone for audio recording, you must throw the Xperia 5 IV in the mix. You can use apps like Music Pro for an unrivaled recording session. It allows you to create multi-layered audio tracks for efficient editing from your phone. Designed for recording audio on your phone just about anywhere, you can use noise and room reverberation reduction for a top-notch experience.  

Verdict

Getting to test the Xperia 5 IV was a blast for our team. However, this is more of a creative tool than a standard phone. If you find yourself exploring artistic ideas and projects through mobile photography, smartphone cinematography, and even live streams, this phone might be what you’ve been looking for.

If these concepts don’t interest you, and you’re more of a traditional smartphone user (calling, texting, etc.), the Xperia will seem slightly pricey and not as enticing. Another great question is how you use your phone screen time. The display and audio improvements make for pleasant media consumption and great user immersion. Overall, the phone is an excellent choice and has the right attributes to put it on our list approval.

The Live Stream Tool Revolutionizing Content Creation | Instream Review

According to Grand View Researchlive video streaming will be worth well over 300 billion (with a “b”) by 2030. Trends like live streaming to Instagram, TikTok, YouTube, Facebook, etc., are taking social media by storm. However, the new Instream all-in-one live stream studio device by YoloLiv will anticipate that storm with an umbrella in hand. This never-before live stream tool is revolutionizing content creation, and if you’re serious about your social media content, you’ll want to read this.

A professional-looking social media live stream can require several devices: a camera switcher, recorder, encoder, monitor, and computer software. However, YoloLiv’s Instream provides all these capabilities in one powerful live stream tool.

Want a green-screen effect, or how about a professional graphic overly? Instream video software does this effectively without a computer or OBS. Easily live stream record, make quick edits, and access the latest visual capabilities without extensive software knowledge.

Instream - best live stream setup

This easy-to-use touch screen device gives a new generation of content creators the best live stream setup and experience for social media to date. Small businesses can also use these tools to develop better engagement and social media branding on apps like Instagram, TikTok, Zoom, and Skype.

Who is the YoloLiv Instream for:

  • Creators
  • Streamers
  • Influencers 
  • Videographers 
  • Storytellers 
  • Small Businesses
  • Social Media Marketers

Let’s uncover why the Instream is one, if not the best live stream tool for social media and video content, especially regarding professional branding and viewer reach.

The Instream Build 

Instream - which is the best streaming device
Photo courtesy of YoloLiv

The YoloLiv Instream was built to be the end-all-be-all video switcher, encoder, monitor, and live stream recorder. What once required tons of cumbersome equipment and time is now quick, portable, and easy to set up. This is ideal for anyone who knows how exhausting an elaborate live stream setup can be, saving creators time and energy. 

The Instream is 7.4in x 4.4in and about an inch thick for a small but firm handheld device. It uses a Qualcomm Snapdragon 84.5-core Processo CPU, a step above its predecessor, the YoloBox Pro. Its battery capacity uses 10,000mAh and can last for up to 3 hours. As for internet connection, you can connect via 4G LTE, Wi-Fi, or use an ethernet cable for fast and secure streaming just about anywhere.

This device has a dozen ports primed and ready for almost every type of streaming usage. You can perform multi-captures, from an SD card slot for live stream recording to two HDMI ports, USB-C in, and even an audio out (3.5mm headphones).

All Instream Ports: 

  • DMI in: Video input
  • HDMI in: Video input
  • USB-C: Video input
  • 1/4-inch Screw Hole: Mount Instream Mini with camera
  • Ethernet Port: Connect to Internet by Ethernet cable
  • HDMI out: Video out to monitor or computer for Zoom/Skype meetings
  • USB-C: For charging
  • Audio Out: Connect with 3.5mm monitor headphones
  • Line in: Stereo, connect to electric guitar or synthesizer
  • Mic in: Mono, connect to microphone for recording
  • SD card Slot: Used for live stream recording and loading graphics
  • SIM card Slot: Insert SIM card to connect to the Internet
  • Power Button: Turn on and turn off

Embracing Vertical Video Format

YoloLiv Instream - Live streaming device for small business, content creators, and influencers

Interestingly, Instream drops the traditional 16:9 video format and supports 9:16 video to accommodate vertical social media videos. A sign of lead innovation, as vertical videos have become the norm for social media platforms like Instagram, TikTok, and Facebook.

Did you know 99% of people access social media through their phones, and to top it off, we use phones vertically over 90% of the time? In short, vertical video is the new horizontal for social content, and Instream is adapting to the new standard for a better user experience.

As an influencer, content creator, or even a business, it’s essential to acknowledge trends within the industry. Instream is optimized to accommodate these needs through high-end, easy-to-use production tools, simplified editing, and smooth multi-connection.

Built-In Software for Live Stream 

Instream’s live stream software features allow you to create captivating content for Instagram and TikTok viewers. Each software feature adds professional elements to your videos, increasing viewership and engagement. Let’s cover them.

Content creators and businesses can use features like chroma key for green-screen video effects. Chroma key gives your stream a signature background and aesthetic that works as an excellent social media branding tool.

You know what else makes a live stream fun and engaging? Picture-in-picture (PiP) videos; this streaming tool allows viewers to watch several display screens on one monitor, like having multiple apps open simultaneously. PiP typically involves “hand-cams” for cooking streams or “face-cams” for video game streams (shown below).

Picture in picture live stream capabilities

Among other live stream tools are the countdown timer and, a personal favorite, the graphic overlay options. The countdown feature can generate viewer suspense around your video content, like counting down until “show time.” As for the graphic overlay, you can use this to create professional logos and labels, build brand recognition, catch viewers’ attention, and more.

The Instream also produces lower-third graphics as another way to make high-quality content for your social media videos. Lower-third graphics are good for adding a “follow” or “subscribe” button, placing credits, or identifying creator handles. These live streaming resources at your fingertips increase social media branding, recognition, and growth.

Verdict

Now, it’s important to note that the Instream is a bit pricey at $1,299. However, as an all-in-one, live stream tool, it’s a no-brainer for businesses doing social media marketing and influencers taking their content to the next level.

Having a monitor for streaming, an encoder, a switcher, and special software for the live stream in a tiny device is unheard of. The YoloLiv Instream will shake up how we produce social media videos, and we’re here for it.   

— What Instream capabilities are you most excited about?

The 6 Key Questions to Ask Before Starting Your Photography Business

How to start a photography business

It’s happening, you’ve started to get into a groove as a photographer, and it feels great. Your photos have developed a signature style, they pop, and your skills are sharpening. You believe you have what it takes to run a professional photography business, or at least attempt a few gigs and see how it goes. The only question now is— what’s the next step to running a photo business

You may have everything from the right camera equipment and photography knowledge to a good work ethic. Yet, you still have inquiries about photography as a career. Don’t sweat it; everyone establishing themselves in a new field or market will have questions; it’s natural.

This post contains a list of essential questions to explore before starting your photo business journey. If you can answer these questions, you will be heading in the right direction of finding your potential photography market along with consistent work and clients. Who doesn’t love making money while doing what they love? Now, you can, too, without further a due. 

What Should You Shoot for Your Photography Services?

freelance photography tips
Photo by Andre Furtado
  • Have you started shooting yet? 
  • If so, what do you like to shoot and why? 
  • What new photography would you like to explore? 

One of the most incredible things about photography is the endless amount of niches to explore. Just because you begin with portrait and food photography doesn’t mean you can’t explore landscape or product photography work. Yes, specializing in your services will help you find the right clients, but playing with all types of photo shoots and ideas makes photography great. Work with models, work with pets, and explore various camera settings, gear, and environments. The more you can try, the better idea you’ll have for what you want to shoot for your photo business.

It’s important to remember you don’t have to stick to one photo market. Having two to three niches will solidify more opportunities for work rather than one source. But, on the flip, if your work is too broad, it will be hard for clients to identify where your specialties are. To avoid this build a portfolio for the work you most desire to perform. The more you experience, the more depth your photography background will have.

How Much Money Are You Looking to Make?

how start photography business, photography as business
photo by Szabo Viktor
  • Is your photography market or services profitable?
  • Are high earnings important to you?

Like any other industry, you have gigs that make you good money and gigs where the checks are much lighter. Pay is a massive question for some people, and you must be honest when answering and exploring how much money matters to you. Photography, in general, is not a huge money-making business but can be profitable with the right amount of gigs, time, experience, and connections.

Check out some of the most lucrative photography gigs here.

One of the most important things to remember is that working purely for money can become draining like any other job and cause you to lose passion over time. When you lose sight of your love and drive (unless money is your drive) for photography, it will become less and less desirable.

It doesn’t hurt to keep pay in mind, but don’t lose track of the things that excite you about photography. Keep shooting for fun and working on your own creative projects, or you will forget why you started a photography business in the first place.  

What’s Your Location & Where Will You Work?

how start photography business, photography as business
Photo by Jimmy Chang
  • Where do you plan on performing your photography? 
  • Are you willing to travel? 
  • Are certain gigs or photo needs more common in your area? 

Location is another undeniable factor in running a photography business. You won’t get too many winter landscape photo sessions when you live in a tropical area. It’s crucial to think about what work is more viable for you.

You should ask yourself: is traveling a feasible option? For example, you probably won’t have to travel much for city life photography when you already live in New York City. If you are willing to travel, which locations will you explore, and how will it benefit or hurt your work?  

Another question that comes to mind is local competition. Who are the local competitors, and what are some of the photography jobs they occupy? Will you find success doing the same services as them, or is their client base already well established in the area? Do your research and discover what niches you can leverage around you. There are always untapped markets waiting to be occupied; it’s up to you to find the best options.

Who Are You Targeting for Photography Work?

how start photography business, photography as business
Photo by Bailey Mahon
  • What type of clients are you seeking?
  • Do you like working with large entities or smaller businesses?
  • Do you prefer fast-paced working environments or laidback photography gigs?

Each photography niche comes with its very own audience and clientele. This is important because you will interact with these people and places frequently or daily. And the further into a market you get, the similarities you will see between client needs, requests, environments, and workloads. Nevertheless, every job is different; however, most niche-based gigs have their parallels. Make sure you are in a market that positively affects you and your work. 

Think about what type of people and environments you interact well with and pursue that line of work. If you struggle in large crowds or less intimate settings, booking event photography gigs with a sizeable venue isn’t for you. Gravitate to people and events that make you happy and clients with whom you will be compelled to work for. 

What Relevant Problems or Needs Can You Help Solve?

how start photography business, photography as business
Photo by James Adams
  • How can you leverage your client’s needs?
  • What type of photography is in high demand?

Every business and client has a problem to be solved. If you want to have a successful photography business, you should address concerns that are in high demand by providing solutions and services to those problems. This could be providing portrait photography services to people needing headshots for a job or a dating site or capturing images of pets to be displayed on an animal adoption center’s website.   

What significant market demand have you noticed that your photography business can solve? An example of supplying a need could be the exponential growth of social media photography. Many companies realize the reach and influence a social media account can have on potential prospects. As a result, having a social media photographer to give companies an online advantage would raise demand. So providing social media photography services would be a wise transition in relation to this growth.

Learn the needs of your target audience or clientele and provide the appropriate solutions. The demand should be relevant, in high volume, and realistic to solve.

How Will You Reach Your Audience?

photo freelance start up,
Photo by Jamie Street
  • What methods are you using to reach your target audience?
  • Do you have a website? Business cards? Posters?
  • What social media should you use?

After you’ve discovered what needs you can offer solutions for and who to market to, the next question is how to reach your audience. It doesn’t matter how well you capture photography if no one knows you even have a photo business. You want to be seen and heard; the problem is that so do your competitors. Study up on your competitor’s strategies for advertising and follow the practices that lead them to similar clients.

Creating a website for your photo business brand is most optimal. However, creating social media accounts across multiple platforms is the next best place to start (or do both). From Pinterest to Instagram and even LinkedIn, leave no social media stone unturned. This is an easy way to put your work out there; using (visual) social media platforms as a public portfolio helps build your photography business brand.

Take this one step further by drawing up a list of places and websites related to your field of work. If you do food photography, go to local restaurants and research food vendors in need of your services online. Anything food-related could be one step closer to a potential client, so check all possibilities. The more places you can place your name, the more exposure you get; with exposure will come more inquiries. Remember, the key is relevance; your business will seem invisible if you look in the wrong places.

Take Away

These questions only graze the surface of learning and understanding the photography market and business tactics. Remember that all industries constantly take on new practices and trends, and photography is just the same. The best thing you can do is to continually educate yourself on what’s new within your photography niche, stay ahead of the curve, and never stop networking.

Lastly, never be afraid to take your work in a new direction. Thinking you’re stuck practicing the photography you started with is stagnant thinking and will hurt your opportunities in the future. 

– How’s your photography business going, and what work do you do?

Simple Sports Photography Tips & Tricks To Improve | Beginners

Sports photography is not for everyone, but for those who are up to the challenge of capturing great action photos, it provides unlimited opportunities. Whether you’re shooting pro sports pictures, a pickup volleyball match or your son’s flag football game, getting the action shots right will make all the difference. Luckily, you’ve come to the right place to learn about this. Scroll down for sports photography tips, picture ideas, and advice.

(This post has a general focus on outdoor sports; we also wrote a whole post on just basketball photography! If you’re interested, head over to this link.)

Get Your Camera and Lens in Order

sport photography tips
Photo by Rille

Before you begin, you will want to make sure you have the right camera and lens for sports photography. The best lens for sports photography, in our opinion, would be a telephoto zoom lens with a flexible focal range and capable of a large aperture, fast shutter speed and variable ISO. A 70-200mm f/2.8 telephoto lens would be perfect, if it’s within your budget.

Focus, Face, Action, Equipment

First, important sports photography tip is to become acquainted with the mantra “focus, face, action, equipment”. This is an excellent formula to remember for crafting a brilliant sports photo.

Focus: This is pretty simple. Make sure you get the focus right. Blur is the last thing anyone wants to see in a sports photo.

Face: If you’re doing standard sports photography, it’s usually best to have your subject facing forward in the frame. Faces are always going to capture interest, and that especially goes for sports like baseball, football or hockey, where the TV isn’t always able to show our favorite athletes in detail while in action.

how to take sports photography
Photo by Marcus

Action: The most interesting picture isn’t going to be the offensive linemen waiting at the line of scrimmage or a player shooting a free throw. A great photo captures everything we love about the sport: an athletic feat or the story behind a team or athlete.

Equipment: While photos in general should be people-centered, sports in particular are about scoring and winning. So when possible, make sure your photos show your subject holding the equipment central to the sport. A ball, bat, mitt, puck, baton, etc. should be in the shot.

Raise the Shutter Speed

Another crucial sports photography tip is to make sure your shutter speed is set somewhere between 1/300 and 1/2000 sec (depending on the sport). If you are shooting a 140MPH tennis serve, you’ll want your speed as fast as possible. But if you’re photographing a track meet, you can set the shutter speed to the lower end of the range. Getting the shutter speed just right will allow you to freeze the action and eliminate the blur that makes most action photos look amateurish.

sports photography tips, how to make sports photography
Photo by Chino Rocha

But because fast shutter speeds take in less light, you will want to either attach a hot-shoe flash or jack up your ISO setting. Just check the rules of the sport you’re photographing to make sure flash is allowed, if you want to go that route.

Although, you may find that flash is ineffective in any case, depending on the setting. Simply making sure the sun is behind you to illuminate an approaching subject will often be all you need to perfect your lighting.

Consider Continuous Focus and Manual

If you’re photographing a sport with fast-paced action such as football or soccer, continuous focus is your friend. You don’t want to be stuck constantly adjusting your setting to the events on the field, or spending time in post-production fixing everything. That’s why setting your mode to manual or sports is also a good idea. Keep in mind that each mode has its pros and cons. Sports mode slows the camera in order to perfect the exposure, so if you have a need for speed, choose manual mode.

Try Burst Mode

Particularly in sports like basketball in which athletes are moving at high speed and making lots of sudden movements, burst mode is a surefire way to capture the shot you want. Burst mode lets you capture multiple frames per second. Just shoot in JPEG, not RAW, to save space.

No Substitute for Knowledge

sports photography tips
Photo by Garry Neesam

A good photograph is a good photograph, so it’s not that a talented photographer can’t succeed without knowing the sport. It’s just a lot harder. Getting to know your sport is a cheat code for putting yourself in the right positions for legendary shots.

First, if you’re not a sports person, make sure you know the rules. This should be an easy web search for any sport, and taking just a little time to understand the sport will make it easier to follow the action. Thus, you will be able to predict your angles better.

Second, do some research on the athletes and, if applicable, the teams. Find out who the star players are or who has the best serve, etc. and watch for those people.

Conclusion

This concludes all your basic but essential sports photography tips. If you’re new to sports photography, there will of course be a learning curve. But learn your stuff and keep at it, and you will get the hang of it in no time.

Do you have any tips for sports photography or unique sports picture ideas? Share in the comments!


Back to School Tech Essentials | Buying Guide 2022

Like it or hate it, it’s almost that time of year – when the back-to-school bells ring everywhere. Are you prepared? Don’t worry; we’re here to help get you on track for a successful school year. We’ve got tons of tech and basic school supplies on sale, and you can even take advantage of our collegiate student and educator discountsGoing back to school doesn’t have to be a painful process. Use this guide to get a list of affordable and valuable supplies, from laptops to storage drives. 

Asus E410 Intel Celeron HD LED Win 10 Laptop 

Asus laptop for back to school
Asus E410 Intel Celeron HD LED Win 10 Laptop

If you’re looking for an excellent cheap laptop with high-end capabilities, the Asus E410 Intel Celeron is a top choice. For well under $400, you can come away with a powerful, secure, and long-lasting laptop. The Asus E410 is sleek for easy usage and contains an HDMI port, two Type-A ports, and a card reader. You’re guaranteed to be satisfied with its 14-in HD LED screen display and quality stereo speakers.

Logitech POP Keys Wireless Keyboard (Mouse + Emoji Keys)

keyboard with emoji pop out keys
Logitech POP Keys Wireless Keyboard (Mouse + Emoji Keys)

The Logitech POP Keys Keyboard with customizable emoji keys is a great way to spice up computer work. It’s a great combination of vintage typewriter style with high-tech connectivity and FN shortcuts. You can create screen snippets with ease or operate voice-to-text for more efficient work. Emoji POP keys are a great way to express yourself and can be removed and replaced on the keyboard.

PTZOptics 12X-SDI Broadcast and Conference Video Camera

Camera for conference call school work more

Conference calling has become very popular in recent years, especially in schools. Stay ahead of the curve using the PTZOptics 12X-SDI video camera. Regarding cameras for streaming, conference calls, or capturing video; this video camera is the best in its class. Take advantage of 1080p video at 60 fps or use the Ethernet port for power, control, video, and audio streams. It supports HDMI, 3G-SDI, and IP Streaming for an optimal video or broadcasting experience.

Epson Workforce WF-C4810 Color Inkjet Multifunction Printer 

inkjet printer, color printer, multifunctioning printer
Epson Workforce WF-C4810 Color Inkjet Multifunction Printer

Getting an at-home printer will save you time and hassle when printing out your assignments or projects. The Epson Workforce Color Inkjet printer is one of the best at-home wireless printers. Many people will struggle to set up wireless printers, but the Epson Multifunction printer is easy to set up and use. Its user-friendly interface is so you can effortlessly use the scanner, fax, edit, or print anytime. The printer takes up very little power and is meant to handle heavy workloads. 

LaCie Rugged Mini 1TB USB 3.0 External Portable Hard Drive

hard drive for back to school, hard drive for computer

When handling back-to-school work, a reliable hard drive is a must-have. The LaCie Rugged Mini portable hard drive makes our list of essential school supplies to buy. For starters, this hard drive is as durable as durable gets, being able to stand multiple drops and is pressure and rain-resistant. It may be small, but it holds a lot of data, up to 5TB, to be specific (price may vary). Your files will be safe, saved, and secured with LaCie’s extremely sturdy external hard drive. 

SanDisk 6TB G-DRIVE Enterprise-class Desktop Hard Drive

hard drive for desktop, heavy duty hard drive
SanDisk 6TB G-DRIVE Enterprise-class Desktop Hard Drive

If you’re less concerned with durability and more worried about space, SanDisk’s Pro 6TB G_DRIVE also makes the list. This can come in handy if you do a lot of editing or store tons of high-res photos or videos.  There is no workload too demanding for this drive; it has a transfer speed of about 19MB/s and works with all UBS-C 3.1, 3.0, and 2.0 computers. 

Conclusion

This concludes our 2022 back-to-school guide; we hope you found something useful here. You can search for more items that didn’t make our back-to-school list here. Better to get it done now than wait till the last minute; take it from a professional procrastinator. 


Sigma 20mm F1.4 DG DN Art Review | Photo Samples

The new Sigma 20mm (24mm) F1.4 DG DN Art series lenses, was just released, and we’ve got some good things to say about them. It’s similar to Sigma’s 20mm F1.4 DG HSM | Art, however, built with a few upgrades and great astrophotography features. Exceptional image quality from the center to the peripheries of the photo and a wide aperture make these lenses stand out from the crowd. Watch what our experts discover during their fun time exploring these Sigma lenses’ capabilities, or read further for an in-depth review.

Build 

Both lenses were built with performance and portability in mind. The Sigma 20mm F1.4 DG DN dimensions are 3.5 x 4.4 in and weigh 22.4 oz, while the 24mm lens is slightly smaller at 3 x 3.8 in and  18.3 oz. Built to be as compact as possible, Sigmas 24mm F1.4 is the smallest and lightest of the DG DN F1.4 Art series. They’ve achieved a tight feel by extending the diameter of the lens body as minimal as possible without hindering the quality. 

Specs

Specs: Sigma 20mm F1.4 Art DG DN Lens
Specs: Sigma 24mm F1.4 Art DG DN Lens

Build & Design

Sigma wanted to align the lens’s look and feel with the DG DN Art F1.4 lens range (20mm, 24mm, 35mm, 85mm), so the aperture and focus ring diameter match that of the 35mm F1.4 lens. This helps to create a smoother and more fluid feel of operation between lenses. The new lenses maintain user-friendly buttons like the aperture ring click switch, aperture lock switch, and hood lock button.  

They contain 17 glass elements arranged in 15 groups for the interior glass. This includes two special low-dispersions (SLD) to reduce chromatic aberration, three aspherical glass elements, and the largest class of double-sided aspherical glass elements in Sigma lenses. These interior glass elements achieve the highest quality while reducing sagittal coma flare and distorted images. 

Buttons & Operation Features 

Both lenses contain front and rear filter holders that can be used simultaneously. This is immensely effective regarding astrophotography and gives way too many creative options. For instance, a light pollution reduction filter combined with a soft rear filter brings out the stars. 

As for buttons, Sigma also introduces its new Manual Focus Lock switch (MFL). It works as a safeguard, so you don’t need to worry about accidentally adjusting your focus ring. It also comes with a focus switch, AFL button, and an aperture ring lock switch.  

Weather-Resistant 

Each lens hits the nail on the head regarding long-lasting durability. Both have dust and splash-resistant structures and an oil and waterproof repellent coating. They’re built for those long outdoor shooting sessions, and the heater retainer even fights internal condensation when the temperature begins to drop.     

Weather-resistant Sigma lenses 20mm/24mm
Photo by Malte Helmhold

Performance Features 

Like existing DG DN Art F1.4 lenses, the AF is an impressive combination of quick, silent, and accurate. This is all accomplished with the stepping motor, ideal for fast and sharp photography. Another great feature for shooting is that both lenses can capture a broad scope of the area while maintaining in-depth detail on subjects.  

Our camera crew especially loved the wide-angle of the 20mm and its ability to make everything feel more callosal through the eyes of the lens. Regarding quality, each image’s aberration, warping, and distortion are essentially nonexistent. If you are indoors or as the sun goes down, you will notice just how amazing it is to utilize the full aperture performance. Our team embraced the low light and had tons of fun creating detailed and creative images contrasting the night sky and street lights (plus using filters). 

Sigma 24mm F1.4 Art DG DN Lens
Photo courtesy of Sigma

Is the Sigma 20mm/24mm F1.4 DG DN | A Worth It?

Looking at affordability and performance, these lenses do an excellent job considering both, especially when comparing them to something like Sony’s G Master lens series. A few features on these lenses make them especially worth it if you’re into landscape, architecture, street, or astrophotography.

Both apertures are wide and built to thrive in low-light conditions at an impressive F1.4. But not only will you be able to see clear quality images, but this lens is also designed to operate well in cold and brisk environments. The front heating element keeps it working fine under cold or even sub-freezing conditions for optimal shooting sessions in harsh conditions. Our team enjoyed the lenses very much and put these on the list of “lenses well-worth the purchase.”  

5 Best Lenses Under $400 for The Sony A6000

Cheap lenses for Sony A6000. Quality & Budget

The Sony A6000 is an exceptional camera for beginner photographers and even veterans. It may be a bit older, but the A6000 is fast and versatile, and the image quality still holds up very well today. Its 24.3 MP APS-C sensor produces fabulous, quality pictures, and for video, you get full HD 1080p. This camera is nothing to overlook, and without a doubt, it makes our list of best beginner cameras under $500 (price may vary depending on the kit). 

best cheap lenses for the sony a6000 - good quality and performance
photo by Lucas Favre

Is the Sony A6000 worth buying today? Yes, without a doubt – it’s inexpensive, fast, and pocket-sized for easy portability. And if you want even more bang for your buck; here’s a list of the best affordable lenses for your sleek and sharp Sony A6000.   

1) Sigma 30mm f/1.4 Contemporary DC DN Prime Lens for Sony E

Sigma 30mm f/1.4 Contemporary DC DN Prime Lens for Sony E - cheap lenses for A6000
Sigma 30mm f/1.4 Contemporary DC DN Prime Lens for Sony E

Sigma’s 30mm prime wide-angle lens is compact, durable, and fast for a budget-friendly price. It’s renowned for its astonishing bokeh effects and can create intimate shots with your subject using a shallow depth field. Its wide aperture makes it easier to work in low-light conditions while maintaining pristine images. Its AF is quick and is nothing to be overlooked, and at such a great price, this lens is undoubtedly worth it.

  • Price: $339

Pros 

  • Light & compact
  • Great for bokeh
  • Good for portrait & landscape photography

Cons

  • No manual-to-autofocus button.
  • May struggle in bright shooting condition
  • May need a neutral density filter 

2) Sony 55-210mm f/4.5-6.3 OSS E-Mount Lens for Sony E (Black)

Sony 55-210mm f/4.5-6.3 OSS E-Mount Lens for Sony E (Black)

Sony’s 55-210mm telephoto zoom lens is another hidden gem regarding price plus performance. It is equipped with a 3.8x magnification (equivalent: 83-315mm – full format) and has a quick, silent, and very responsive AF. This, combined with a tight zoom and OSS (Optical Steady Shot) for excellent stabilization, makes it an ideal lens for wildlife and sports photography. Keep in mind, however, that at max 210mm zoom, the aperture is cut down to 6.3, leaving you slightly at a disadvantage for lowlight situations.  

  • Price: $348

Pros 

  • Good stabilization 
  • Reduced chromatic aberration
  • Ideal for wildlife, sports, & portrait photography

Cons

  • Low aperture at high zoom
  • Slightly clunky build

3) Tamron 20mm f/2.8 Di III OSD Wide-Angle Prime Lens for Sony E-Mount

Tamron 20mm f/2.8 Di III OSD Wide-Angle Prime Lens for Sony E-Mount 
Tamron 20mm f/2.8 Di III OSD Wide-Angle Prime Lens for Sony E-Mount

The Tamron 20mm f/2.8 wide-angle lens may be the cheapest lens on this list but surely doesn’t underperform. You can see superb detail close to your subject with an impressive minimum focusing distance of .11m and a 1:2 magnification ratio. The 2.8 aperture and 94.5-degree viewing angle are optimal for large group shots, architecture, and landscape photography. This lens is very durable, built for moisture-resistance, while the fluorine coating repels grease and fingerprints. 

No, this lens doesn’t have as many controls or features as the Sony FE 24mm f/1.4 GM lens. But, for a quarter of the price and excellent image quality, these lenses are well worth it, especially for beginner photographers. 

  • Price: $299 

Pros 

  • Great minimum focusing distance 
  • Weather-resistant  
  • Good for architecture & landscape photography

Cons

  • High chance of barrel distortion 
  • No buttons or switch controls 

4) Sony Alpha 20mm f/2.8 E-Mount Prime Lens

Lenses for sony camera - under 300
Sony Alpha 20mm f/2.8 E-Mount Prime Lens

Pancakes, anyone? The Sony 20mm f/2.8 E Mount pancake lens (equivalent – 30mm Full Frame) is by far the lightest and most compact on the list, similar to the size of a camera body cap. But within this tiny lens is a powerful ability to capture astounding shots with high contrast and resolution, even in poor lighting. This lens is excellent at creating a bokeh effect and adds a smoother, more natural look because of its circular aperture design.

  • Price: $348

Pros 

  • Small, light, & portable
  • Great contrast and resolution   
  • Good for street & candid photography

Cons

  • Could be sharper along edges  
  • Slight chromatic aberration

5) Sony E 50mm f/1.8 OSS Prime Lens (Black)

affordable Sony E mount lens
Sony E 50mm f/1.8 OSS Prime Lens (Black)

Sony’s 50mm f/1.8 E mount prime telephoto lens may be a bit older, but it’s aged like wine. Equipped with OSS and a silent and swift AF and wide aperture range, this lens is simple and efficient. Creating crisp images even in low-light is the least of your worries and if you up the shutter speed you can capture moving subjects with ease. Factor in excellent image stabilization to combat any camera shaking and you can produce beautiful photos.

  • Price: $348

Pros 

  • Wide aperture 
  • Great image stabilization
  • Good for portrait, indoor, & street photography

Cons

  • No buttons or switch controls  
  • No weather-sealing elements

Take Away

The most important thing to remember when shopping for your next lens is what you are most looking to get out of it. Budget is a significant consideration, but each lens is unique. Some lenses will be ideal for low-light, others for capturing everyday candid photos or landscapes. What about durability, speed, or even equipment space; is a smaller lens better in your case?

Tell us, what will be your next lens & why?

Best Camera Settings for Astrophotography (Beginner Guide)

Astro photography settings

Astrophotography is unique. It’s the art of beholding the beauty of the stars beyond our reach. However, the key word here is “beauty” and not “blurry,” meaning your astrophotography settings are essential for capturing illuminating images of the Milky Way. Producing a mediocre shot after spending hours trying to capture the perfect night sky essence is no fun. So, today’s post will cover some critical, easy-to-remember tips regarding good camera settings for astrophotography.

Astrophotography doesn’t have to be complicated, but working in lowlight situations with long exposures can lead to undesirable results. That’s why it’s crucial to have a good grasp on appropriate camera settings for astrophotography. Some variables will change depending on your camera, but here’s everything we’ll cover to ensure you’re prepared to shoot the Milky Way the right way.

Star photography guide
Photo by Rishav Banerji

Table Of Contents

First, let’s cover the vital three pillars of exposure (also known as the exposure triangle), especially when it comes to long- exposure. This will include aperture, ISO, and shutter speed. You’ll need to manually adjust all these to get well-exposed and clear-cut images.

Aperture

Aperture refers to how wide or narrow your lens will open, affecting the amount of light being let in. The number is represented in “f/stops”. For example, the NIKKOR Z 28-75mm f/2.8 lens has an aperture of f/2.8. The higher the number, the less light is let in (or, the narrower the lens gets). The lower the number, the more light it lets in (or wider the aperture opens).

Regarding astrophotography settings, you’ll want a wider aperture (or lower f/stop) due to the dark nighttime conditions. This ensures you capture an efficient amount of light to see the image. A good number for this is f/2.8. However, if your lens doesn’t go that low, it’s not the end of the world, but it will be more difficult to see (f/4 is also an ideal aperture).

Camera settings for astrophotography
Photo by Ivan Torres

ISO

ISO (International Standards Organization) affects the sensitivity of your camera to light. But rather than doing this through opening and closing (like the aperture), it controls the sensor sensitivity (try saying that 5x fast). In this case, the number scale works opposite to the aperture; the higher the number, the brighter the image.

Once again, you’ll want to bump this number up because it’ll be dark out. A good starting point is around 1600 ISO for your camera’s astrophotography settings. Depending on your situation, between that and 800 or even up to 3200 can work. However, it’s important to remember that a high ISO will add “noise” to your photo and can ruin your image. You want to be able to see the night sky, but you also want a clean picture.

Astrophotography star trails
Photo by Samuele Errico

Shutter

The shutter speed refers to how long the camera’s shutter will stay open (like your eyelids when you blink). This is measured in seconds or fractions of a second. In the case of astrophotography settings, you’ll want your shutter open for much longer than usual. Rather than 1/100, 1/60, or 1/30 of a second, we’re talking 15, 20, or 25 seconds long. There are a few ways to approach this. If you want simple and aren’t obsessed with the perfect number, anywhere from 20-30 seconds should be good.

However, there are two other methods that you can use to find a more accurately calculated shutter speed called the – 500 Rule (sometimes also known as the 400/600 rule) and the NPF formula or NPF equation. I will elaborate more on these photography formulas further down in the post.

Lens & Focal Length

To capture the sharpest image of the Milky Way possible, you’ll want to go for a short focal length of ideally around 16mm -24mm. A wide or ultra-wide lens will allow you to capture a large chunk of the landscape and stars for an authentic nighttime shot. These lenses will help give you a greater depth of field, keeping your foreground and background of the landscape in focus.

That said, if you don’t have a wide-angle lens, you can still use a longer focal length. Sometimes this can be used to purposefully create star trails adding motion and creativity to your picture.  The wider the lens, the more information in your image, so be aware of shot composition. If you go lower than this focal length, you’ll also need to be mindful that distortion can start to take place.

Star photography examples
Photo by Mindaugas Vitkus

Auto-Focus – Turn Off

For astrophotography, you’ll want to turn off AF. Due to the lack of light, your camera will struggle to find a point of focus. To avoid this, you will want to manually focus on the brightest star, the moon, or the next distant object in view (like mountain tops or trees).

White Balance

White balance will adjust for the color temperature displayed in the camera image. There are warm colors like orange, yellow, and red or cool colors like purple or blue. To keep things short and simple, you’ll want to shoot in Auto-White Balance (AWB) in most scenarios. However, you may want to adjust due to other factors such as light pollution, in which case 3,200K or a neutral white is an excellent place to start.

White balance color temperature guide for star photography
Color Temperature Guide Courtesy of Exposure Guide

File Format

You will want to shoot in RAW for the best results in terms of file format. This will ensure you capture as much color detail as possible, in addition to reducing image compression and noise. You’ll also have more post-production capabilities with adjusting aspects like dynamic range.

Extra Tips & Important Gear

  • Long exposure noise reduction – Turn off (if applicable)
  • Flash – Turn off
  • Tripod – long exposure makes it easy to ruin your shot with the slightest movement. Using a tripod will play a crucial role in securely locking your camera in place.
  • Remote shutter release – once again, you don’t want to have to touch the camera when taking your shot. Using this or a timer for your shutter will be crucial.
Astrophotography example photos
Photo by Jeremy Thomas

Helpful Photography Formulas to Know

What Is the 500 Rule Of Photography?

The 500 rule (also known as the 400 rule or 600 rule) is an excellent template for photographers who are new to astrophotography or can’t figure out what shutter speed to put. It is designed to help you find a reasonable shutter speed range for your best shots.

However, it should be noted that this equation isn’t an end-all to astrophotography shutter speeds because it doesn’t account for all factors while shooting.

Alright, ready for some fun math class nostalgia?

To use the 500 rule, you simply take 500 and divide it by the focal length of your camera. For example, if your focal length is 24mm, you would do: 500 ÷ 24 = 20.83. This means you would set your shutter speed to about 20 seconds. Nice and easy.

500 ÷ (Focal Length) = Shutter Speed 

Photo of the stars and night sky
Photo by Jacob Dyer

What is the NPF Rule/Formula?

For those of you who’re looking for more of a mathematical challenge, you can use the NPF formula for even sharper images. The NPF formula is another equation created by Frédéric Michaud to find a more accurate shutter speed for your night shots. The only exception is that the formula is much more complicated because it factors in more elements such as pixel density, width, aperture, and focal length (shown below).

The equation requires you to know: F-stop or aperture, focal length (mm), pixel pitch (micrometers/μm).

  • N = Aperture.
  • P = Pixel density (pixel pitch), the distance between the pixels on the camera sensor.
  • F = Focal length.

First, you need to find the pixel pitch, which is the distance from the center of one pixel to the next nearest pixel. To find this, you need to divide the width of your camera’s sensor (mm) by the total number of pixels within that width. After, multiply that number by 1,000 to get your answer in micrometers/microns (μm).

Here’s an example for the Canon EOS R6: the senor is 36mm x 24mm, and the pixel dimensions are 5472 x 3648. So the equation would be:

36 ÷ 5472 x 1,000= 6.57 μm

Photo of the stars, photography tips
Photo by Andrew Gloor

Now, all you do is add your pixel pitch to the complete equation. To make things easier, we’ve used a simplified version of the equation, which uses averages for factors like declination and latitude (shown below):

(35 x aperture + 30 x pixel pitch) ÷ focal length = shutter speed in seconds

Using the Canon EOS R6Canon RF 15-35mm f/2.8L IS USM Lens:

(35 x 2.8 + 30 x 6.5) ÷ 15 = 19 seconds

Now, for anyone whose head hurts as much as mine from looking at too many numbers for too long, you can also just use an NPF calculator site. It helps to download these apps on your phone or computer when you’re out shooting and need quick assistance.

Conclusion

Your camera settings for astrophotography do matter, but not everything has to be perfect. After all, it is your work, and you have complete control of what you choose to do with it. Finding the settings you’re most fond of will take time, and as long as you’ve established the basics, the rest will come over time. Finally, have fun.

Tell us how your astrophotography is going. Have you discovered any neat tips and tricks along the way?

Top 6 Yeti Microphone Recording Tips to Improve Your Content Creation

Blue Yeti microphones are great for streaming, podcasting, YouTube videos, and online calls. However, to get the highest sound quality, it helps to know the best Yeti microphone settings and practices. This post covers good recording tips and techniques, including the best Yeti microphone modes and great Yeti software options.

Yeti Microphone Setup & Software

Unlike most traditional mics, this microphone is very easy to set up. You pull it out of the box and plug the Yeti mic USB into your computer or console. What about Yeti mic drivers? There are none; after it’s plugged in, you simply load up your favorite software and select a mic input.

Regarding Yeti mic software, there are many compatible services such as Audacity, iMovie, Skype, Garageband, Ableton, and more. In terms of streaming services, you can use Discord, XSplit, Open Broadcast Software (OBS), and Gameshow. Moreover, now that Logitech G has obtained Streamlabs, we’ll cover what makes this a big deal for streamers in tip #6 (below).  

Blue Yeti mic tips (Aurora Collection)
Blue Yeti & Aurora Collection special – includes (Pink Dawn or White Mist) Yeti microphone + three exclusive Streamlab Themes.

How To Use a Yeti Microphone 

After setting up your desired software, it’s time to place your mic in a comfortable location and start recording or streaming. New (and sometimes veteran) content creators will make a few common mistakes when recording audio. It could be as simple as positioning the microphone wrong to using the wrong Yeti microphone settings. The good news is, these errors are easy to spot and even easier to fix. 

Common Microphone Errors:

  • Using the wrong Yeti mic mode (pattern).
  • Being too close or too far from the mic.
  • Incorrect use of mic gain.  
  • Incorrect positioning of the mic.
  • Not using the proper equipment to support the mic. 
  • Not using the best Yeti software options.

Now that you’ve got your setup down let’s cover the best Blue Yeti microphone settings and tips to improve your content’s sound quality. 

1) Which Yeti Mic Mode Should You Use

The Yeti microphone settings for picking up sound include four patterns that can be interchanged. These patterns are – cardioid, omnidirectional, bidirectional, and stereo mode. The graph shows the symbols representing each Yeti mic mode, their purpose, and how the sound is picked up.

Yeti mic setting - Yeti mic modes
Photo courtesy of Blue Microphone

When you are simply talking into the mic for a stream or podcast, your best option is the cardioid mode. This mode does more than just help pick up sound directly in front of the microphone. It eliminates background noises around you, like your fan, pets, or console. Plus, it will give your voice that professional “boom” you typically hear on the radio, garnering full attention from your listeners.

2) What’s the Right Distance From the Mic

Yet another common problem among Yeti mic users is bad quality sound issues. Recording an hour-long session just to play it back and hear the unbearable sound quality is an awful experience. One, you should always do a few test runs before going into your dialog.

Second,  Blue Yeti mics have a “proximity effect,” emphasizing low-end frequencies like the pronounced bass in broadcasters’ voices. The problem is usually being too close or far from the mic, which can cause unwanted sound issues. Being right on the mic will cause undesirable “hissing” and “popping” noises. While being too far away will be hard to hear. The key is to be around 6 inches away from the mic for ideal use.

Pink Yeti microphone

3) How to Use the Mic Gain

Many people may mistake microphone gain for volume. Yes, turning up the gain will make you louder, but that isn’t exact volume control. Instead, the gain controls how much sound the mic picks up (or takes in). This means turning up the gain will also cause the mic to pick up background noise, while turning it down will force you to project more.

The gain nob should be at a low to medium level if you stand close enough to the mic. This will prevent the background from becoming too loud and your voice from being distorted. Always play around with the gain to find a sweet spot before recording.   

4) How to Position the Yeti Mic

When you watch a podcast online or a television series, you may see some host speak directly into the top of the microphone. Naturally, you’ll want to do the same with your microphone, but this will produce lousy sound quality. The Yeti mic is a “side-address” microphone meaning the sound is picked up along the side and not the top. 

To hear your voice clearly, you’ll want to speak into the microphone’s sides and ensure the “Blue” logo is facing you (as shown below).

Yeti mic tips - Settings for Yeti mic
Photo courtesy of Blue Microphone

5) What Equipment Can You Pair With The Yeti Mic

The good thing about the Yeti microphone is you can plop it on your desk, and it’s ready to go. Although this is very convenient, it can also create a lesser quality sound for your stream or podcast. Since sound is vibration, having the mic on your desk will pick things like you typing on your keyboard or bumping into your computer desk. 

To eliminate this problem, you’ll want to consider investing in a boom arm stand. This will not only lessen unwanted noises but allow you to position your mic closer and more comfortably. It’s also worth it to add a pop filter in front of your mic, helping to soften harsh sounds like when you pronounce words with “k,” “t,” or “p” sounds (also known as plosive sounds). 

Yeti mic boom arm stand & pop filter

6) What Is a Great Yeti Software to Use

When it comes to Yeti software, there are plenty of different programs you can work with (mentioned earlier). However, an excellent software recommendation for the best on-stream functions is Blue VO!CE.

For starters, you can acquire Blue VO!CE free through Logitech G-Hub software. It allows you to use audio samples and morph your voice with modulations and filters. For instance, you can use a high-pitched Chipmunk effect or easily switch to a deep narrator-type voice for theatrical effect.

You’d be surprised how much a few audio samples and voice effects can add a professional aesthetic to your stream. The collaboration of Logitech G, Blue Vo!CE and Streamlabs give you an exceptional amount of Blue Yeti microphone settings to create a powerhouse stream. You can use personalized themes for your streaming visuals, stream to multiple platforms at once, and add filters and effects – it’s a win-win for streamers. 

Take Away

Now that you’ve gotten a handle on a few podcasting and streaming tips, the only thing left to do now is go out there and make lots of content. Remember, trial and error is key to learning from your mistakes, and there are always ways to improve your content. So, go out there and sound like a pro.

SD Card vs Compact Flash & More | What’s the Difference?

If the goal was to bewilder as many people as possible with the increasing variety of memory cards, card manufacturers are undoubtedly succeeding. New photographers and videographers are constantly struggling to discern the difference between an SD card vs CompactFlash card vs XQD and so on. Additionally, it only gets more confusing when you factor in card transfer speeds for various cameras. So, let’s do a deep dive into camera memory cards and the key features that distinguish them from one another.

Want to learn all about the SD speed class and specs? Click here.

The Nikon 660GB CFexpress Type B memory card was recently released, adding another card to the never-ending evolution of memory cards. Having more options is an excellent thing for the photography and videography community. However, the more cards released, the more questions that surface.

Memory cards for camera
Photo by Markus Winkler

It feels like card manufacturers are dishing out new cards faster than a dealer during a casino’s grand opening. So, if you need a refresher on the different memory cards and their varying features, you’re in the right place. This post will highlight the differences between popular memory cards today and hopefully aid you in your next purchase. 

Table of Contents

What Are SD Cards for?

SD cards are small and easy to forget, but they play a significant role in photography, videography, smartphones, printers, drones, gaming consoles, and much more. For relevance, we will stick to SD cards in relation to camera and video, plus the bigger spectrum of memory cards, including Compact Flash, XQD, CFast, and more.

Memory cards allow you to save and store what you digitally capture using flash memory, otherwise known as a non-volatile storage device. Meaning the device being used does not require power to store data and will not lose data when the device is powered off. The data on the memory card can be written and erased electronically as well as reprogrammed. 

Popular Memory Cards Used in Photo & Video

Today, several memory cards are created by companies and associations like SanDisk, Sony, Nikon, Kingston Technology, Lexar, Samsung, Toshiba, and more. The progress of improved memory card technology has been swift and influential to filmmakers and photographers everywhere. But, this is the same reason your head might spin when you think about all the numerous cards and their respective speeds and capacities. Here’s a list of a few of the different types of memory cards out today: 

  • CompactFlash (Type I & Type II)
  • CFast
  • XQD
  • CFexpress (Type A, B, C)
  • SD (secure digital)
    • microSD
    • SDHC (secure digital high capacity)
    • SDXC (secure digital extended capacity)
    • SDUC (secure digital ultra-capacity)
    • SDexpress
Lexar memory card
Photo by Manuel Chinchilla

What Is Card Read & Write Speed

  • Write Speed: is measured in MB/s (Megabytes per second) and refers to the action of new data being created (or written) on an SD card (camera to card data transferring)
  • Read Speed: The read speed refers to when the data is transferred (or read) from the SD card to your computer or device (card to computer).

(If a card has one number on the front for speed, it is typically the read speed due to the fact it’s usually the bigger of the two numbers.)

As stated before, click here for the complete rundown of card speeds and specs. 

A Look at Card Compatibility 

It’s important to note that not every card is compatible with every device, some cards are interchangeable, but the range of devices varies depending on the card or card reader. The camera or equipment you use will determine which card you should buy and shouldn’t be overlooked. For instance, SD cards are interchangeable with devices supporting SDHC, SDXC, or SDUC. 

However, you also have the SDUC card, which can only be used in SDUC compatible devices because it’s the latest version.  In contrast, SDXC memory cards can be used in SDXC and SDUC compatible devices. 

Some cameras will have dual memory card slots as well, like the Canon EOS R5, which can house SD cards in one slot or the CFexpress (type b) in the other. It can sometimes get confusing; however, knowing your camera’s card compatibility is essential to ensure you’re ready to capture correctly.

This image is an excellent visualization of which SD cards are interchangeable with their respective supported devices. 

Photo courtesy of SDA 

How do you know which memory card your camera will take? No need to guess and waste your time and money. Simply look at your product manual or the site of the brand manufacturer, and voila, you have your answer!

CompactFlash

First developed by SanDisk in 1994, the CompactFlash card is also referred to as the CF card for short. These cards are big and sturdy, making them useful for photographers who require more durable gear for harsher gigs or environments. There are a bunch of data storage sizes for CF cards ranging from 2 GB to 512 GB. 

It’s good to note that the latest CF cards now operates using a UDMA 7 mode (Ultra Direct Mode Access 7) which is supported by a UDMA interface. SanDisk made this decision years ago to fully optimize the card speed to a maximum theoretical speed of 167 MB/s. However, the device you use the card on must also support UDMA tech to take advantage of these full capabilities. 

The size capacity and the minimum read and write speeds can be seen on the front of the card. They come in two formats, either type I or type II, the latter being able to store a lot more data. Once upon a time, CF cards faced a long and drawn-out demise due to a lack of popularity and camera compatibility. However, that’s been put at bay because of their high use in the more professional-grade DSLR cameras.

  • Max Speed: 167 MB/s
  • Dimensions:
    • (Type I) 43 x 36 x 3.3 mm 
    • (Type II) 43 x 36 x 5 mm 
  • Cameras that use CF cards:
  • Capacity:
  • 2 GB 
  • 64 GB
  • 128 GB
  • 256 GB
  • 512 GB
  • 512 GB

Related post: 6 Fool-Proof Ways To Avoid Corrupted SD Cards

Using a memory card
Photo by Samsung

CFast cards

Next is the CFast card, often confused with CF cards due to similar names and dimensions. However, CFast cards are essentially a better, faster, more expensive, and more efficient version of the CF card. CFast cards are built with faster read and write speeds and are better equipped for data storage. In addition to this, they’re less prone to damage. However, the CFast market price is much higher than a standard CF card.

It has a faster data transfer rate than the CF card because it uses a SATA3 interface. Cards such as the Sandisk Extreme PRO 2.0 can have read speeds up to 525/MBs and write speeds up to 450/MBs, making them highly suitable for professional-grade cameras. 

  • Max Speed: 525 MB/s
  • Dimensions: 8 mm x 36.4 mm x 3.3 mm 
  • Cameras that use CFast cards:
  • Capacity:
    • 64 GB
    • 128 GB
    • 256 GB
    • 512 GB

Related post: SanDisk CFexpress Memory Cards Give Nikon Z Photographers More Flexibility

Memory card
Photo by Tom Pumford

XQD Card

Another successor to the CF card was the XQD card, introduced by the CFA in 2012. The XQD card uses a PCIe interface (much faster than SATA) and is geared toward camcorders and high-res mirrorless and DSLR cameras. XQD cards possess pins designed not to bend and to protect from external elements such as dust, high temperatures, magnets, or electrical surges. 

Cards like the XQD G series can have read speeds up to 440MB/s and 400 MB/s, twice the rate of a typical CF card. They’re usually used by professional-grade Sony and Nikon cameras and are also suitable for smooth 4K videos and lots of RAW burst shooting. 

  • Max Theoretical Speed: 1000 MB/s
  • Dimensions: 5×29.6×3.8mm
  • Cameras that use XQD cards:
    • Nikon D4(s)
    • Nikon D5
    • Nikon D6
    • Nikon D850
    • Nikon Z6
    • Nikon Z7
  • Capacity: 
    • 32GB
    • 64GB
    • 128GB
    • 256GB
XQD card speed chart
Photo courtesy of Sony

CFexpress card

Next comes the CFexpress card, the latest and most competent card announced by the CompactFlash Association (CFA), running on a PCIe 3.0 interface. It can offer 1-4 lanes of transfer at 1 GB/s per lane, completely outdoing the XQD with powerful performance and speed (however, this doesn’t always mean it’s the best card for your camera). The ability to capture 8K videos, drastically reduce photo buffer time, hold large capacity, and keep up with high-demand camera features bring CFexpress cards to a slightly higher price than XQD cards.

The CFexpress card has three types of form factors containing different data transfer speeds – Type: A, B, and C. Type A being the smallest to Type C the larger of the 3. Type B is in the middle, with a form factor identical in size to XQD cards, with the ability to be interchanged in a compatible device. The same goes for the physical size of Type A cards and SD cards. Each card “Type” has a different number of PCIe lanes (1-4).  Type A has one – Type B has two – and Type C has four lanes with the fastest data transfer potential. 

  • Max theoretical Speeds: Type A 1 GB/s, Type B 2 GB/s, Type C 4 GB/s
  • Dimensions:
    • Type A: 20mm x 28mm x 2.8mm 
    • Type B: 5 x 29.8 x 3.8 mm 
    • Type C: 54 x 74 x 4.8 mm
  • Cameras that use CFexpress cards:
  • Type A
  • Type B
  • Type C
  • Capacity:
    • 120 GB
    • 256GB
    • 512GB
    • 1TB
    • 2TB
    • 4TB
Memory card in Laptop
Photo by Jeremy Bezanger

Secure Digital Cards (SD Cards)

Secure Digital (SD cards) were first developed a few years after the CF card (1999) by a collaboration between Matsushita, Toshiba, and SanDisk. They helped to create the SD Association (SDA), an organization designed to assist in establishing industry standards for memory card storage. SD cards are among the most popular and widely used memory cards today.

SD cards are much lighter, less expensive, and smaller than your standard Compact Flash. However, this means they’re more susceptible to potential external damage. SD card dimensions are smaller than that of a CFexpress or XQD card. As stated, some cameras will contain dual slots, one for the SD and the other for the CFexpress or  XQD card for recording convenience. The SD is put together by a 9-pin socket structure and doesn’t typically transfer data as fast as XQD or CFexpress cards but closes the price and availability gap. Lexar has recently developed the SDexpress card to compete with the popular, growing and influential CFexpress card, but it still has a ways to go before we start seeing a rise in popularity and use. 

  • Dimensions: 32.0×24.0×2.1 mm
  • Cameras that take SD cards:
  • Capacity:
  • SD card – 2 GB
  • SDHC cards (High Capacity) – store between 2 GB to 32GB.
  • SDXC cards (Extended Capacity) – store between 32 GB to 2TB.
  • SDUC cards (Ultra Capacity) – store between 2 TB to 128TB

Take Away

The number of cards available will only get more extensive and diverse as technological achievements are made. However, memory card adapters and continuous firmware updates significantly allow card flexibility for filmmakers and photographers. When searching for your next memory card, you should keep compatibility, capacity, and transfer speed in mind. Working event photography or high-paced shooting sessions will call for short buffer times between photos and quick data transfers. Be aware of these concepts, and you will be well prepared when exploring memory cards.  

Which cards do you prefer for photography or video? Are you in need of a new card? Explore tons of options here.